Arc


Overview
Overview
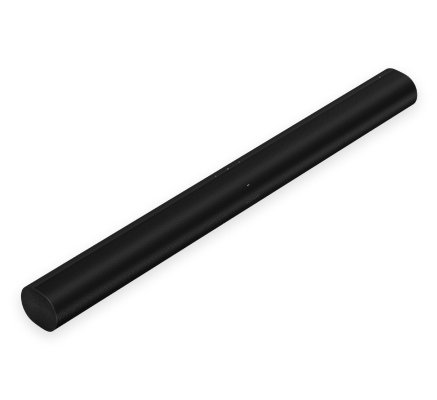
The premium soundbar for your business—
- Effortless setup with just two cables and smart Trueplay™ tuning.
- Stream music when the TV is off.
- Elegant design discreetly mounts to a wall or sits on a counter.
- Feel sound all around you with the spacious 3D experience of Dolby Atmos.
- Control your Sonos system with the Sonos S2 app (for Android and iOS).
- See Getting Started when you’re ready to add Arc to your system.
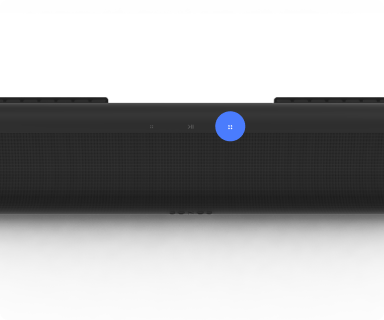
Controls and lights
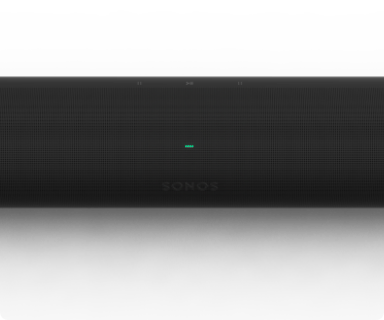 | Status light | Displays the product's connection to WiFi, indicates when the volume is muted, and signals errors. Learn more |
 | Volume control |
Press and hold to quickly change the volume. |
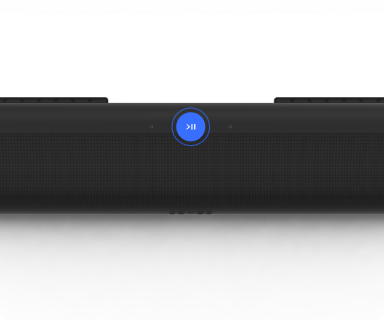 | Play/Pause |
|
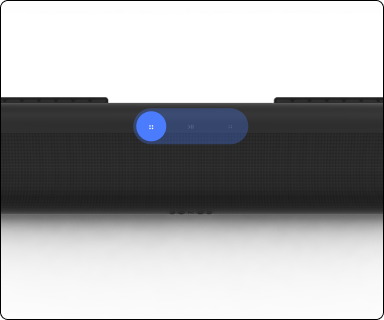 | Next/Previous (music only) |
Note: You can’t skip forward or go back when listening to a radio station. |
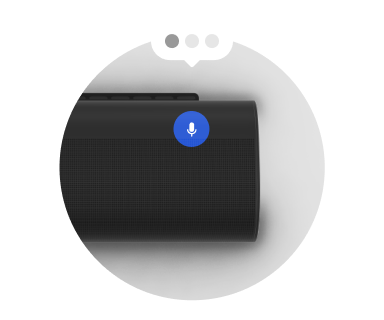 | Microphone | Press to turn the microphone on or off:
Note: If you’ve installed a voice service and the microphone is off, you can still use voice commands. Just press and hold |
Note: If you don’t want to allow playback or volume adjustments using the speaker touch controls, you can disable them in the Sonos app.
Connector panel

1 | HDMI port | Use to connect Sonos Arc to a TV. |
2 | Join button | Press to connect during setup. |
3 | Ethernet port | Use an Ethernet cable if you want to connect to a router, computer, or network-attached storage (NAS) device (optional). |
4 | AC power (mains) input | Use only the supplied power cord (using a third-party power cord will void your warranty). Note: Insert the power cord firmly until it is flush with the speaker. |
Select a location
You can wall mount Sonos Arc below a TV or place it in or on a TV stand.
TV stand placement
- Place horizontally on a stable and level surface.
- Keep 4" (10.2 cm) space (minimum) between the top of the soundbar and the bottom of your TV (if placing soundbar below the TV).
- Don't place vertically or on its side.
- Make sure the touch controls are facing up.
Wall mount
You can secure the soundbar to a wall with a compatible wall mount. We recommend the custom-designed Sonos Arc Wall Mount (sold separately).
Connect the cables
Before you start
- Disconnect existing home theater or surround sound equipment from your TV.
- Connect any external devices, like a cable box or DVD player, directly to your TV.
- Turn your TV on.
1 | Connect the power cord and plug in the soundbar. Note: Use only the supplied power cord (using a third-party power cord will void your warranty). |  |
2 | Connect the HDMI cable (included) to the soundbar's HDMI port. |  |
3 | Connect the HDMI cable to your TV:
| TV with ARC/eARC port  Optical adapter (if needed) 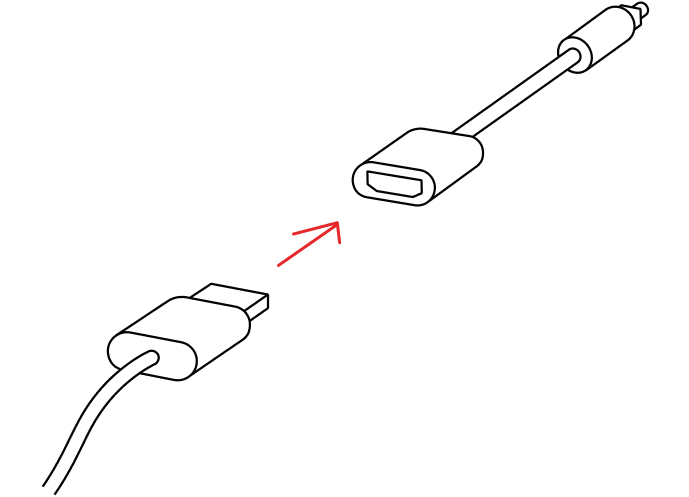 |
Trueplay™
Trueplay tuning measures how sound reflects off walls, counters, and other surfaces in an area, then fine tunes the Sonos speakers to make sure they sound great no matter where they're placed.
During setup, choose the Trueplay option that works best for your space. To retune later:
- Go to Settings
 .
. - Choose a product.
- Select Trueplay.
Note: If VoiceOver is enabled on your iOS device, Trueplay tuning isn’t available. Turn it off in your device settings before tuning your speakers.
Advanced Tuning
Advanced tuning is custom and precise. It takes about 5 minutes and uses the microphone on an iOS device (running iOS 8 or later) so you'll move around the room while the sound is fine tuned for your space.
Note: Advanced tuning is the best choice for larger areas (larger open spaces may experience less precise tuning).
Quick Tuning
Quick tuning is fast, effortless, and accessible. It takes about a minute and uses the microphone on your Sonos product to detect the environment so there's no need to move around during tuning.
Note: Quick Tuning is available for both iOS and Android, and is a good choice for smaller areas, or spaces where it's difficult to move easily.
Product settings
You can customize Sonos products using the Sonos app.
- Go to Settings .
- Select a product.
| FEATURE | DESCRIPTION |
|---|---|
Product Name | If you move your speaker to a new spot, you can change its name in Settings. |
EQ | Sonos products ship with preset equalization settings. You can change the sound settings (bass, treble, balance, or loudness) to suit your personal preferences. Learn more |
Trueplay | Trueplay adapts the sound for your surroundings and content. Portable products can tune themselves automatically. Learn more |
Volume Limit | You can set a maximum volume for each product or set. Learn more |
Battery Saver (portable products only) | Set your portable speaker to power off automatically instead of going to sleep. It won't appear in the Sonos app until it’s powered back on. |
Line-In (Enable in Global Settings) | When a projector, turntable, stereo, or other audio device is connected to a Sonos product, you can adjust these line-in settings:
|
Idle Auto-Disconnect | When enabled, the speaker automatically disconnects from Bluetooth after 30 minutes of inactivity, only when it's also connected to WiFi. |
Status Light | Displays the speaker’s connection to WiFi, indicates when the volume is muted, and signals errors. Learn more |
Touch Controls | You can disable the touch control on your speaker. Do this to prevent accidental playback or volume adjustments (recommended for Sonos Pro users). Learn more Note: This setting also turns off Sonos Roam's controls. |
Turn off WiFi (not available for portable products) | You can turn off your speaker’s WiFi when it’s connected to your network with an Ethernet cable. This reduces power consumption and can improve connectivity for some wired speakers. |
Microphone on/off
The microphone is used for voice control and for microphone-dependent features like Trueplay tuning. Press to turn the microphone on or off—the microphone LED light will let you know when your voice assistant is listening.
When the microphone light is on:
- If you set up a voice service, voice control is on and ready to respond.
- Microphone-dependent features like Trueplay are available.
When the microphone light is off:
- If you set up a voice service, voice control is off.
- Microphone-dependent features like Trueplay are unavailable.
Voice services
Use your voice to control your Sonos system with any voice-enabled Sonos product—play and control content, turn the volume up or down, and more.
- Sonos Voice Control: Control your whole Sonos system with hands-free ease and unmatched privacy. Sonos Voice Control comes ready to use—it only takes a few seconds to add when you set up your speakers. More information
- Amazon Alexa: You’ll need the Sonos app and the Alexa app with the Sonos skill enabled. You’ll make some changes in both apps during setup. Learn more
- Google Assistant: You’ll need the Sonos app and the Google Assistant app. You’ll make some changes in both apps during setup. Learn more
- Siri: You’ll need the Apple Home app. Add your AirPlay2-compatible Sonos speakers to the Apple Home app and then use an iPhone, iPad, or Apple TV to ask Siri to play music (currently limited to Apple Music). Learn more
Note: Voice control isn’t supported in every country yet—this feature will be available as soon as Sonos and a voice service launch together in your region.
Home theater
Home theater settings
Use the Sonos app to adjust product settings or change how your speakers work together.
TV Dialog Sync | Adjust audio delay (lip sync) when the TV audio and video are out of sync. Learn more |
Group Audio Delay | Adjust audio delay when grouped speakers' audio is out of sync. Learn more |
TV Autoplay | TV Autoplay—if music or other content is playing when you turn on your TV, the audio automatically switches to TV audio (default). Ungroup on Autoplay—if your soundbar is grouped with other products when you turn on the TV, it automatically drops from the group (default). |
Speech enhancement | Makes TV dialog easier to hear. Learn more |
Night sound | Enhances quiet sounds and reduces the intensity of loud sounds. Turn on to reduce the volume while still experiencing proper balance and range. Learn more |
Remote Control Setup | During setup, you’ll program a remote control. You can program a different remote control any time. Learn more |
Set up surrounds
If you have a soundbar in your Sonos system, you can turn two speakers of the same type (i.e. a pair of Ones or a One and a One SL), or a Sonos Amp and two non-Sonos speakers, into separate right and left channels.
- Angle each surrounds towards the listening area (Sonos recommends about 10 feet from a listening position).
- Go to
 > System.
 - Select a zone with a soundbar and choose Add Surrounds to get started.
Note: If you group the rooms or create a stereo pair instead, you won't have surround sound.
Surround audio settings
During setup, surround sound is optimized for your area. These settings are adjustable:
Surrounds | Turn surround sound On or Off. |
TV Level | Adjust surround volume for TV audio. |
Music Level | Adjust surround volume for music. |
Music Playback | Ambient (subtle) or Full (louder, full range). Doesn't apply to Dolby Atmos Music playback. |
Accessories
Find the perfect accessory for your Sonos system—tailored to perfectly fit your Sonos products.
For a full selection of Sonos-compatible stands, wall mounts, chargers and cables, see Accessories on our website.
Wall mount
Guidelines
- Use the Sonos Arc Wall Mount (sold separately on www.sonos.com).
- Keep 4" (10.2 cm) of space (minimum) between Arc and your TV.
- Make sure the touch controls are facing up.
- For the best audio quality, keep both ends of the soundbar at least 1' ( .3 m) from a wall or other obstructions.
What's in the box?
- Wall mount bracket
- Positioning guide (don't discard—it may look like packing material)
- 2 knobs
- 6 wall anchors
- 6 screws
| Wall Material | Pre Drill |
|---|---|
Wood stud | 1/8" / 3 mm bit |
Drywall (no stud) | 5/16" / 8 mm bit |
Plaster | 5/16" / 8 mm bit |
Concrete or brick | 5/16" / 8 mm bit |
1 | If your TV is wall-mounted, place the positioning guide against the wall, aligning the top edge with the bottom of your TV. There should be 5.5" (14 cm) between the top of the wall mount bracket and the TV. | 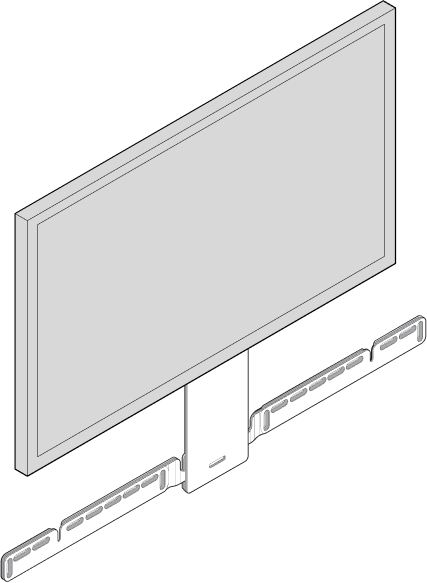 |
2 | Mark the screw locations and remove the guide. | 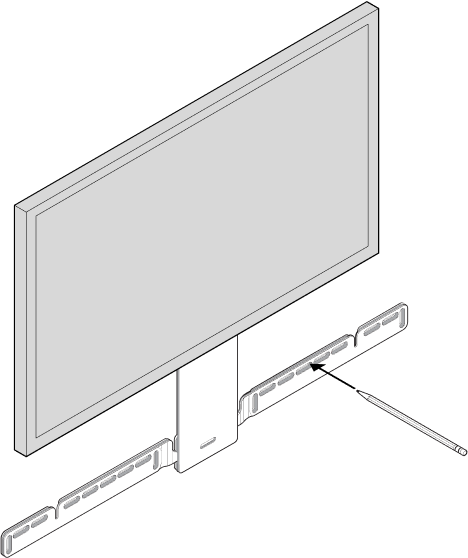 |
3 | If you’re using the included wall anchors, use a 5/16" (8 mm) drill bit to drill the pilot holes and then insert the wall anchors. Don’t use the anchors if you’re drilling into wood or plastic. | 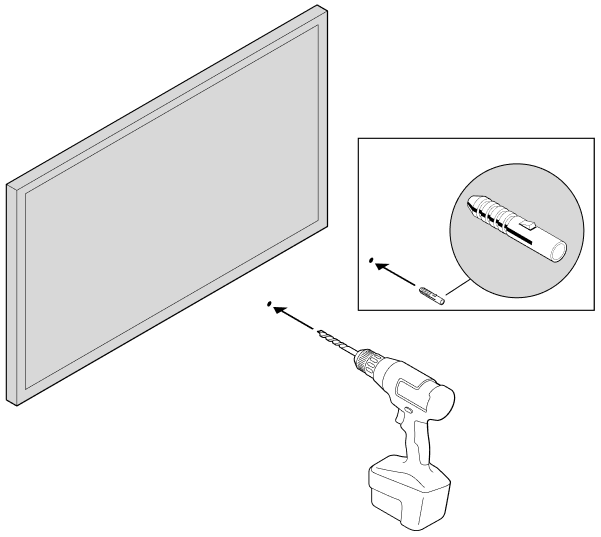 |
4 | Position the wall mount bracket over the marked screw locations, using a level to confirm accuracy. Use a Phillips-head screwdriver or a power drill to screw the bracket to the wall, making sure the arrows in the center are pointing up. | 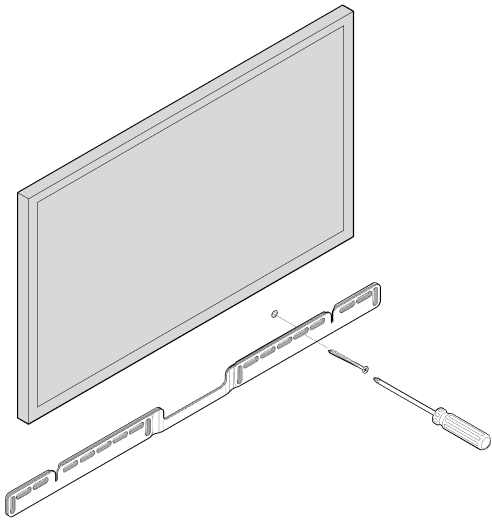 |
5 | Screw the 2 knobs into the back of the soundbar until they are fully tightened. |  |
6 | Connect the power and HDMI cables to the back of the soundbar. | 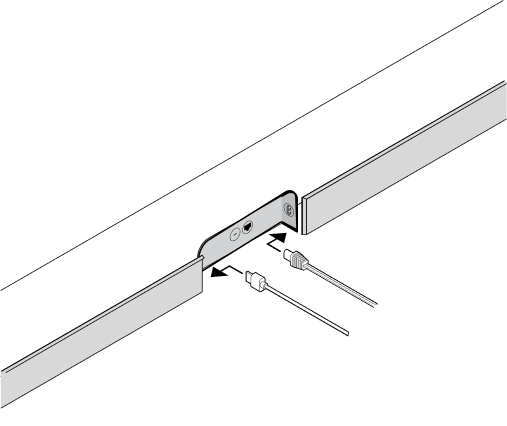 |
7 | Slide the soundbar down so the knobs fit into the slots on the wall bracket. Make sure the touch controls are facing up and the soundbar is fully seated. | 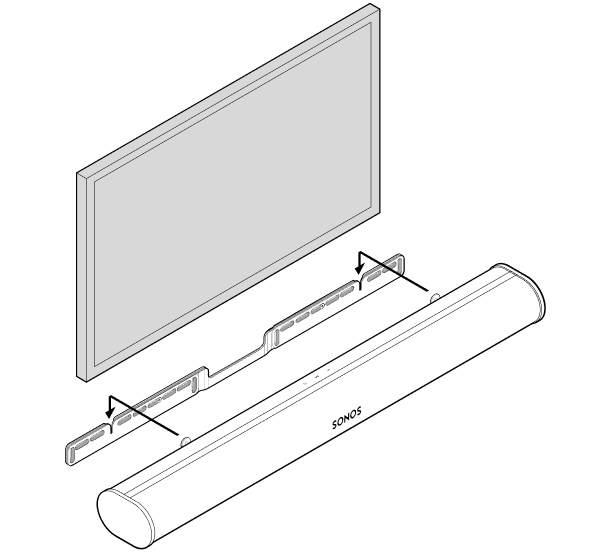 |
Specifications
| Feature | Description |
|---|---|
AUDIO |
|
Amplifier | Eleven Class-D digital amplifiers. |
Elliptical woofer | Eight full-range woofers ensure you’ll hear the faithful playback of mid-range vocal frequencies plus deep, rich bass. |
Microphones |
|
Tweeter | Three silk dome tweeters create a crisp and clear high-frequency response. |
NETWORKING* |
|
Ethernet port | One 10/100 Mbps Ethernet port. You can wire directly to your router if your WiFi is unstable. |
Wireless connectivity | Connects to WiFi network with any 802.11 b/g/n, 2.4 GHz broadcast-capable router. |
SOFTWARE |
|
Night sound | Reduces the intensity of loud TV sound effects. Enable in Settings. |
Speech enhancement | Makes TV dialogue even clearer. Enable in Settings. |
TrueplayTM | Dynamically tunes the speaker to the unique acoustics of the room or area (iOS 8 device required). Start tuning from Settings. |
Voice | Integrated voice control. Enable in Settings. |
GENERAL |
|
Dimensions (H x W x D) | 3.4 x 45 x 4.5 in. (87 x 1141.7 x 115.7 mm) |
Operating temperature | 32° F to 104° F (0° C to 40° C) |
Package contents | Sonos Arc, power cord, HDMI cable, optical audio adapter, Quickstart Guide. |
Power supply | Auto-switching 100-240 V, 50-60 Hz 3.5 A AC universal input. |
Storage temperature | -4° F to 122° F (-20° C to 50° C) |
System requirements | TV with HDMI ARC or optical digital audio output, broadband internet, and the Sonos S2 app. |
Weight | 13.78 lb (6.25 kg) |
*Specifications subject to change without notice.
Important safety information
- Read these instructions.
- Keep these instructions.
- Heed all warnings.
- Follow all instructions.
- Do not use this apparatus near water.
- Clean only with dry soft cloth. Household cleaners or solvents can damage the finish on your Sonos products.
- Do not block any ventilation openings. Install in accordance with the manufacturer’s instructions.
- Do not install near any heat sources such as radiators, heat registers, stoves, or other apparatus that produce heat.
- Protect the power cable from being walked on or pinched, particularly at plugs, convenience receptacles, and the point where they exit from the apparatus.
- Only use attachments/accessories specified by the manufacturer.
- Unplug this apparatus during lightning storms or when unused for long periods of time.
- This product does not have any user-serviceable parts. Do not open or disassemble or attempt to repair it or replace any components. Refer all servicing to Sonos qualified service personnel. Servicing is required when the apparatus has been damaged in any way, such as power-supply cable or plug is damaged, liquid has been spilled or objects have fallen into the apparatus, the apparatus has been exposed to rain or moisture, does not operate normally, or has been dropped.
- The Mains plug should be readily available to disconnect the equipment.
- Warning: To reduce the risk of fire or electric shock, do not expose this apparatus to rain or moisture.
- Do not expose apparatus to dripping or splashing and do not place objects filled with liquids, such as vases, on the apparatus.