Sonos Pro dashboard
Overview
Overview
Manage Sonos Pro from anywhere—
The Sonos Pro dashboard is used to remotely monitor system activity and manage content across all locations in real time. You must be an owner or administrator (admin) to sign in.
- Global settings. Apply content control settings for all systems across locations.
- Schedule music. Set music schedules to play the right content at the right time.
- Sonos Backgrounds included. Every Sonos Pro subscription comes with Sonos Backgrounds—a commercially licensed music service that's fully designed with businesses in mind.
- Sonos S2 compatible. The Sonos app guides you through setup and provides onsite system control (iOS and Android).
Tabs and controls
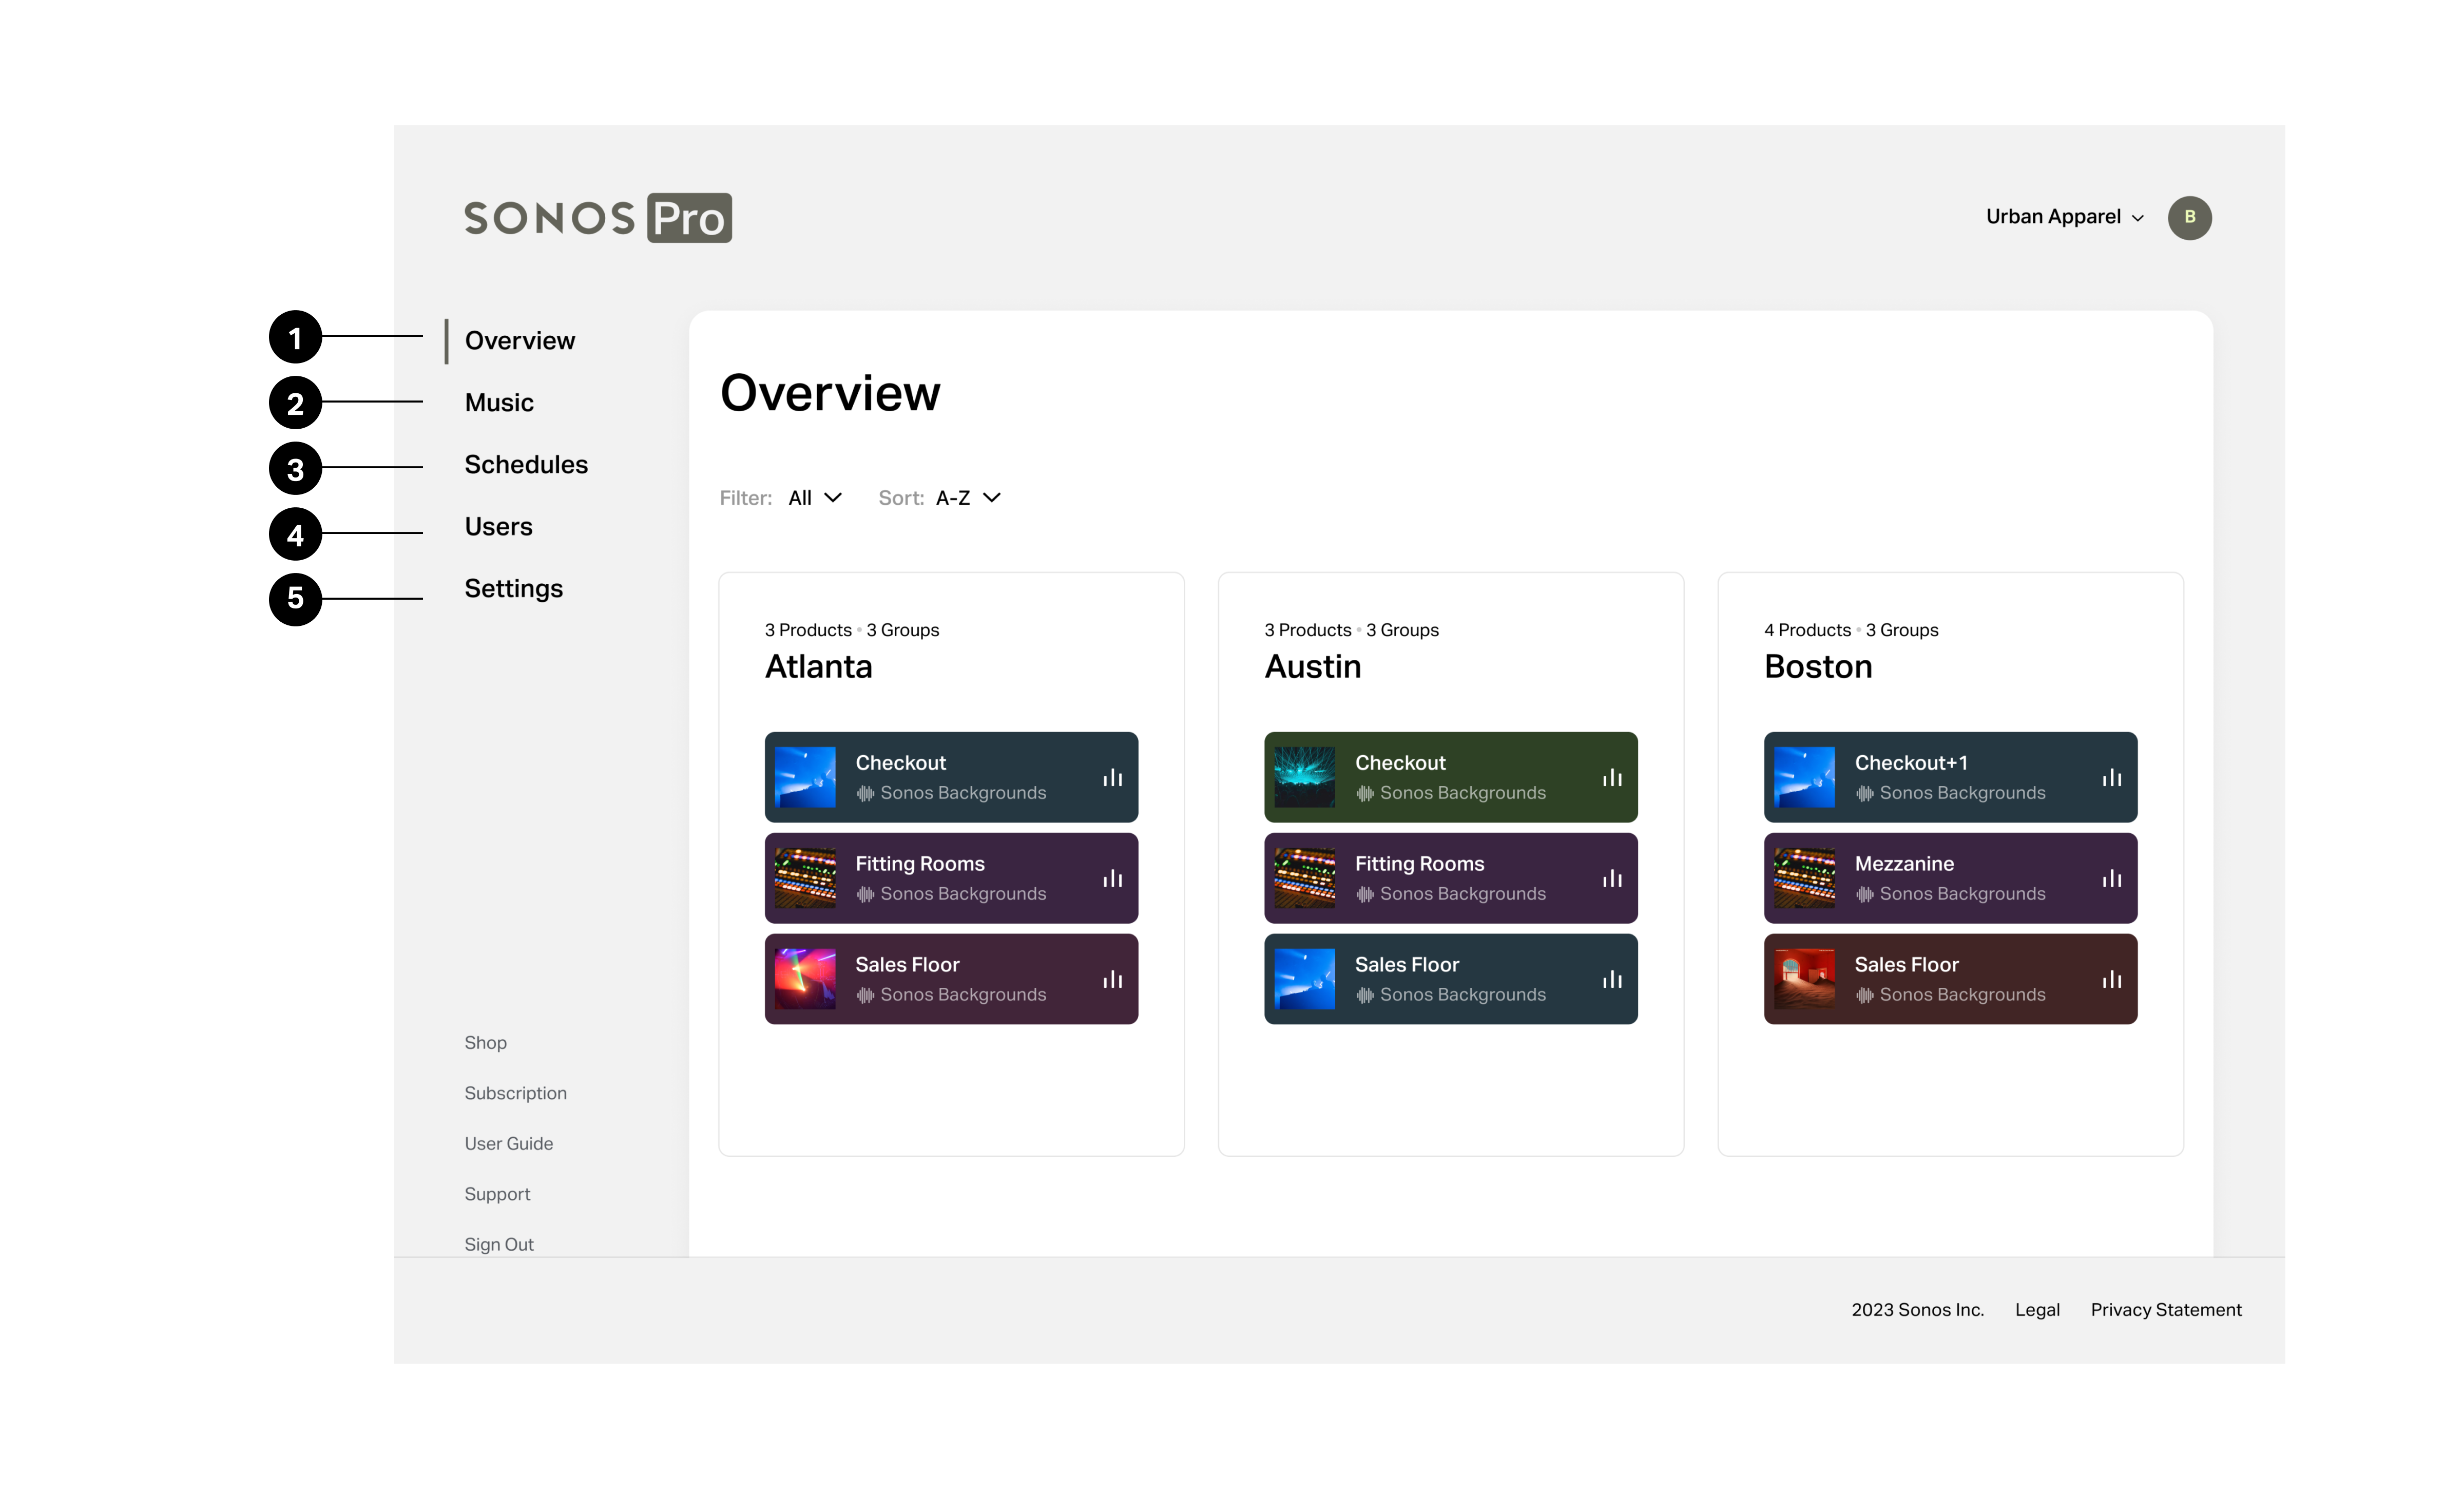
1 | Overview | From the Overview tab, you can review what’s happening in each location and remotely make changes. Select a system to get started.
|
2 | Music | From the Music tab, you can:
|
3 | Schedules | From the Schedules tab, you can:
|
4 | Users | From the Users tab, you can:
|
5 | Settings | From the Settings tab, you can:
|
Manage music
Start and change music immediately
Go to the Overview tab, select a system, and select Start music or Change music. The music won’t change until you save your changes.
You’ll only be able to select music from your approved music library.
Change product grouping for current music
When you’re starting or changing what’s playing right now, you can change how your products are grouped. Select Start music or Change music, then select  to group or ungroup Sonos products. Grouped products play the same audio at the same time.
Add music to your music library
In your dashboard, you can add music from Sonos Backgrounds to your approved music library. You can approve up to 70 music items using the dashboard and the Sonos app.
- Go to Overview, select a system, then go to Browse.
- Browse the Sonos Backgrounds stations and use the + icon to add stations that suit your business to your approved music library.
- To browse all Sonos Backgrounds stations at once, choose View all. Select a category to browse the different stations filed under that category and add the individual stations to your approved music library.
Notes:
- If you approve an entire category of Sonos Backgrounds stations using the ‘+’ icon, you’ll be able to browse all those stations from the app but not the dashboard at this time. We recommend approving individual stations rather than entire categories for now.
- To browse and approve content from other commercial music services, use the Sonos app.
Remove music from your music library
You can remove any approved content from your dashboard.
From the Overview tab:
- Select a system and go to Music.
- Select Edit.
- Choose the content you want to remove, then select Save.
From the Music tab:
- Select Edit.
- Choose the content you want to remove, then select Save.
Note: Sonos Backgrounds (Legacy) stations no longer play, and schedules that use those stations stopped working on February 13, 2024. We recommend you remove these stations from your music library.
Add music services
Currently, you can only add additional commercial music services using the Sonos app. Instructions are available on the Sonos app User Guide.
Remove music services
From the Overview tab:
- Select a system and go to Browse.
- Select a service in Additional music services.
- Select Edit > Select a system > Remove.
From the Music tab:
- Go to Music services and select a service.
- Select Edit > Select a system > Remove.
Manage schedules
Businesses that play the same content regularly can create permanent or temporary music schedules. You can enable or disable them at any time. The maximum number of schedules you can set for one location is 32.
There are two ways to manage schedules from the dashboard. Choose the one that works best for you.
Create a schedule
Schedules can only play approved music. Before creating or editing a schedule, add approved content to the music library by following steps above.
From the Overview tab:
- Select a location.
- Go to Schedules, then select Add to get started.
- Choose the product(s), time, music, and volume, then select Save.
- Within Rooms, select where you want the schedule to play.
- Within Time, decide when the schedule will start and end. If you want music to automatically stop at a certain time, use Duration.
- Within Music, choose the content that the schedule will start. If you want to play different stations at different times or on different days of the week, create multiple schedules. If you use Shuffle, the music within the station or playlist you choose will be shuffled. Each station from Sonos Backgrounds has hundreds of tracks, so you won’t hear repeated songs within a typical business day.
- If you want employees onsite to set the appropriate volume, turn on Set volume onsite in the Volume settings. If you prefer to set the starting volume, adjust the individual speaker settings within Rooms. The Volume settings will show you the averages of the volumes across your selected speakers.
From the Schedules tab:
- Make sure you’re looking at the right location, then choose Add to get started.
- Choose the product(s), time, music, and volume, then select Save.
- Within Rooms, select where you want the schedule to play.
- Within Time, decide when the schedule will start and end. If you want music to automatically stop at a certain time, use Duration.
- Within Music, choose the content that the schedule will start. If you want to play different stations at different times or on different days of the week, create multiple schedules. If you use Shuffle, the music within the station or playlist you choose will be shuffled. Each station from Sonos Backgrounds has hundreds of tracks, so you won’t hear repeated songs within a typical business day.
- If you want employees onsite to set the appropriate volume, turn on Set volume onsite in the Volume settings. If you prefer to set the starting volume, adjust the individual speaker settings within Rooms. The Volume settings will show you the averages of the volumes across your selected speakers.
Edit a schedule
From the Overview tab:
- Select a location and go to Schedules.
- Select the schedule you want to change.
- Choose one of the following options:
- Change schedule details, then select Save.
- Select Delete to remove the schedule.
From the Music tab:
- Make sure you're looking at the right location, then select the schedule you want to change.
- Choose one of the following options:
- Change schedule details, then select Save.
- Select Delete to remove the schedule.
Manage users
Add a user
An owner or admin can invite trusted users to become admin so they can control music and update settings using the dashboard.
To add a new admin:
- Go to the Users tab and select + Add user.
- Enter an email address, choose a Role for the new user, and select Invite.
After the invite is sent, the new user’s email address displays as Pending in the Users tab.
Remove a user
- From the Users tab, find the user you want to remove.
- Choose
 and select Remove.
Notes:
- Only Owners can sign in to the Sonos app to access the Sonos Pro system settings while at your business.
- Your employees can play music using the Sonos app while they’re at work without you giving them admin privileges. They’ll be able to access your approved music library as a guest when they connect to the same WiFi network as your speakers.
- If you’re a dealer, installer, franchise owner, or someone who helps multiple businesses manage their music systems, you can use one email address to switch between multiple Sonos Pro accounts on the dashboard. After your email has been added to multiple Sonos Pro accounts, you’ll be able to switch between them in the upper right-hand corner of the dashboard.
Manage settings
Owners and administrators can change settings that apply to all products across locations. Go to the Settings tab to make changes to these options.
- Allow direct control: When turned on, 3rd-party music services and control options (e.g. Mood Mix, AirPlay, Lutron) connected to your WiFi can access and play content on your products. This setting is on by default.
- Allow line-in: When turned on, devices plugged in to a Sonos product via line-in can access and play content on your products. This setting is on by default.
- Allow UPnP: When turned on, 3rd-party apps that use UPnP protocol can access and play content on your products. This setting is on by default.
- Allow guest access: When turned on, anyone on your network, even when not signed in as owner or admin, can use the Sonos app to access and play content on your products. This setting is on by default.
- Allow content access: When turned on, anyone on your network, even when not signed in as owner or admin, can use the Sonos app search and browse in any content service you’ve added. This setting is off by default, and we recommend leaving it off if you want to limit your staff to playing content from your approved music library. If the Allow guest access setting is off, this setting has no effect.
Manage locations
All of your locations should be set up using the same email address in order to show on the Sonos Pro dashboard. To change how many locations you are paying for in your subscription, review the details on the Subscription page by selecting Manage subscription.
Add a new location
- While physically at the location where you’re setting up a new system, open the Sonos app from a phone or tablet (Android or iOS).
- Sign in to the Sonos app with the Sonos Pro owner email address.
- Follow prompts in the app to set up your products.
Transfer a system to Sonos Pro
If a location was set up using a different email address, you can add it to your dashboard by following the system transfer steps.
If you have a personal system associated with the email address you’re now using for Sonos Pro, you should transfer your personal system to a different email address by following the system transfer steps.
Removing a location
- Transfer the system, or remove all of the products from the system at the location you no longer want to use by factory resetting each product.
- On the dashboard, go to Subscription.
- Select View locations. The location will now have an option to remove it.
- Select Remove to remove the location.
Notes:
- Only owners can remove a location from the dashboard.
- If you do not complete the steps above, you will continue to be billed for an unused system for up to 3 months.
- Once you remove a system, you will not be billed for it starting with your next billing cycle. If you have questions about a past bill or believe there’s a discrepancy in your invoice, you can reach out to success@sonos.com for assistance.
- Even after removing a system from your billing, you may continue to see it on the dashboard as offline for up to 3 months.