Sub 4


Overview
Overview
Sub 4 unlocks the full power of Sonos sound, delivering powerful bass to immerse you even deeper in every scene and song.
- Pulse-pounding bass. Dual Sonos-engineered drivers generate deep, dynamic low frequencies. The ported enclosure enhances the bass response so you feel every beat, roar, and rumble in your chest.
- Transform your home theater experience. Pair Sub 4 with Sonos Arc, or Beam for dramatically deeper bass and clearer highs that draw you deeper into movies, shows, and games.
- Bring your music to life. Hear the nuance in every note and enjoy a greater sense of spaciousness when you pair Sub 4 with Sonos Five, Era 300, or Era 100.
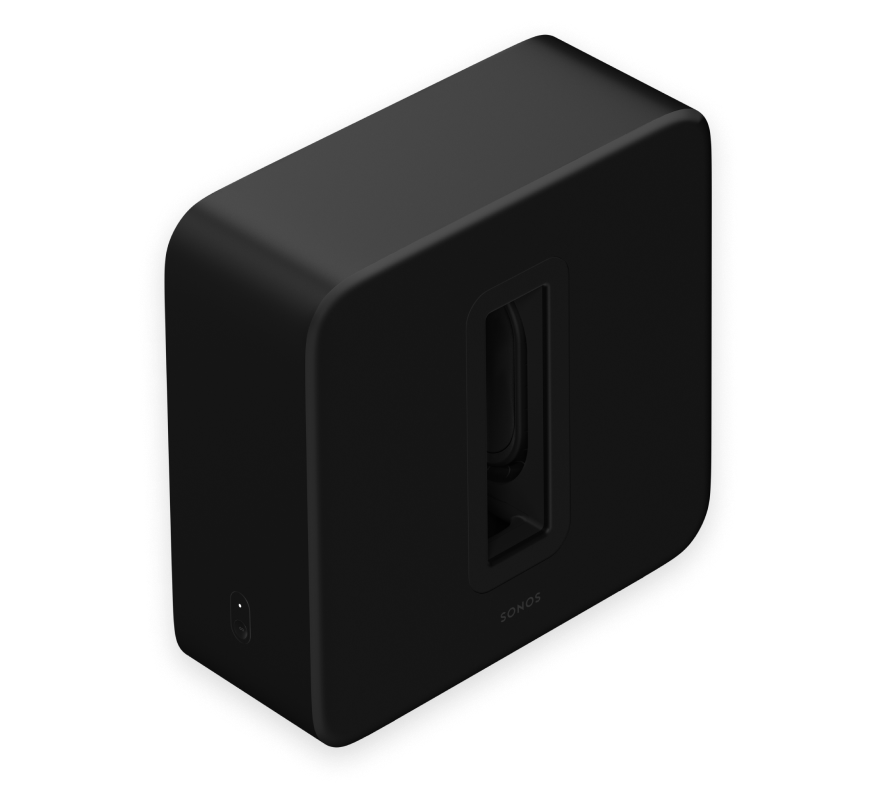
- Iconic design. With its elegant sculptural shape and updated matte finish, Sub 4 is designed to look great in your home and to match your Sonos speakers.
- Place it where and how you want. Sub 4 reliably connects to your Sonos soundbar or speaker over WiFi so you can place it anywhere in the room—even on its side and under your sofa.
Controls and buttons

1 | Acoustic slot | You can use the acoustic slot as a handle to lift Sub 4. |
2 | Status light | Displays the product's connection to WiFi, indicates when the volume is muted, and signals errors. Learn more |
3 | Join button | Press to connect during setup. |
4 | Ethernet port | Use an Ethernet cable if you want to connect to a router (optional). |
5 | AC power (mains) input | Use only the supplied power cord to connect to a power outlet (using a third party power cord will void your warranty). Be sure to use the proper power adapter for your country. Push the power cord firmly into Sub 4 until it is flush with the surface. |
Select a location
Choose a location—Sub 4 is designed to provide optimal sound wherever you place it.
- Use the acoustic slot as a handle to lift Sub 4 out of the box. You should always bend your knees when lifting heavy objects to avoid undue stress on your back.
- Make sure at least one side of the slot is free from obstruction. If you place it vertically against a wall, don’t block the front opening.
- If you place Sub 4 horizontally on the floor, don’t put anything on top of it. Leave at least 1" clearance along the top of Sub 4 if placing under furniture.
- Sub 4 is designed to sit on the floor. You can place it in a corner, against the wall, behind, under, or next to any piece of furniture on any kind of floor surface.
- Position Sub 4 either vertically or horizontally. If you’re going to use it horizontally, you can attach permanent felt feet.
Connect the cables
- Attach the power cord and plug in Sub 4. Be sure to push the power cord firmly into Sub 4 until it is flush with the surface
- Download the Sonos app from the app store if you don't already have it. You’ll use it to set up and control your Sonos system.
Note: Make sure you set up at least one compatible speaker before adding Sub 4.
Sub Audio
Use the Sonos app to adjust Sub Audio settings:
- Go to Settings
 .
. - Select a product where you've added a Sub.
- Then select Sub Audio.
| Setting | Description |
|---|---|
Sub | Toggle On or Off to turn the sound from Sub on and off. |
Sub Level | Use the slider to increase or decrease volume. (You can use this setting to match the Sub level to the level of your main speakers.) |
Phase Control | Choose 0° or 180° to set the phase control for your Sonos Sub or third-party subwoofer (flip if you don't hear enough bass in your usual listening position). When a room with a Sonos Sub is tuned using Trueplay, phase control is set and can't be changed unless you disable Trueplay. |
Reset | Resets all Sub audio settings to their default values (0). |
Change speaker pairing
You can easily change the Sonos speaker your Sub 4 is paired with.
Note: If you unplug your Sub from power and plug it back in somewhere else, wait for the status light to stop flashing and turn solid white before changing its settings.
- Go to Settings .
- Select a product where you've added a Sub.
- Then select Remove Sub to get started.
You can pair the Sub 4 with a different Sonos product or choose not to use it right now. It will appear as "unused" in your list of products until you pair it with another Sonos speaker.
Connect a second Sub
Connect a second Sonos subwoofer to your home theater setup for even deeper, room-filling bass.
In the Sonos app:
- Go to Settings .
- Select a product where you've added a Sub.
- Then select Connect Second Sub to get started.
Before you start, make sure your subwoofers are compatible with a dual subwoofer home theater setup.
| Soundbar | Subs needed |
|---|---|
Arc Ultra |
|
Arc or Arc SL |
|
Beam (Gen 1 and 2) |
|
Ray |
|
Specifications
Audio | |
Amplifiers | Dual Class-D digital amplifiers perfectly tuned to the subwoofer's unique acoustic architecture. |
Woofers | Dual 5" x 8" elliptical woofers face inward for a force-canceling effect that virtually eliminates distortion. |
Architecture | Ported cabinet enhances bass response. |
Frequency response | As low as 25 Hz |
EQ | Audio settings automatically equalize to balance Sub 4 and the paired Sonos speaker(s). Use the Sonos app to adjust bass, treble, and loudness. |
TrueplayTM | This software measures the acoustics of the room then fine-tunes your Sonos system. |
Details & Dimensions | |
Dimensions | Height: 15.31 in (389 mm) |
Weight | 26 lb (11.79 kg) |
Colors | Black, White |
Finish | Matte |
Join button | Press once to add Sub 4 to your system during setup. |
Power & Connectivity | |
WiFi | Connects to any 802.11a/b/g/n/ac/ax 2.4/5 GHz broadcast-capable router |
Ethernet | 10/100 port for hardwiring to your router |
Supply voltage | 100-240V 50/60Hz |
CPU | Quad Core |
Memory | 512 MB DDR4 |
Operating temperature | 32°F to 104°F (0°C to 40°C) |
What's in the box? | |
Sonos Sub 4 | Product |
Power cable | Length: 6 ft (2 m) |
Documentation | Quickstart Guide and legal/warranty information |
Requirements | |
WiFi | Internet connection |
Power source | Nearby electrical outlet |
Sonos app | The latest generation of the Sonos app running on a compatible device |
Sonos product | An amplified non-portable product, such as Arc Ultra or Era 300 |
Important safety information
- Read these instructions.
- Keep these instructions.
- Heed all warnings.
- Follow all instructions.
- Do not use this apparatus near water.
- Clean only with dry soft cloth. Household cleaners or solvents can damage the finish on your Sonos products.
- Do not block any ventilation openings. Install in accordance with the manufacturer’s instructions.
- Do not install near any heat sources such as radiators, heat registers, stoves, or other apparatus that produce heat.
- Protect the power cable from being walked on or pinched, particularly at plugs, convenience receptacles, and the point where they exit from the apparatus.
- Only use attachments/accessories specified by the manufacturer.
- Unplug this apparatus during lightning storms or when unused for long periods of time.
- This product does not have any user-serviceable parts. Do not open or disassemble or attempt to repair it or replace any components. Refer all servicing to Sonos qualified service personnel. Servicing is required when the apparatus has been damaged in any way, such as power-supply cable or plug is damaged, liquid has been spilled or objects have fallen into the apparatus, the apparatus has been exposed to rain or moisture, does not operate normally, or has been dropped.
- The Mains plug should be readily available to disconnect the equipment.
- Warning: To reduce the risk of fire or electric shock, do not expose this apparatus to rain or moisture.
- Do not expose apparatus to dripping or splashing and do not place objects filled with liquids, such as vases, on the apparatus.