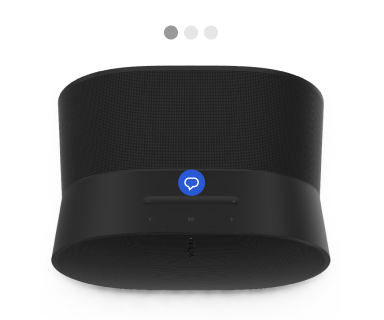
Era 300


Oversikt
Oversikt
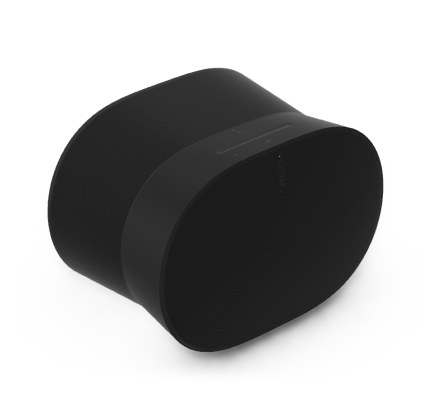
Den førsteklasses smarthøyttaleren, konstruert for lytting til romtilpasset lyd –
- Strøm innhold over Wi-Fi, Bluetooth® eller med USB-C-line-in (krever adapter).
- Støtter romtilpasset lyd med Dolby Atmos-musikk.
- Enkel styring med Sonos-appen, stemmen din eller de intuitive berøringskontrollene.
- To separate mikrofonkontroller for enkelhet og personvern.
- Pare to Era 300-høyttalere med Sonos Arc eller Beam (Gen. 2) for flerkanals surroundlyd.
- Kompatibel med de andre Sonos S2-høyttalerne dine for lytting i flere rom.
- Les Konfigurering når du er klar til å legge til en Sonos Era 300 i anlegget.
Kontroller og lys
| Knapp | Kontroller | Beskrivelse |
|---|---|---|
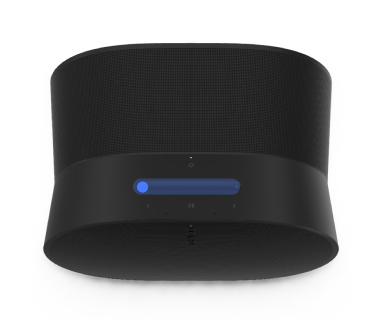 | Volumstyring |
Merk: Når musikk spilles av, trykk og hold inne + eller - for å raskt endre volumet. |
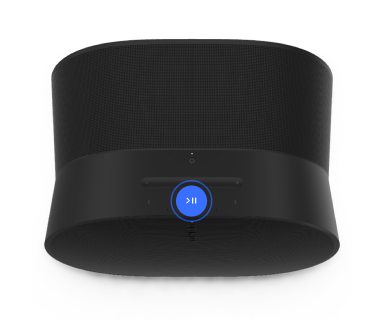 | Spill av / sett på pause |
|
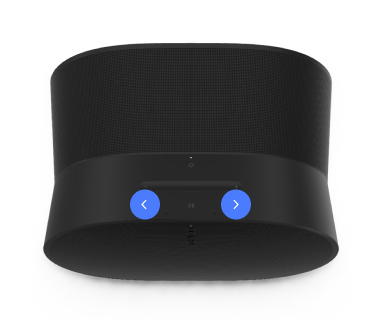 | Neste / forrige |
Merk: Du kan ikke hoppe fremover eller gå tilbake når du lytter til en radiostasjon. |
 | Stemmetjenester av/på | Trykk på mikrofonikonet for å slå stemmetjenester av eller på.
|
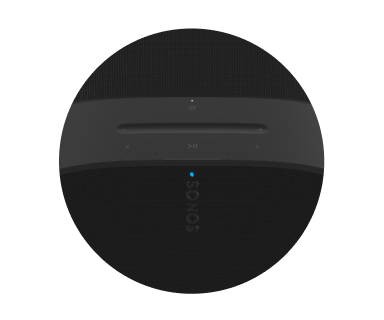 | Statuslys | Viser produktets tilkobling til WiFi, indikerer når volumet er dempet, og varsler om feil.Finn ut mer |
Tilkoblingspanel
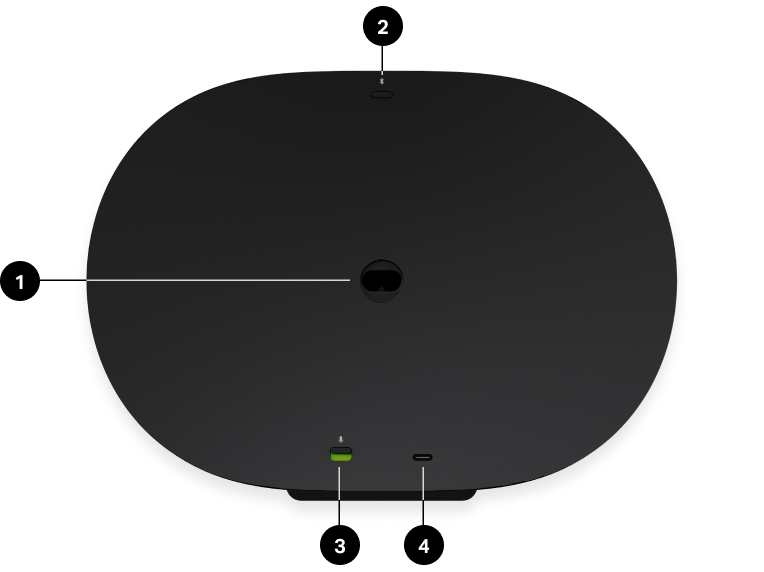
1 | AC-strøm (nettilkobling) inngang | Bruk bare den medfølgende strømledningen (garantien kjennes ugyldig hvis du bruker en tredjeparts strømledning). |
2 | Bluetooth-knapp |
|
3 | Universell mikrofonbryter | Veksle for å slå alle produktmikrofoner av eller på.
Merk: For å bruke stemmetjenester må både mikrofonbryteren og indikatorlyset for stemmetjenester være på. |
4 | USB-C-port | USB-C-porten er laget for line-in- og Ethernet-tilkoblinger ved bruk av Sonos Line-In Adapter eller Combo Adapter (selges separat). Den er ikke en strømkilde for høyttaleren og skal ikke brukes til å lade andre enheter.
|
Velg et sted
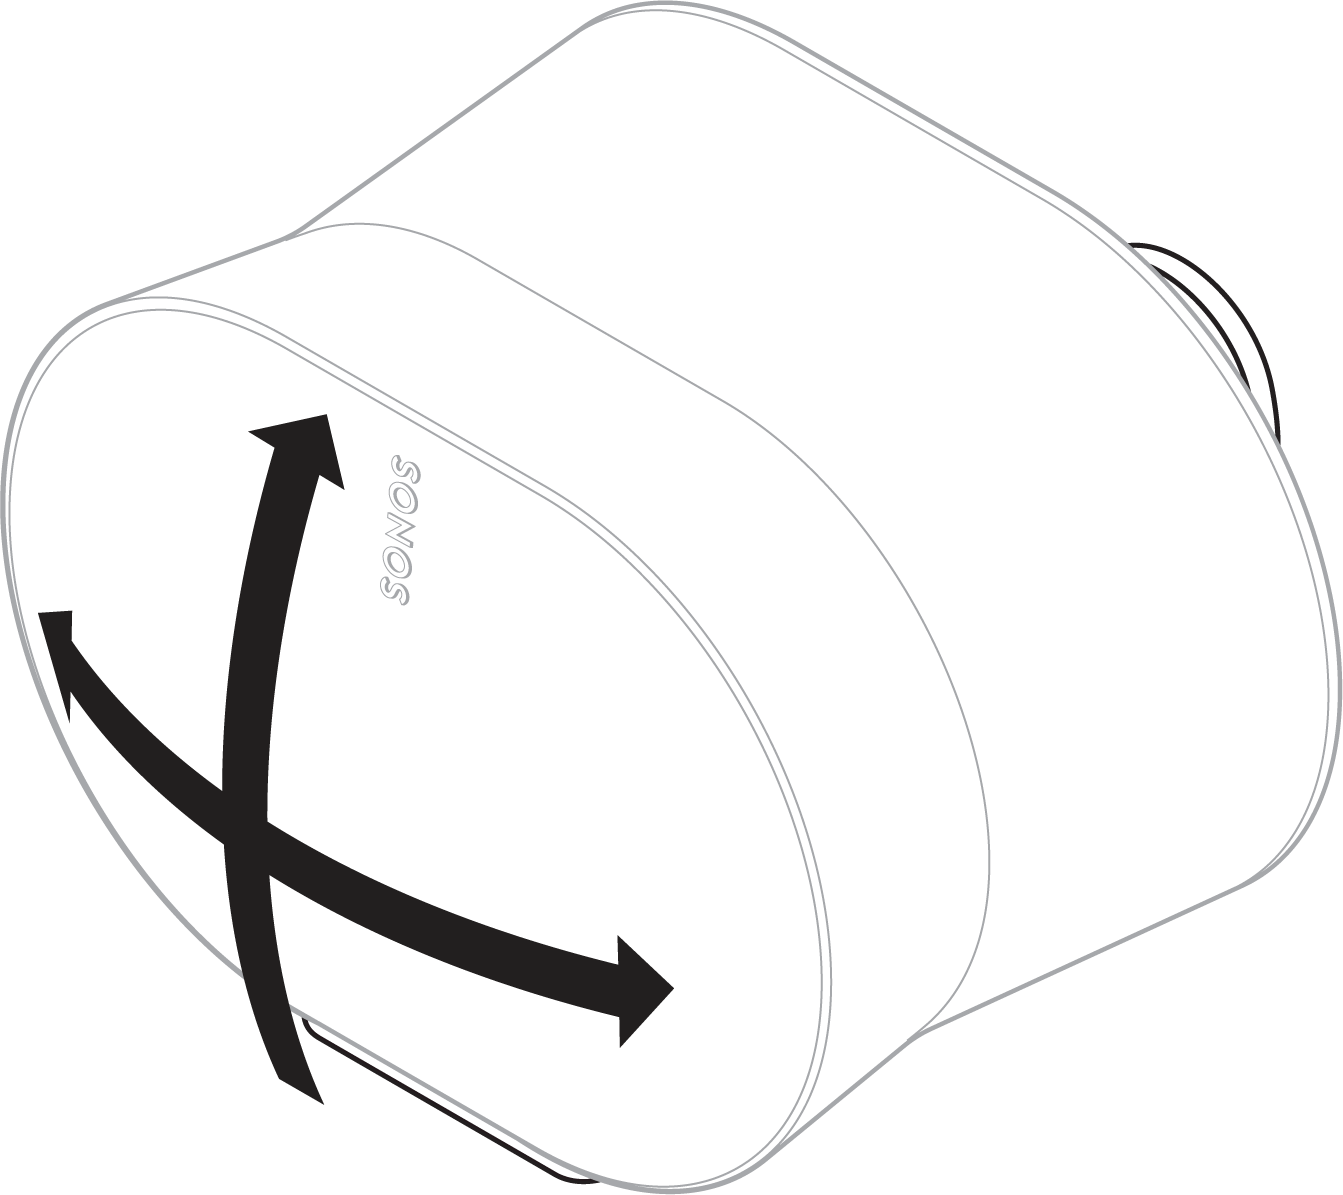
Trueplay-justering tilpasser lyden uansett hvor du plasserer Sonos Era 300, men for at høyttaleren skal projisere lyden mest effektivt, er det noen retningslinjer du bør følge:
- Era 300 bør plasseres innendørs og ha omtrent 60 cm klaring over seg for optimal lydkvalitet. Plassering i et lukket rom, som en bokhylle, anbefales ikke da dette kan påvirke spredning og klarhet i avspillingen.
- Hvis du monterer Era 300 mindre enn 60 cm fra taket, bør den plasseres opp-ned for best mulig lyd.
- Når Era 300 plasseres inntil en vegg eller på en hylle, la det være minst 2,5 cm klaring bak og 20 cm på hver side av høyttaleren.
- Tradisjonelle stereooppsett har ofte et ideelt sted å sitte i rommet for best mulig lytteopplevelse, men med Era 300 sendes lyden i alle retninger slik at du får rik detalj uansett hvor du sitter.
Merk: Ikke plasser Era 300 vertikalt eller i bratt vinkel, da vil lyden stoppe.
Plassering for hjemmekino
Koble to bakre Era 300-høyttalere til en kompatibel Sonos-lydplanke for omsluttende surroundlyd.
- Begge høyttalernes høyde bør være omtrent i ørehøyde og plassert bak sitteposisjonen din.
- La det være minst 20 cm klaring på sidene av hver høyttaler.
Bluetooth-paring
- Slå på Bluetooth i innstillingene til enheten.
- Trykk og hold inne Bluetooth-knappen på baksiden av høyttaleren til du hører en tone, så slipper du. Statuslyset blinker blått når høyttaleren er klar for paring.
- Velg Sonos Era 300 fra listen over tilgjengelige enheter i Bluetooth-innstillingene. Mobilenheten kobles til automatisk neste gang.
Linjeinngang
Koble til en lydenhet, som en projektor, CD-spiller eller platespiller (med innebygd RIAA-forforsterker), til et hvilket som helst Sonos-produkt som har en line-in-port (Era 300, Era 100, Amp, Port eller Five). Deretter gå til > Line-In for å velge kilden og starte avspillingen.
Merk: Era 300 og Era 100 krever en Sonos Line-In eller Combo Adapter ( selges separat ). Andre produkter kan kreve en annen type line-in-adapter avhengig av lydkilden din.
Mikrofon av/på
Det finnes to måter du kan styre mikrofonene på Era 300 på:
En universell mikrofonbryter på baksiden slår alle mikrofonene av og på.
En knapp for stemmetjenester på toppen slår stemmetjenester av og på uten å påvirke mikrofonene som trengs for Trueplay og andre mikrofonavhengige funksjoner.
- Når begge er på, er stemmestyring og alle mikrofonavhengige funksjoner tilgjengelige.
- Når begge er av, er stemmestyring og alle mikrofonaktiverte funksjoner utilgjengelige.
- Når den universelle mikrofonbryteren er på og lyset for stemmetjenester er slått av, er Trueplay og andre mikrofonavhengige funksjoner tilgjengelige, men stemmestyring er slått av.
Stemmeassistenter
Bruk stemmen til å styre Sonos-anlegget ditt med alle stemmeaktiverte Sonos-produkter – spill av og styr innhold, skru volumet opp eller ned med mer.
- Sonos Voice Control: styr hele Sonos-anlegget enkelt og håndfritt, med uovertruffent personvern. Sonos Voice Control kommer klar til å brukes – det tar bare noen få sekunder å legge det til når du konfigurerer høyttalerne dine. Finn ut mer
- Amazon Alexa: du trenger Sonos-appen og Alexa-appen med Sonos-ferdigheten aktivert. Du skal gjøre noen endringer i begge appene under konfigureringen. Finn ut mer
- Google Assistant: du trenger Sonos-appen og Google Assistent-appen. Du skal gjøre noen endringer i begge appene under konfigureringen. Finn ut mer
- Siri: du trenger Apple Home-appen. Legg til de AirPlay 2-kompatible Sonos-høyttalerne dine i Apples Hjem-appen og bruk iPhone, iPad eller Apple TV til å be Siri om å spille av musikk (foreløpig begrenset til Apple Music). Finn ut mer
Merk: Stemmestyring er foreløpig ikke støttet i alle land. Denne funksjonen blir tilgjengelig så snart Sonos og en stemmetjeneste lanseres sammen i regionen din.
Trueplay™
Trueplay-justering måler hvordan lyden reflekteres av vegger, møbler og andre overflater i et rom, og finjusterer deretter Sonos-høyttaleren din for å sikre at den høres flott ut uansett hvor du plasserer den.
Under oppsettet, velg Trueplay-alternativet som fungerer best for deg og ditt rom.
Hvis du ønsker å justere på nytt senere, følg disse trinnene:
- Gå til Innstillinger
 .
. - Velg produktet du ønsker å justere.
- Velg Trueplay .
Avansert justering
Avansert justering er tilpasset og presis. Det tar omtrent 5 minutter og bruker mikrofonen på en iOS-enhet (som kjører iOS 8 eller nyere), så du vil bevege deg rundt i rommet mens lyden finjusteres for ditt område.
Merk: Avansert justering er det beste valget for store rom (åpne konseptområder kan oppleve mindre presis justering).
Rask justering
Rask justering er rask, enkel og tilgjengelig. Det tar omtrent ett minutt og bruker mikrofonen på Sonos-produktet ditt til å registrere omgivelsene, så det er ikke nødvendig å bevege seg rundt i rommet under justeringen.
Merk: Rask justering er tilgjengelig for både iOS og Android, og er et godt valg for mindre rom eller områder hvor det er vanskelig å bevege seg fritt.
Konfigurer stereopar
Pare to Sonos-høyttalere i samme rom for en enda bredere, stereofonisk opplevelse. Én høyttaler fungerer som venstre kanal og én som høyre kanal.
Merk: Sonos-høyttalerne i et stereopar må være av samme type.
- Plasser høyttalerne 2,4 til 3 meter fra hverandre. Din favorittlytteposisjon bør være 2,4 til 3,7 meter fra de pargjorte høyttalerne – mindre avstand øker bassen, mer avstand forbedrer stereoavbildningen.
- Åpne Sonos-appen, og gå til Innstillinger .
- Velg ett av produktene du vil bruke i stereoparet.
- Velg Konfigurer stereopar for å komme i gang.
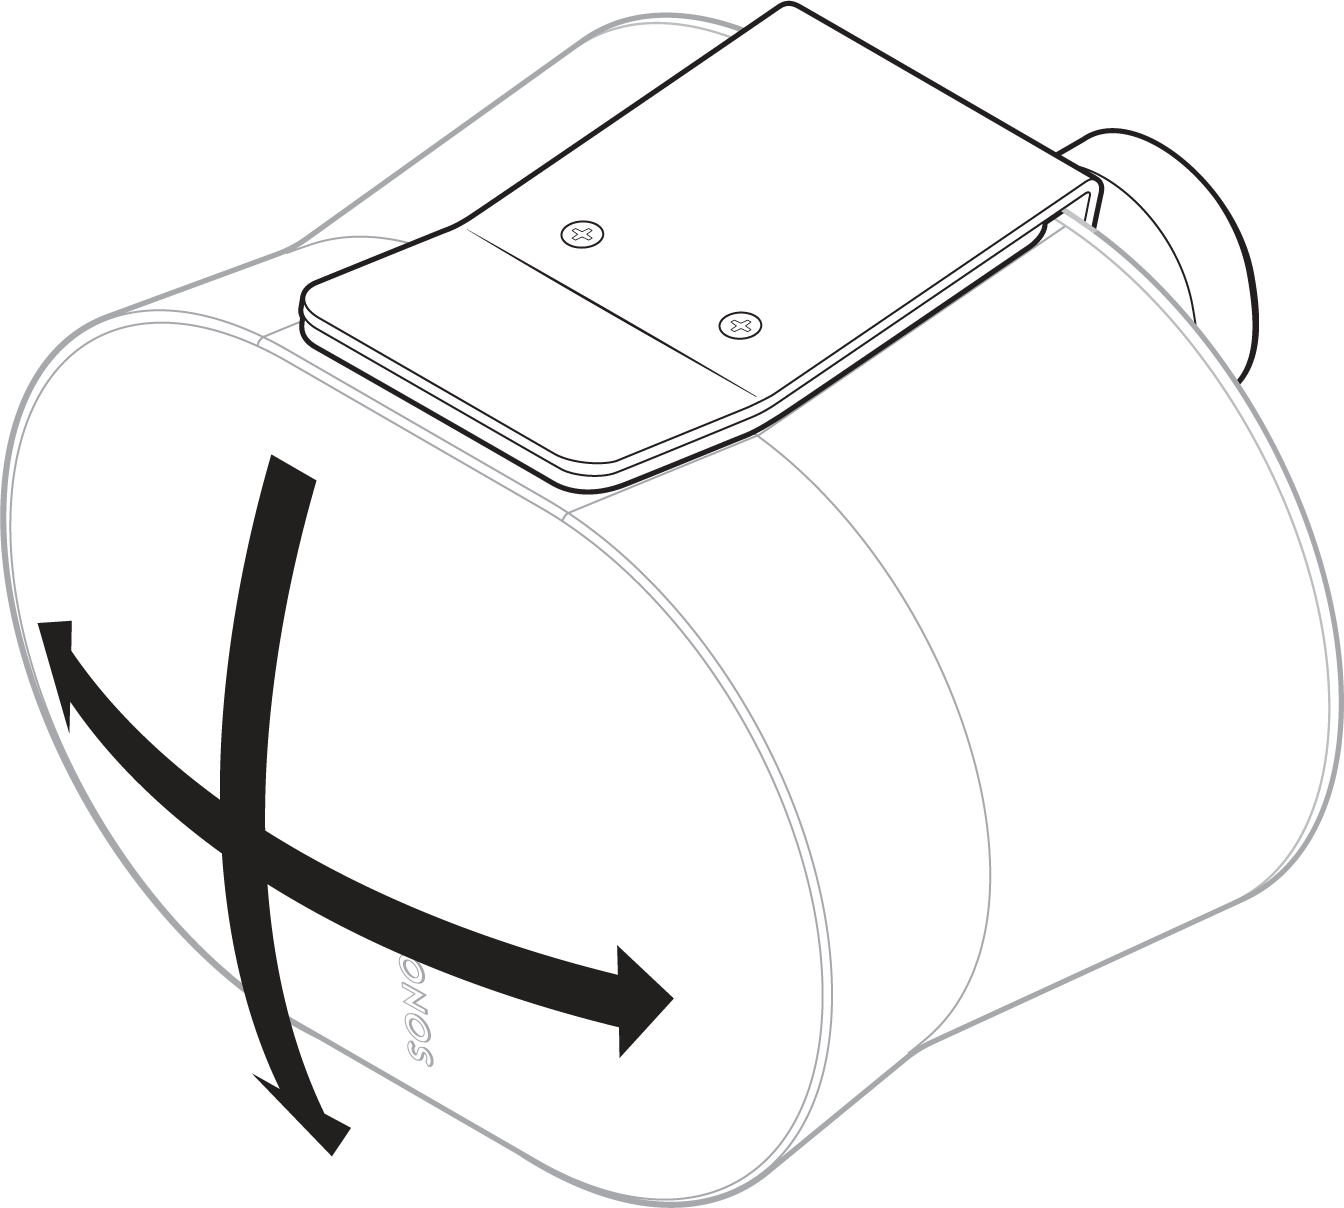
Konfigurer surroundhøyttalere
Det er enkelt å gjøre to Sonos Era 300-høyttalere om til separate høyre og venstre kanaler for hjemmekinoen din. Med Era 300 sendes lyden i alle retninger, så det er ikke nødvendig å finne et spesielt lyttepunkt i rommet.
- Plasser høyttalerne slik at frontgitteret vender mot TV-en.
- Åpne Sonos-appen, og velg Innstillinger .
- Velg en lydplanke, og velg Legg til surroundhøyttalere for å komme i gang.
Merk: Hvis du grupperer rommene eller lager et stereopar i stedet, får du ikke surroundlyd.
Innstillinger for surroundlyd
Under oppsettet optimaliseres surroundlyden for rommet ditt. Disse innstillingene kan justeres:
Surroundhøyttalere | Slå på surroundlyd På eller Av . |
TV-nivå | Juster surroundvolum for TV-lyd. |
Musikknivå | Juster surroundvolum for musikk. |
Musikkavspilling | Omgivelseslyd (diskré) eller Full (høyere, fullt frekvensområde). Gjelder ikke for avspilling av Dolby Atmos Music. |
Produktinnstillinger
Du kan tilpasse Sonos-produktene til omgivelsene dine.
- Gå til Innstillinger .
- Velg et produkt.
Romnavn | Hvis du flytter høyttaleren til et nytt rom, kan du endre navnet i Innstillinger . |
Slå av WiFi (ikke tilgjengelig for Sonos Era 100, Era 300 eller bærbare produkter) | Du kan slå av WiFi på høyttaleren din når den er koblet til nettverket ditt med en Ethernet-kabel. Dette reduserer strømforbruket og kan forbedre tilkoblingen for kablede høyttalere. Merk: WiFi er slått av for Era 100 og Era 300 når du kobler til en Sonos Combo Adapter ved bruk av Ethernet-kabelen. |
EQ | Sonos-produkter leveres med forhåndsinnstilte equalizer-innstillinger. Du kan endre lydinnstillingene (bass, diskant eller volum) for å tilpasse dem til dine personlige preferanser.Finn ut mer |
Trueplay | Trueplay tilpasser lyden til omgivelsene og innholdet. Bærbare produkter kan justere seg selv automatisk.Finn ut mer |
Volumgrense | Du kan sette et maksimalt volum for hvert rom. Finn ut mer |
Statuslys | Viser høyttalerens tilkobling til WiFi, indikerer når volumet er dempet, og signaliserer feil. Finn ut mer Merk: Hvis lyset er distraherende, kan du slå det av i Innstillinger . |
Berøringsknapper | Du kan deaktivere berøringskontrollen på høyttaleren din. Du kan ønske å gjøre dette for å forhindre at et barn eller et nysgjerrig kjæledyr ved et uhell justerer avspilling eller volum. Finn ut mer |
Batterisparer (kun for bærbare produkter) | For å spare batterilevetid, kan du sette den bærbare høyttaleren til å slå seg av automatisk i stedet for å gå i dvale. Den vil ikke vises i Sonos-appen før den er slått på igjen. |
Line-In (Sonos-produkter med line-in-funksjon) | Når en projektor, platespiller, stereo eller annen lydenhet er koblet til et Sonos-produkt, kan du justere disse linjeinnstillingene:
|
Soner
Å sette opp soner hjelper deg med å fylle store områder med lyd. En sone er en ny, semipermanent konfigurasjon for flere høyttalere i et anlegg. Soner kan være et enkelt rom, en del av et rom eller til og med flere rom i et hjem eller bygg. For øyeblikket kan disse produktene legges til en sone i Sonos-appen: Amp Multi, Era 100, Era 100 Pro, Five, One og One SL. Du kan også legge til en sub i en sone som kun inneholder én Amp Multi.
Når en sone er opprettet, styres alle produktene som er lagt til i den sammen, som om de var ett enkelt element. Dette gjør det enklere å spille av innhold på alle høyttalerne i samme område, sammenlignet med å gi dem et felles navn (f.eks. Kjøkken, Kjøkken 2, Kjøkken 3 osv.) og gruppere dem.
Du kan legge til maksimalt 16 produkter i en sone. Ethvert antall utganger fra én enkelt amp teller som 1 produkt. Et anlegg kan inneholde maksimalt 32 produkter eller soner.
For å sikre best mulig opplevelse ved bruk av soner, anbefaler vi å sette opp kablede internettforbindelser til hvert Sonos-produkt. Hvis du bruker trådløse tilkoblinger (Wi-Fi) i stedet, anbefaler vi å legge til maksimalt 6 produkter per sone.
Bruk utgangsvelgeren for midlertidig å gruppere ulike soner og høyttalere sammen. Når du opphever grupperingen, forblir sonene dine intakte.
Konfigurer en sone
Soner kan være et enkelt rom, en del av et rom eller til og med flere rom.
- Gå til Innstillinger .
- Velg et kompatibelt rom, en bærbar enhet eller hodetelefoner (se listen over kompatible produkter ovenfor).
- Velg Produkter , og velg deretter + Konfigurer sone for å komme i gang.
Høyttalere forblir i en sone til du Rediger sone eller Skill sone i Innstillinger .
Administrer, rediger og separer sonene dine
Når en sone er opprettet, kan du endre høyttalerne i en sone eller fjerne en sone helt.
- Gå til Innstillinger og velg en sone.
- Under Produkter , velg enten Rediger sone for å legge til eller fjerne høyttalere i sonen, eller Separer sone for å koble fra alle høyttalerne i sonen.
Identifiser høyttalere i en sone
Hvis du mister oversikten over hvilke høyttalere som er i sonen din, kan du sjekke dette ved å gå til Systeminnstillinger, velge sonen og se gjennom produktlisten. I appen har høyttalere i en sone et høyttalerikon ved siden av seg i Innstillinger. Du kan trykke på dette ikonet for å få høyttaleren til å spille av en kort lyd og blinke med LED-lysene slik at du kan finne den fysiske plasseringen.
Tilbehør
Find the perfect accessory for your Sonos system—tailored to perfectly fit your Sonos products.
For a full selection of Sonos-compatible stands, wall mounts, chargers and cables, see Accessories on our website.
Era 300 Stand
Spesialdesignet stativ for Sonos Era 300 holder høyttaleren sikkert på plass.
- Fast høyde, optimal for hjemmekino-surround.
- Enkel montering.
- Kabelkanal i stolpen skjuler høyttalerens strømkabel for enkel kabelhåndtering.
Merk: For hele utvalget av Sonos-kompatible stativer, veggfester og kabler, se Accessories på nettstedet vårt.
Hva er i esken?
Hver Sonos Era 300 Stand-pakke inneholder:
- 1 stativbase
- 1 stativstang
- 1 høyttalerplattform
- 1 stativstanglokk
- Monteringssett med 4 skruer (3 hvite og 1 svart, eller 4 svarte), 1 skive
Merk: Sonos-høyttalere selges separat.
Dette trenger du
- Stjerneskrutrekker
Konfigurer den
1 | Ta alt ut av esken og plasser basen i sporet i emballasjen for å stabilisere den for de neste trinnene. Tre enden av Sonos Era 300-strømkabelen som festes til høyttaleren gjennom åpningen i stativbasen og inn i kanalen i stangen. Forsiktig: Dette stativet er kun beregnet for bruk med Sonos Era 300. | |
2 | Plasser skiven med justeringspinnene vendt inn. Juster deretter stangens stolpe med basen, og bruk justeringspinnene som veiledning. | |
3 | Fest basen (med skiven) til stativstangen med én svart skrue (inkludert) og en stjerneskrutrekker. Pass på at ledningen fortsatt kan gli fritt. | 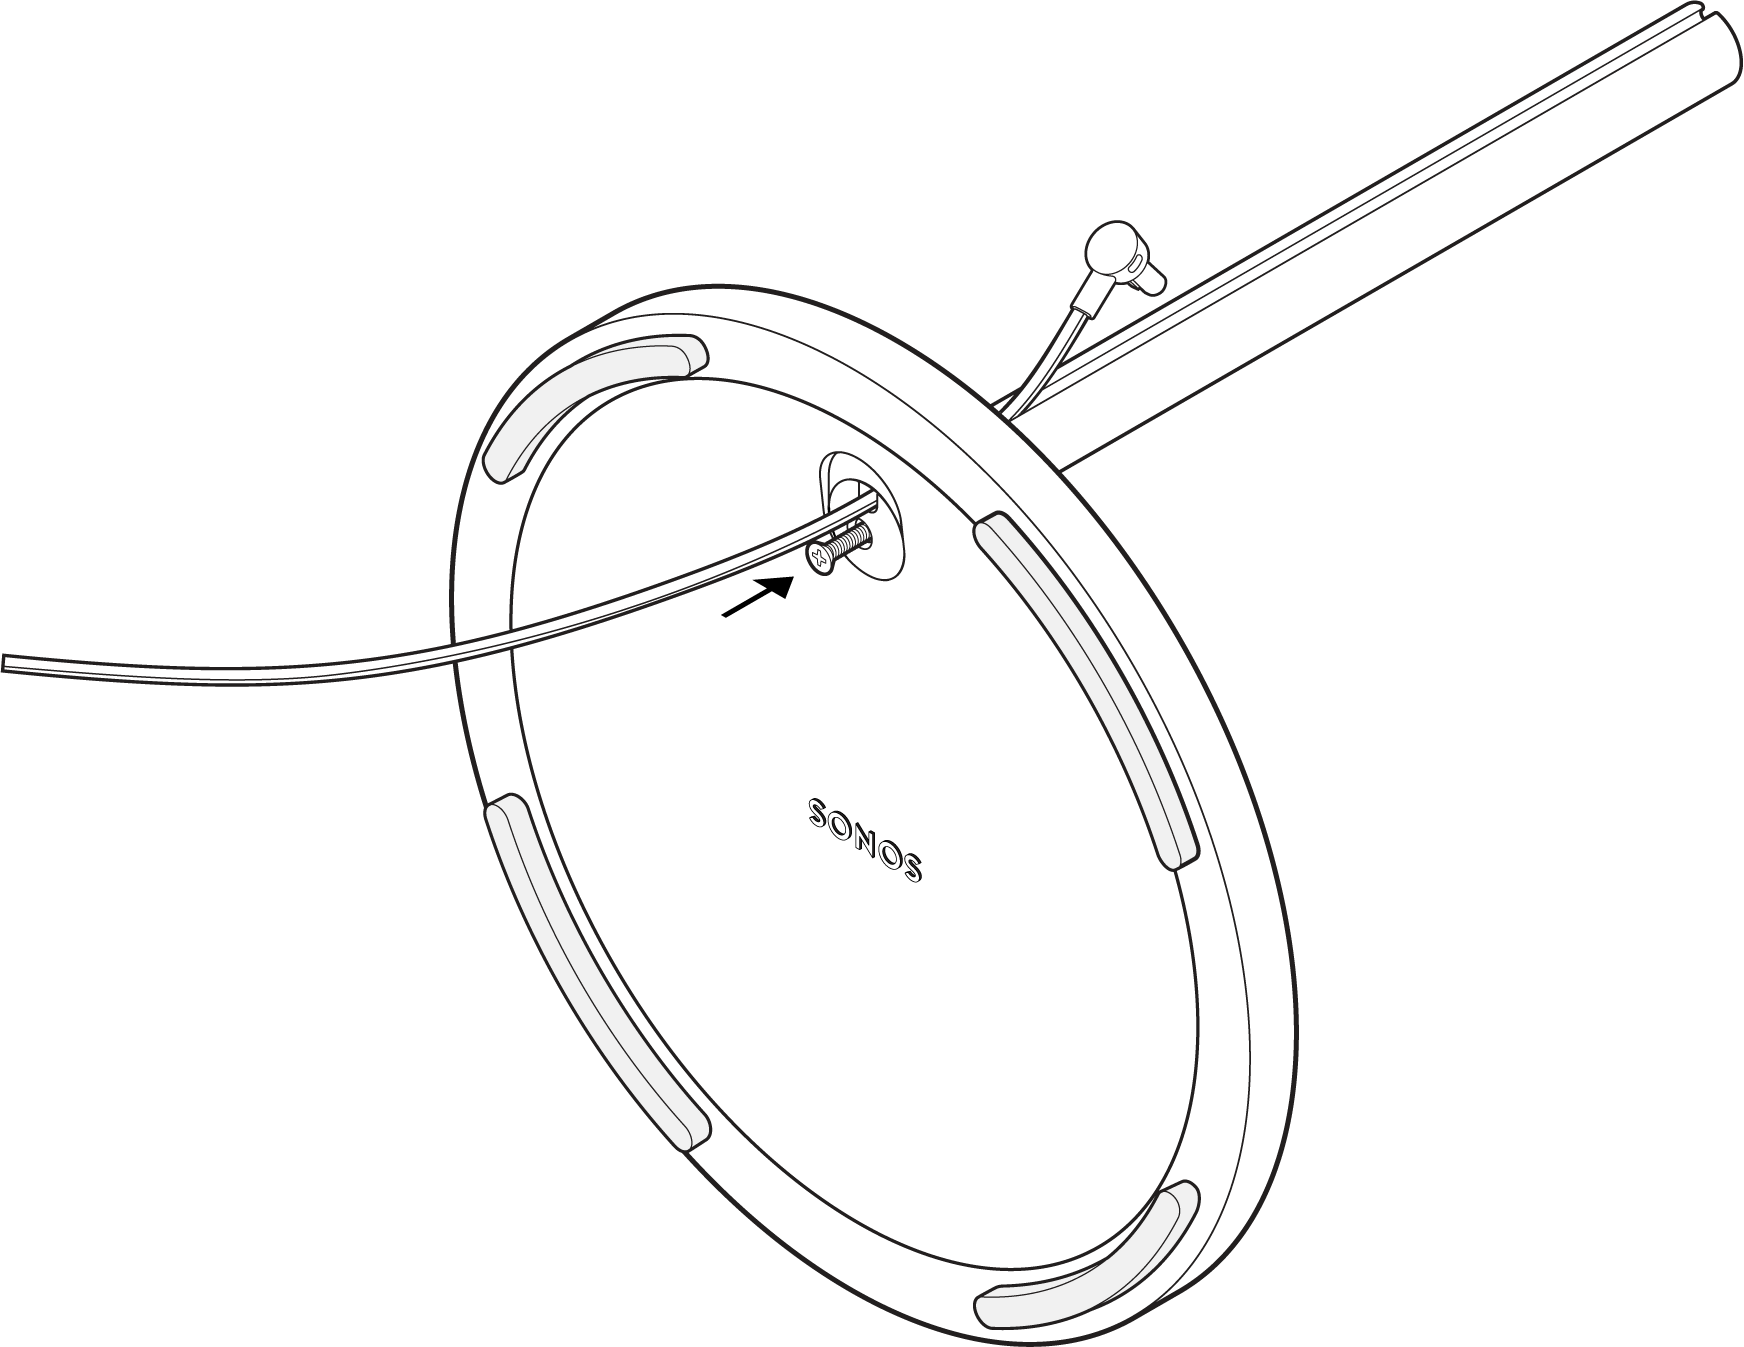 |
4 | Fest høyttalerplattformen til bunnen av høyttaleren med 2 skruer (inkludert). | 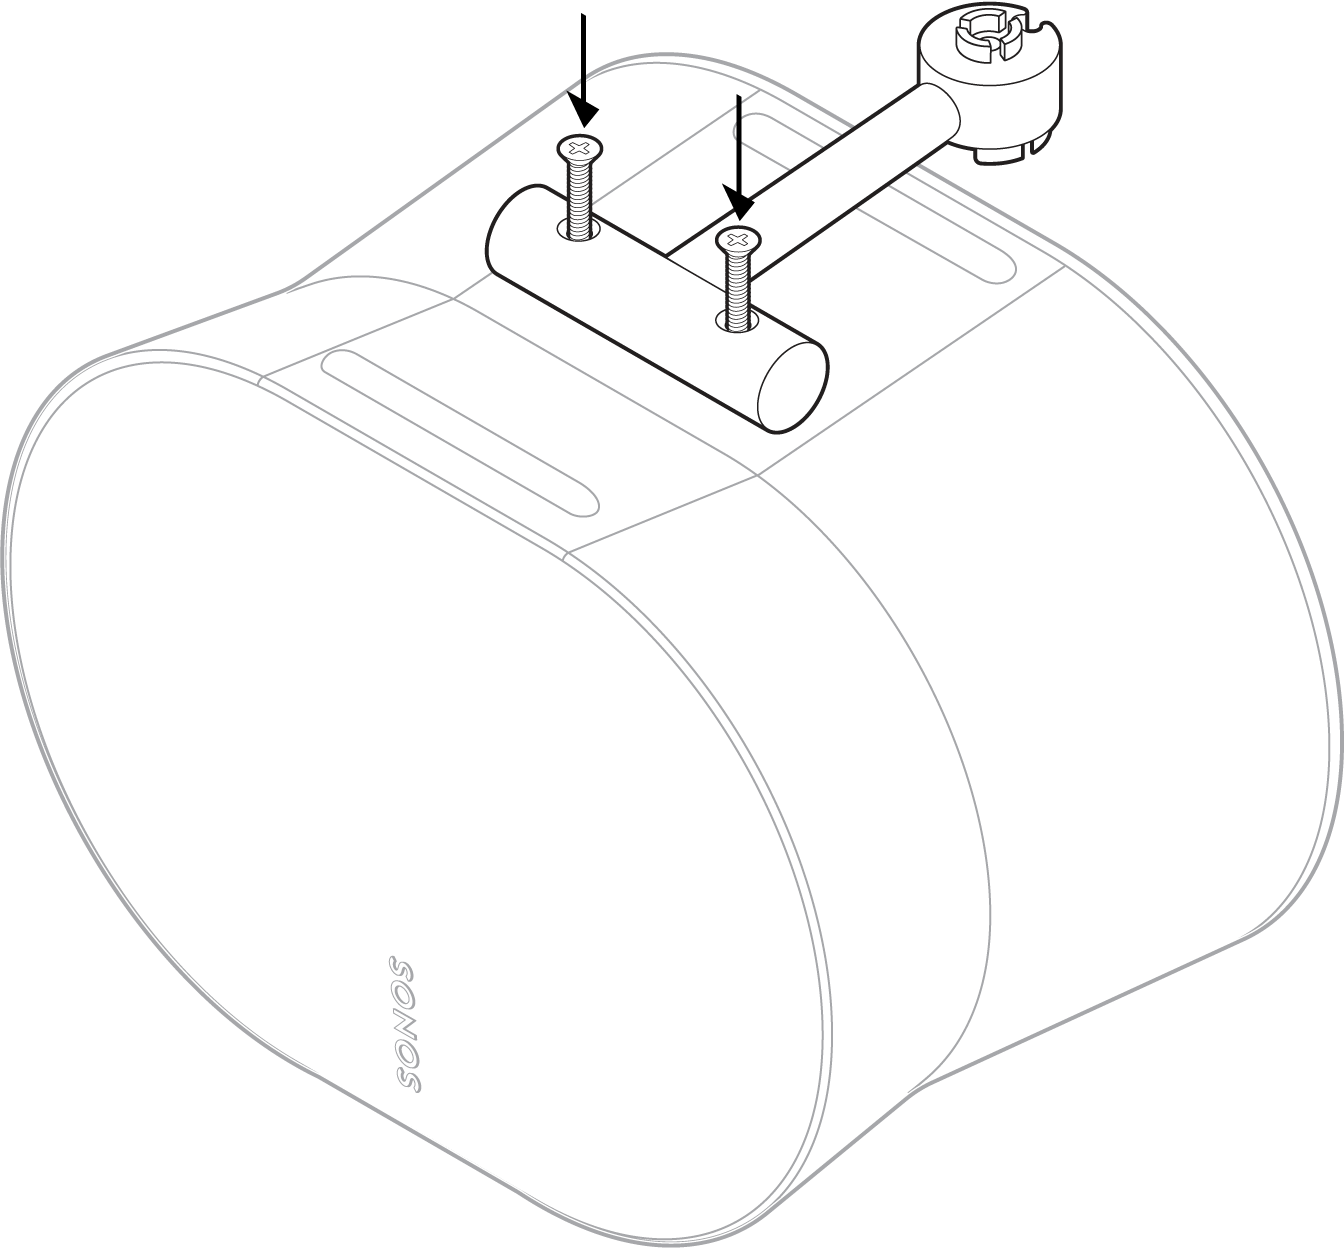 |
5 | Fest høyttalerplaten til stativstangen med den andre skruen (inkludert). Koble deretter strømledningen til høyttaleren. Du kan trenge hjelp av noen til å holde høyttaleren under dette steget. | 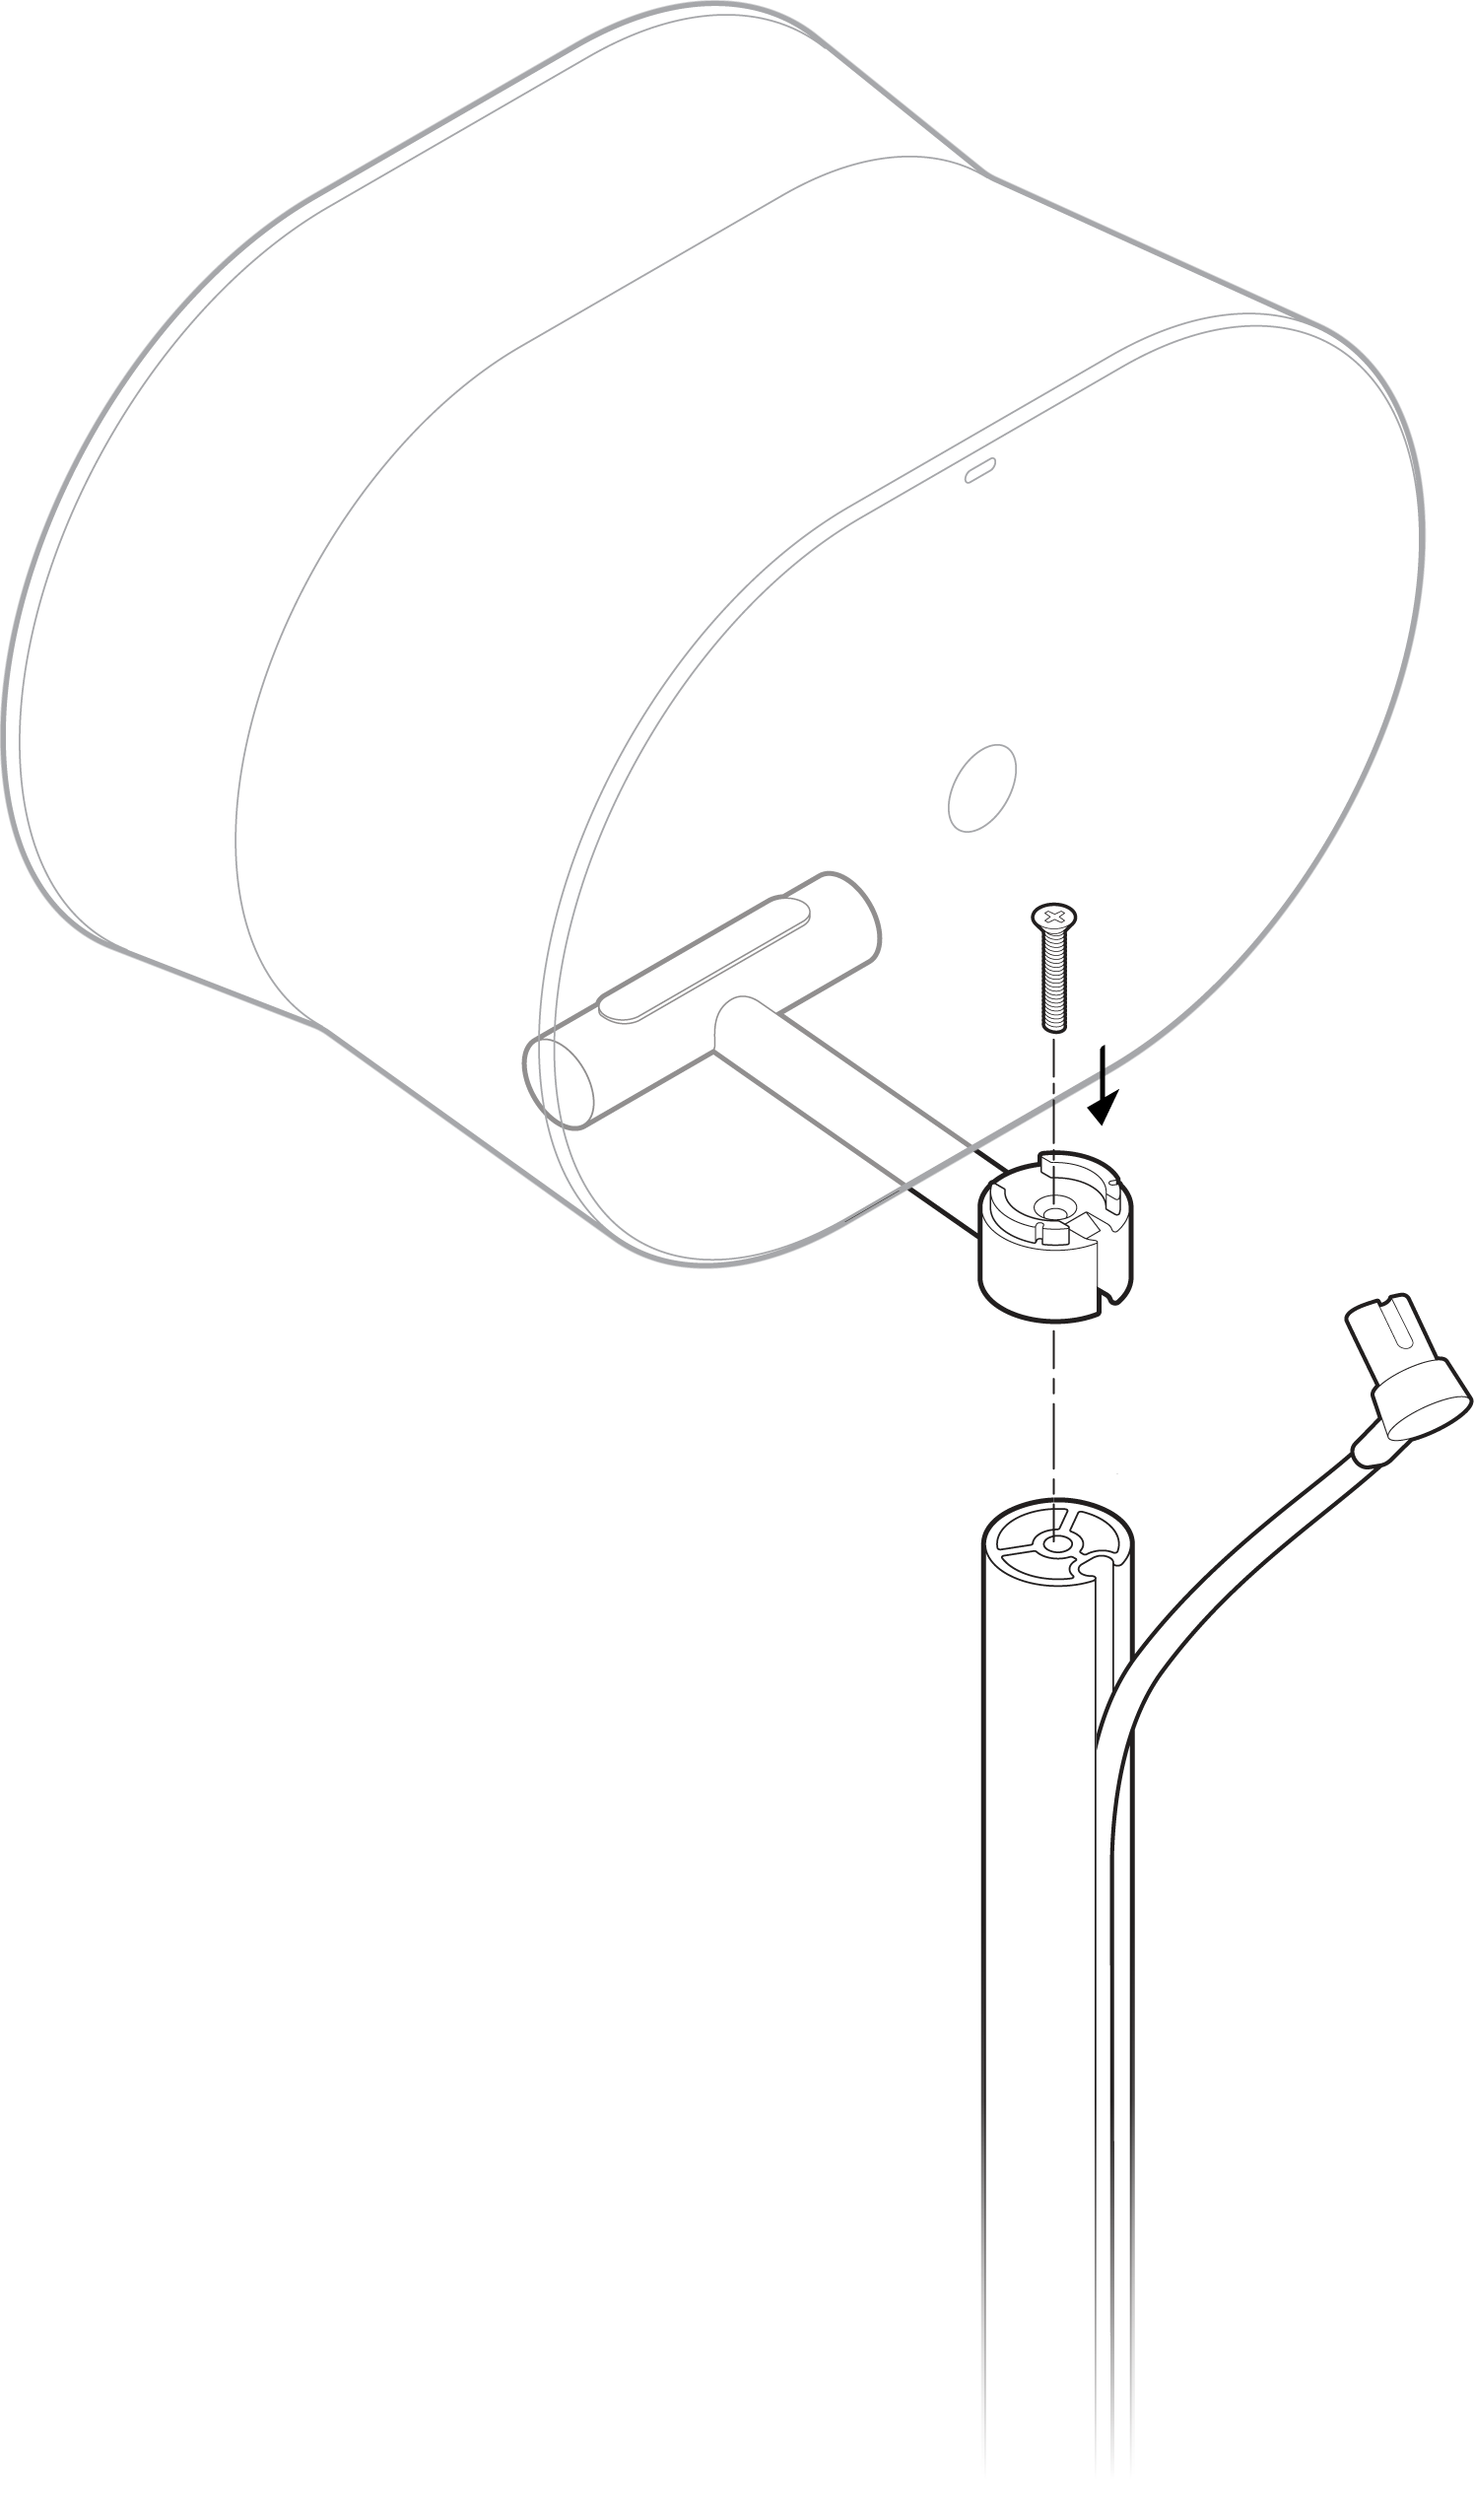 |
6 | Fest stolpehetten på toppen av stolpen for å skjule strømledningen. Pass på at du ikke klemmer kabelen. Deretter, arbeid deg fra toppen og nedover, og trykk strømledningen pent inn i kabelkanalen på stolpen. | 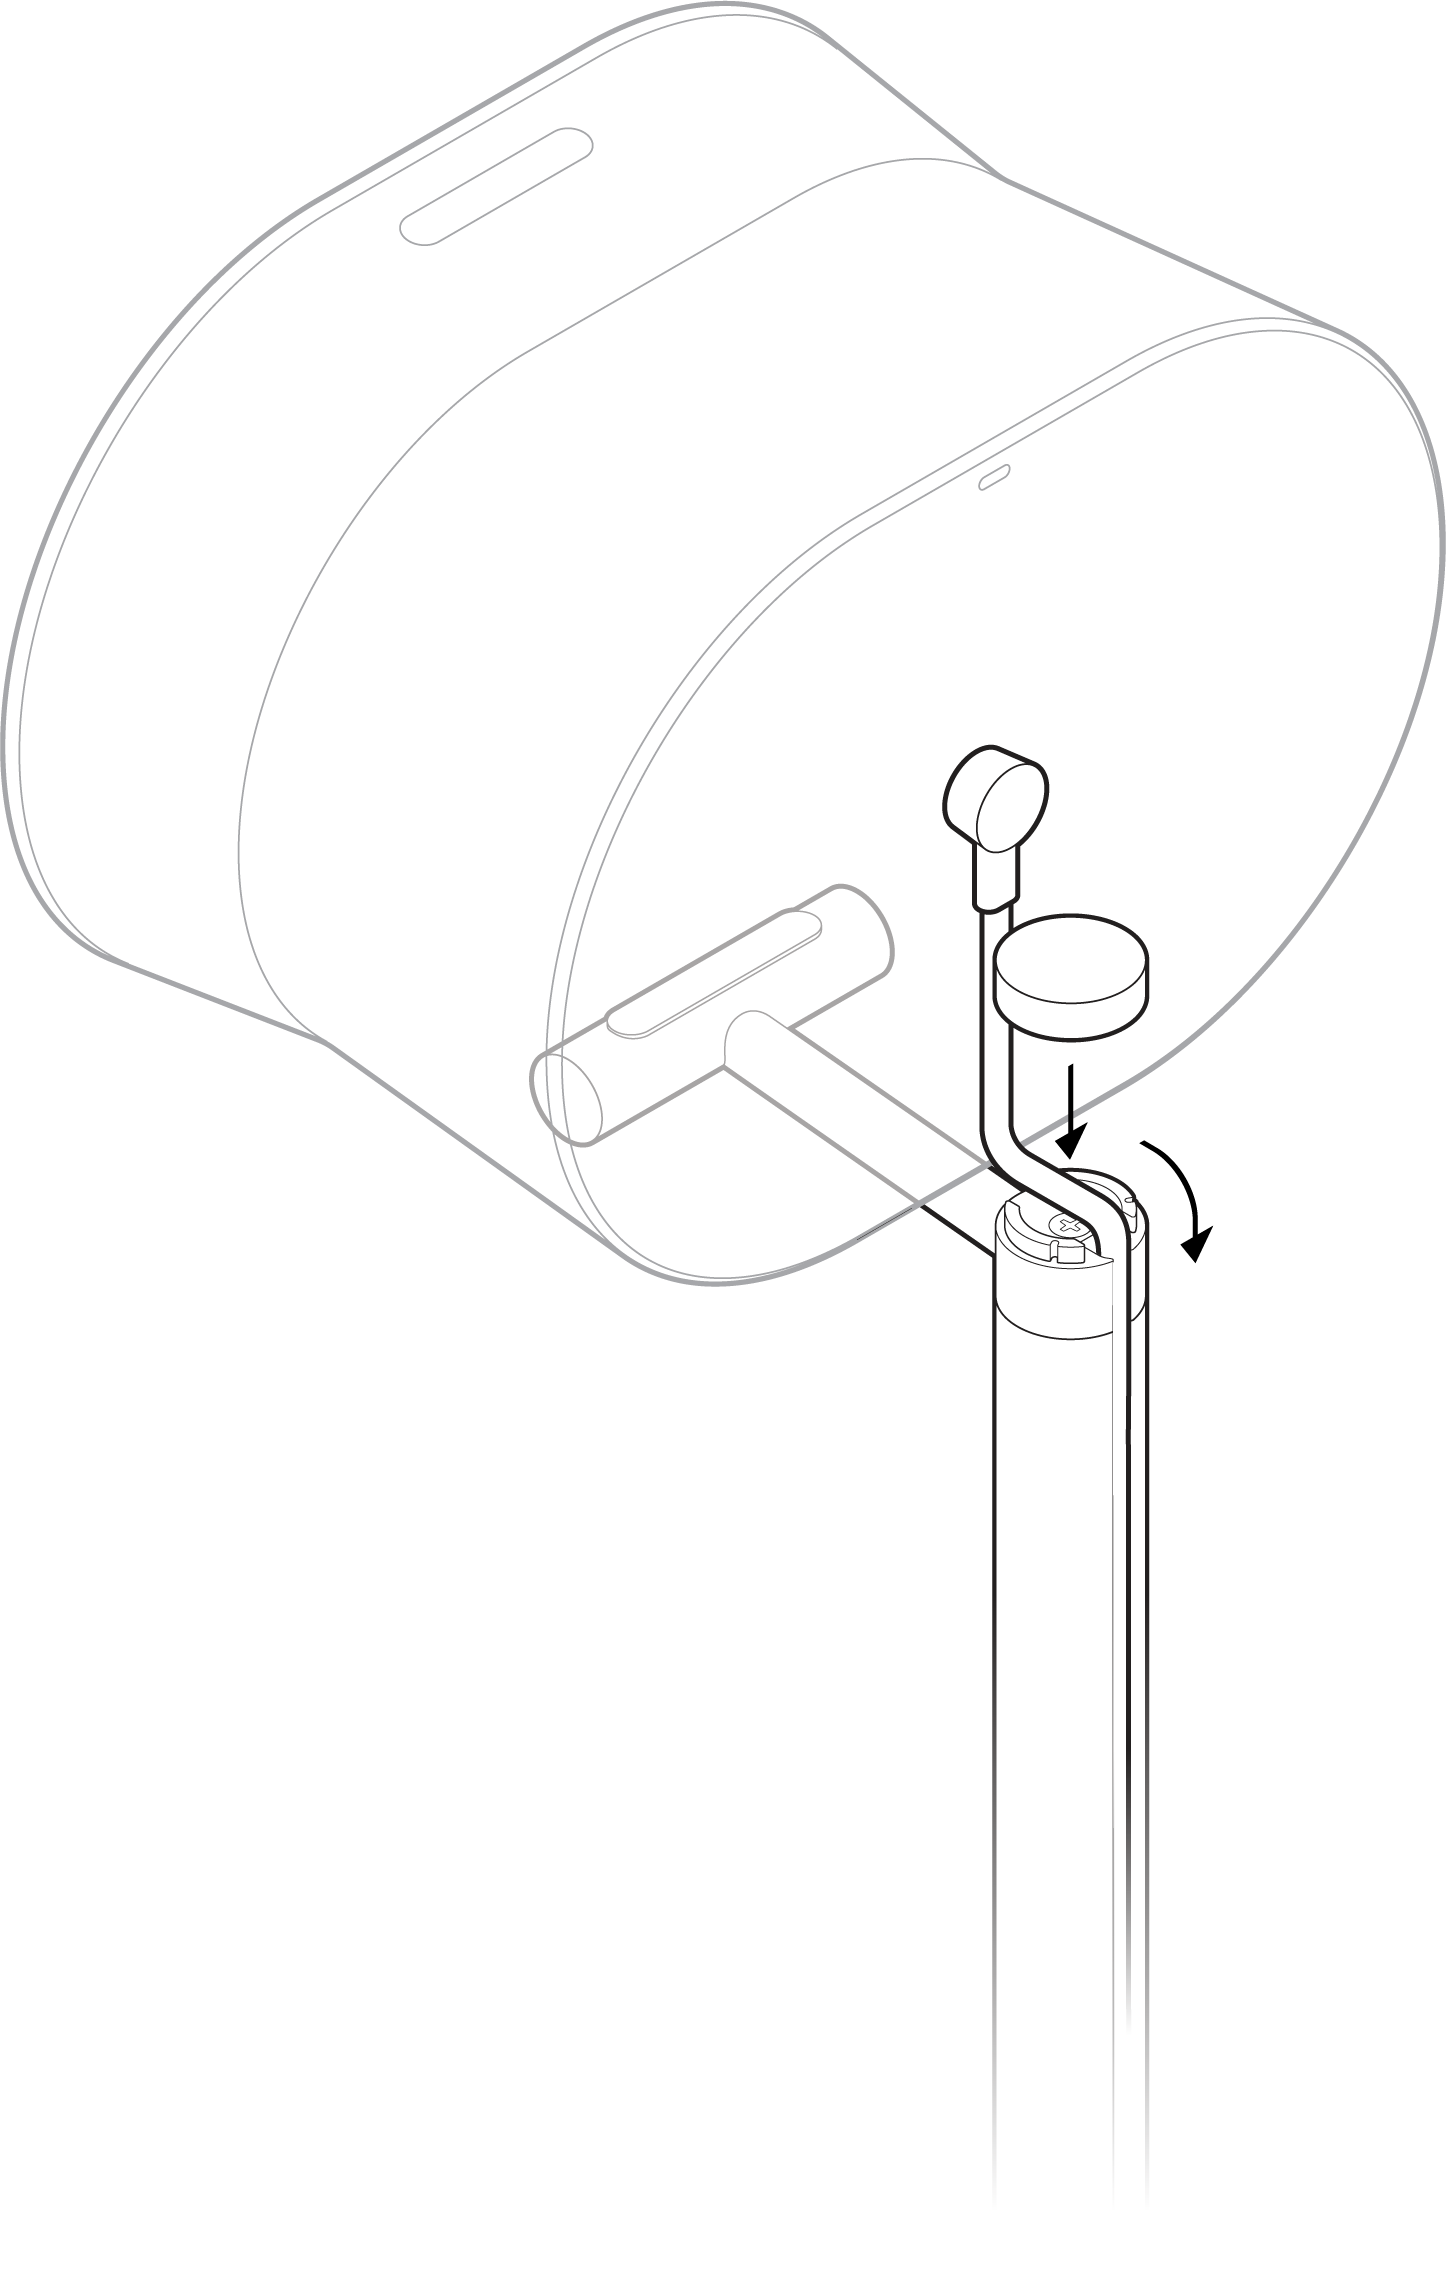 |
7 | Plasser stativet der du ønsker. Koble høyttaleren til en stikkontakt, og legg deretter overflødig ledning under stativbasen. | 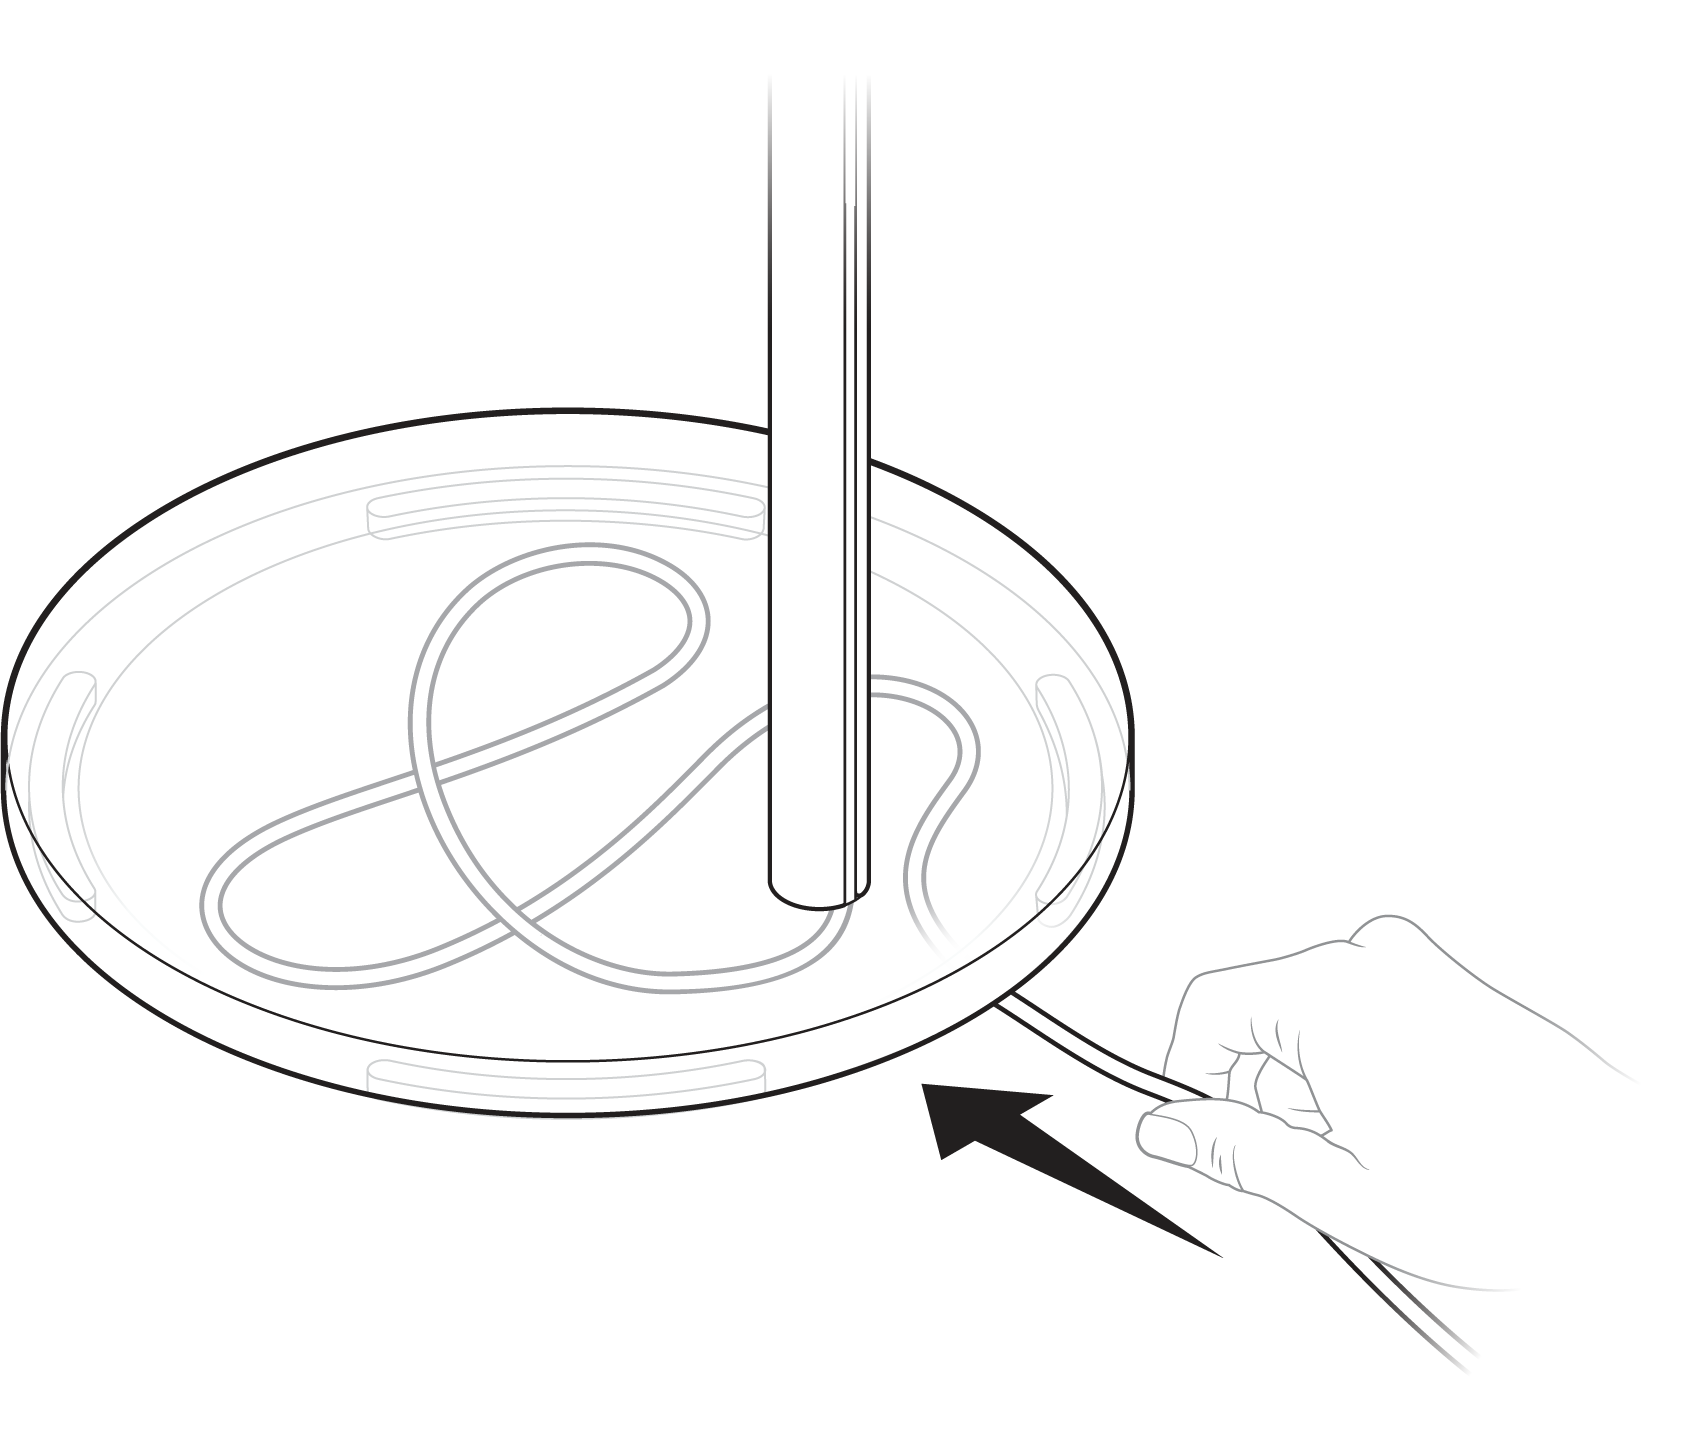 |
Era 300 veggfeste
- Det lettinstallerte festet for Sonos Era 300.
- Støtter vekten av høyttaleren din og holder den sikkert på plass.
- Gir tilgang til porter, knapper og berøringskontroller, og leder høyttalerkabelen pent.
- Fleksibilitet til å plassere høyttaleren for best mulig lyd.
Viktig: Dette veggfestet er kun for bruk med Sonos Era 300 (selges separat), og er designet for montering i veggstender.
Hva er i esken?
Hver spesialdesignede Sonos Era 300 veggfeste-pakke inneholder:
- 1 veggfeste
- 1 veggbrakett
- Monteringssett med 4 skruer
Dette trenger du
- Blyant
- Vater
- Stendersøker
- Stjerneskrutrekker
- Boremaskin
Velg orientering
Montering på vegg i oppreist posisjon
|  |
Omvendt veggmontering (opp-ned)
|  |
Monter stående
1 | Finn en stender i veggen. Plasser braketten mot veggen og bruk et vater for å sikre at den er i vater, og merk av for skruehullene. Fjern braketten. | 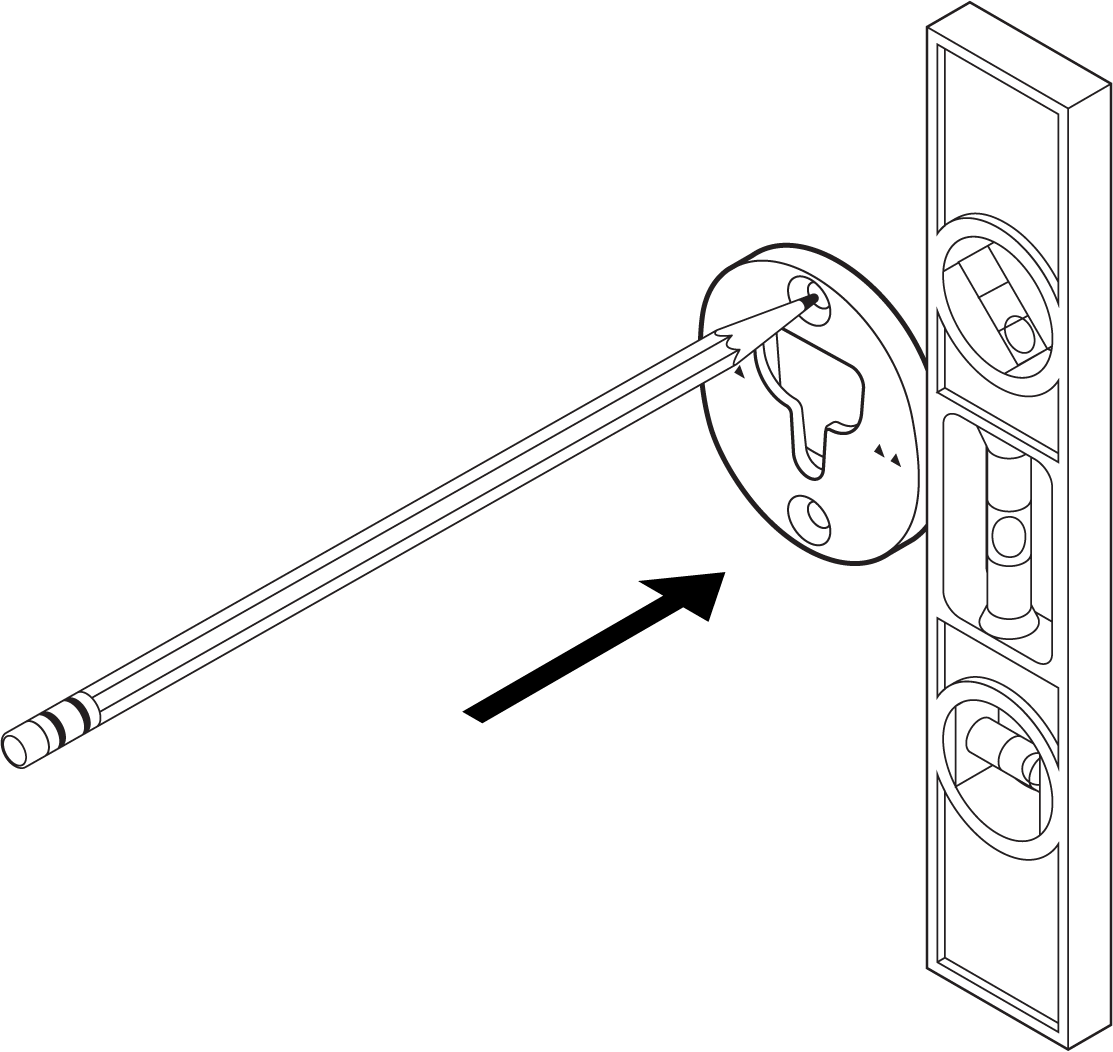 |
2 | Forbor pilothull i en stender med et 3,5 mm bor. Plasser braketten mot veggen med de små pilene pekende opp, og fest den til veggen med 2 lange veggbrakett-skruer (inkludert) og en drill eller stjerneskrutrekker. | 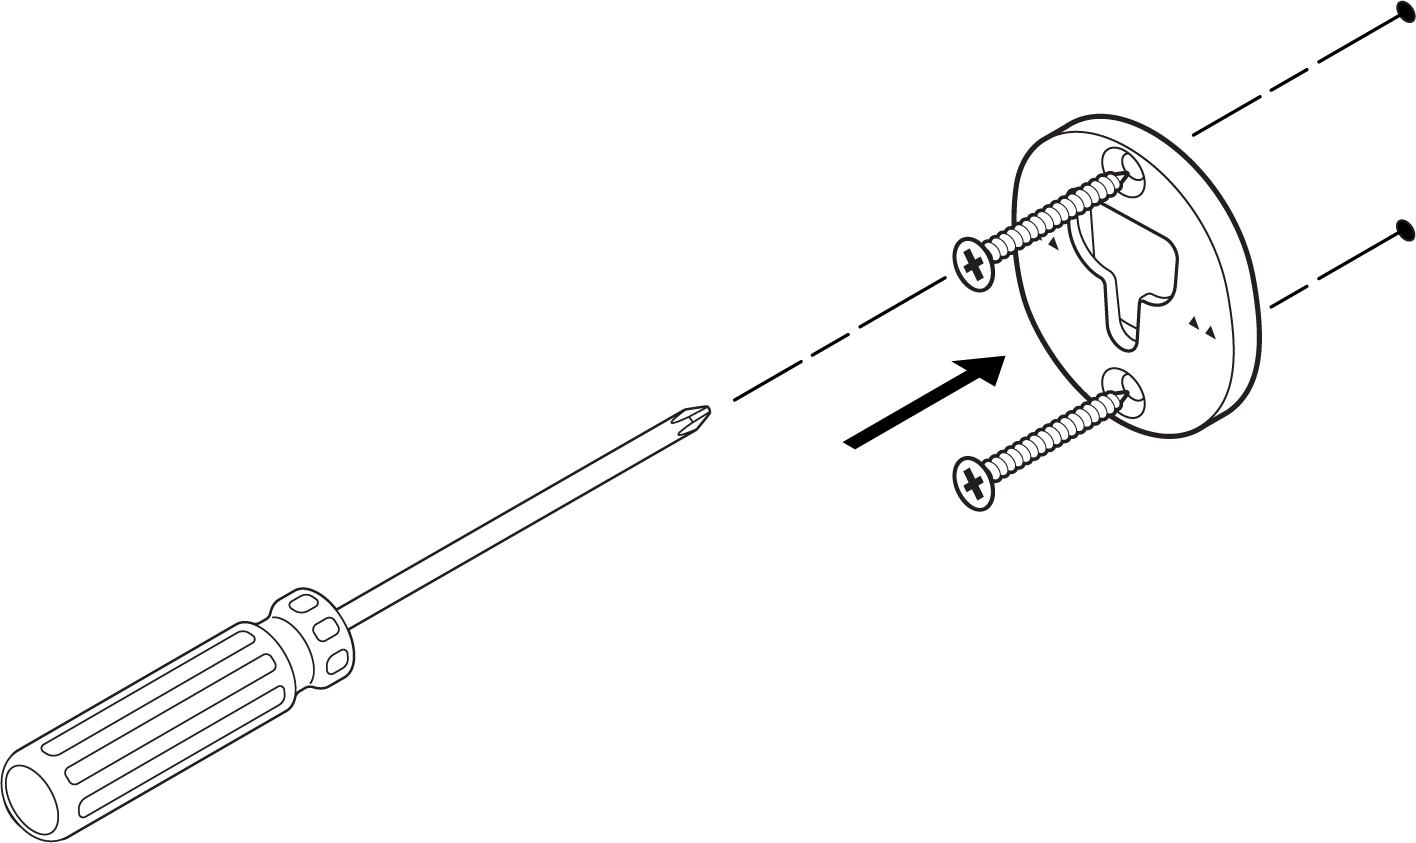 |
3 | Tre strømledningen gjennom åpningen på baksiden av festet og koble den til høyttaleren. | 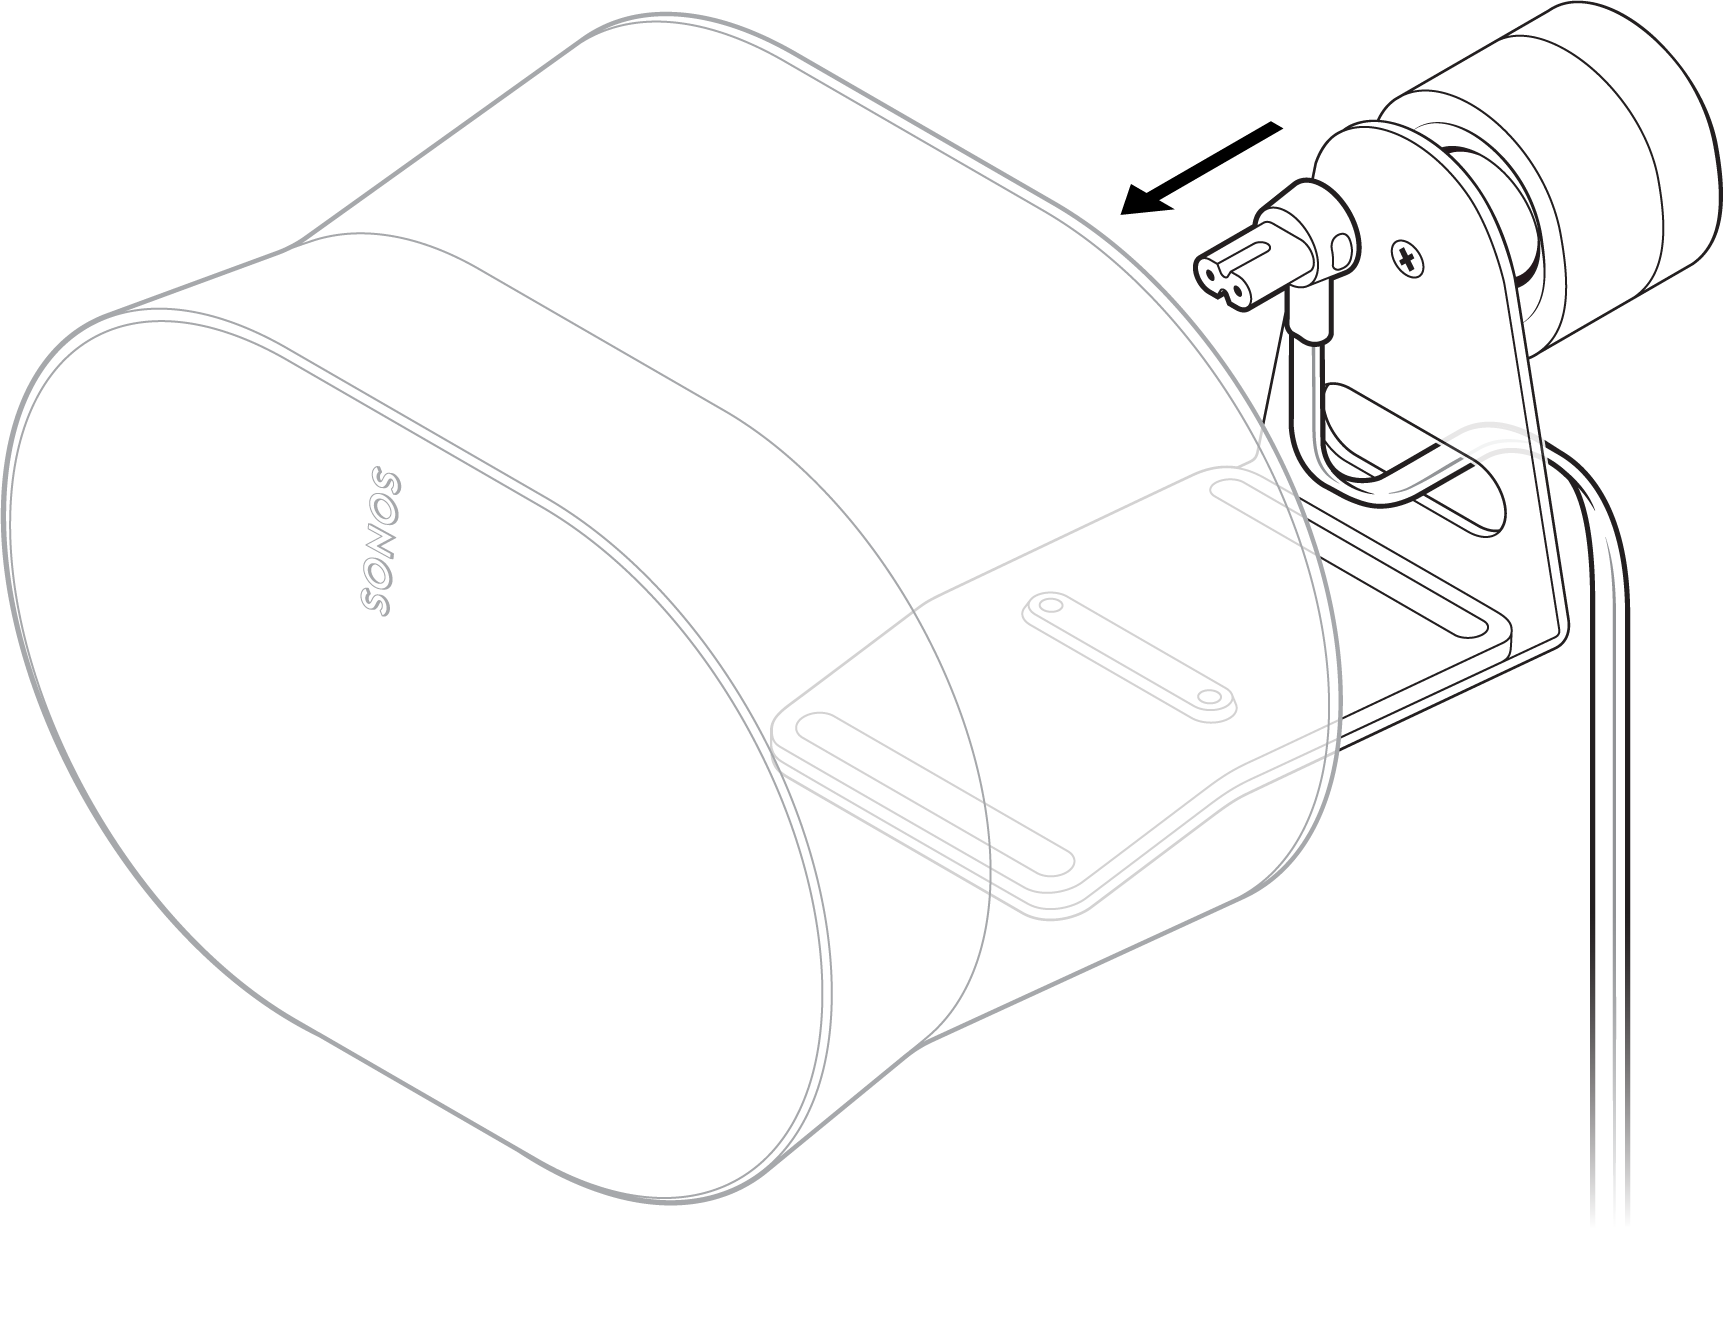 |
4 | Roter høyttaleren 180° slik at skruehullene vender opp. Fest høyttalerplattformen til høyttaleren med 2 korte høyttalerfesteskruer (følger med). | 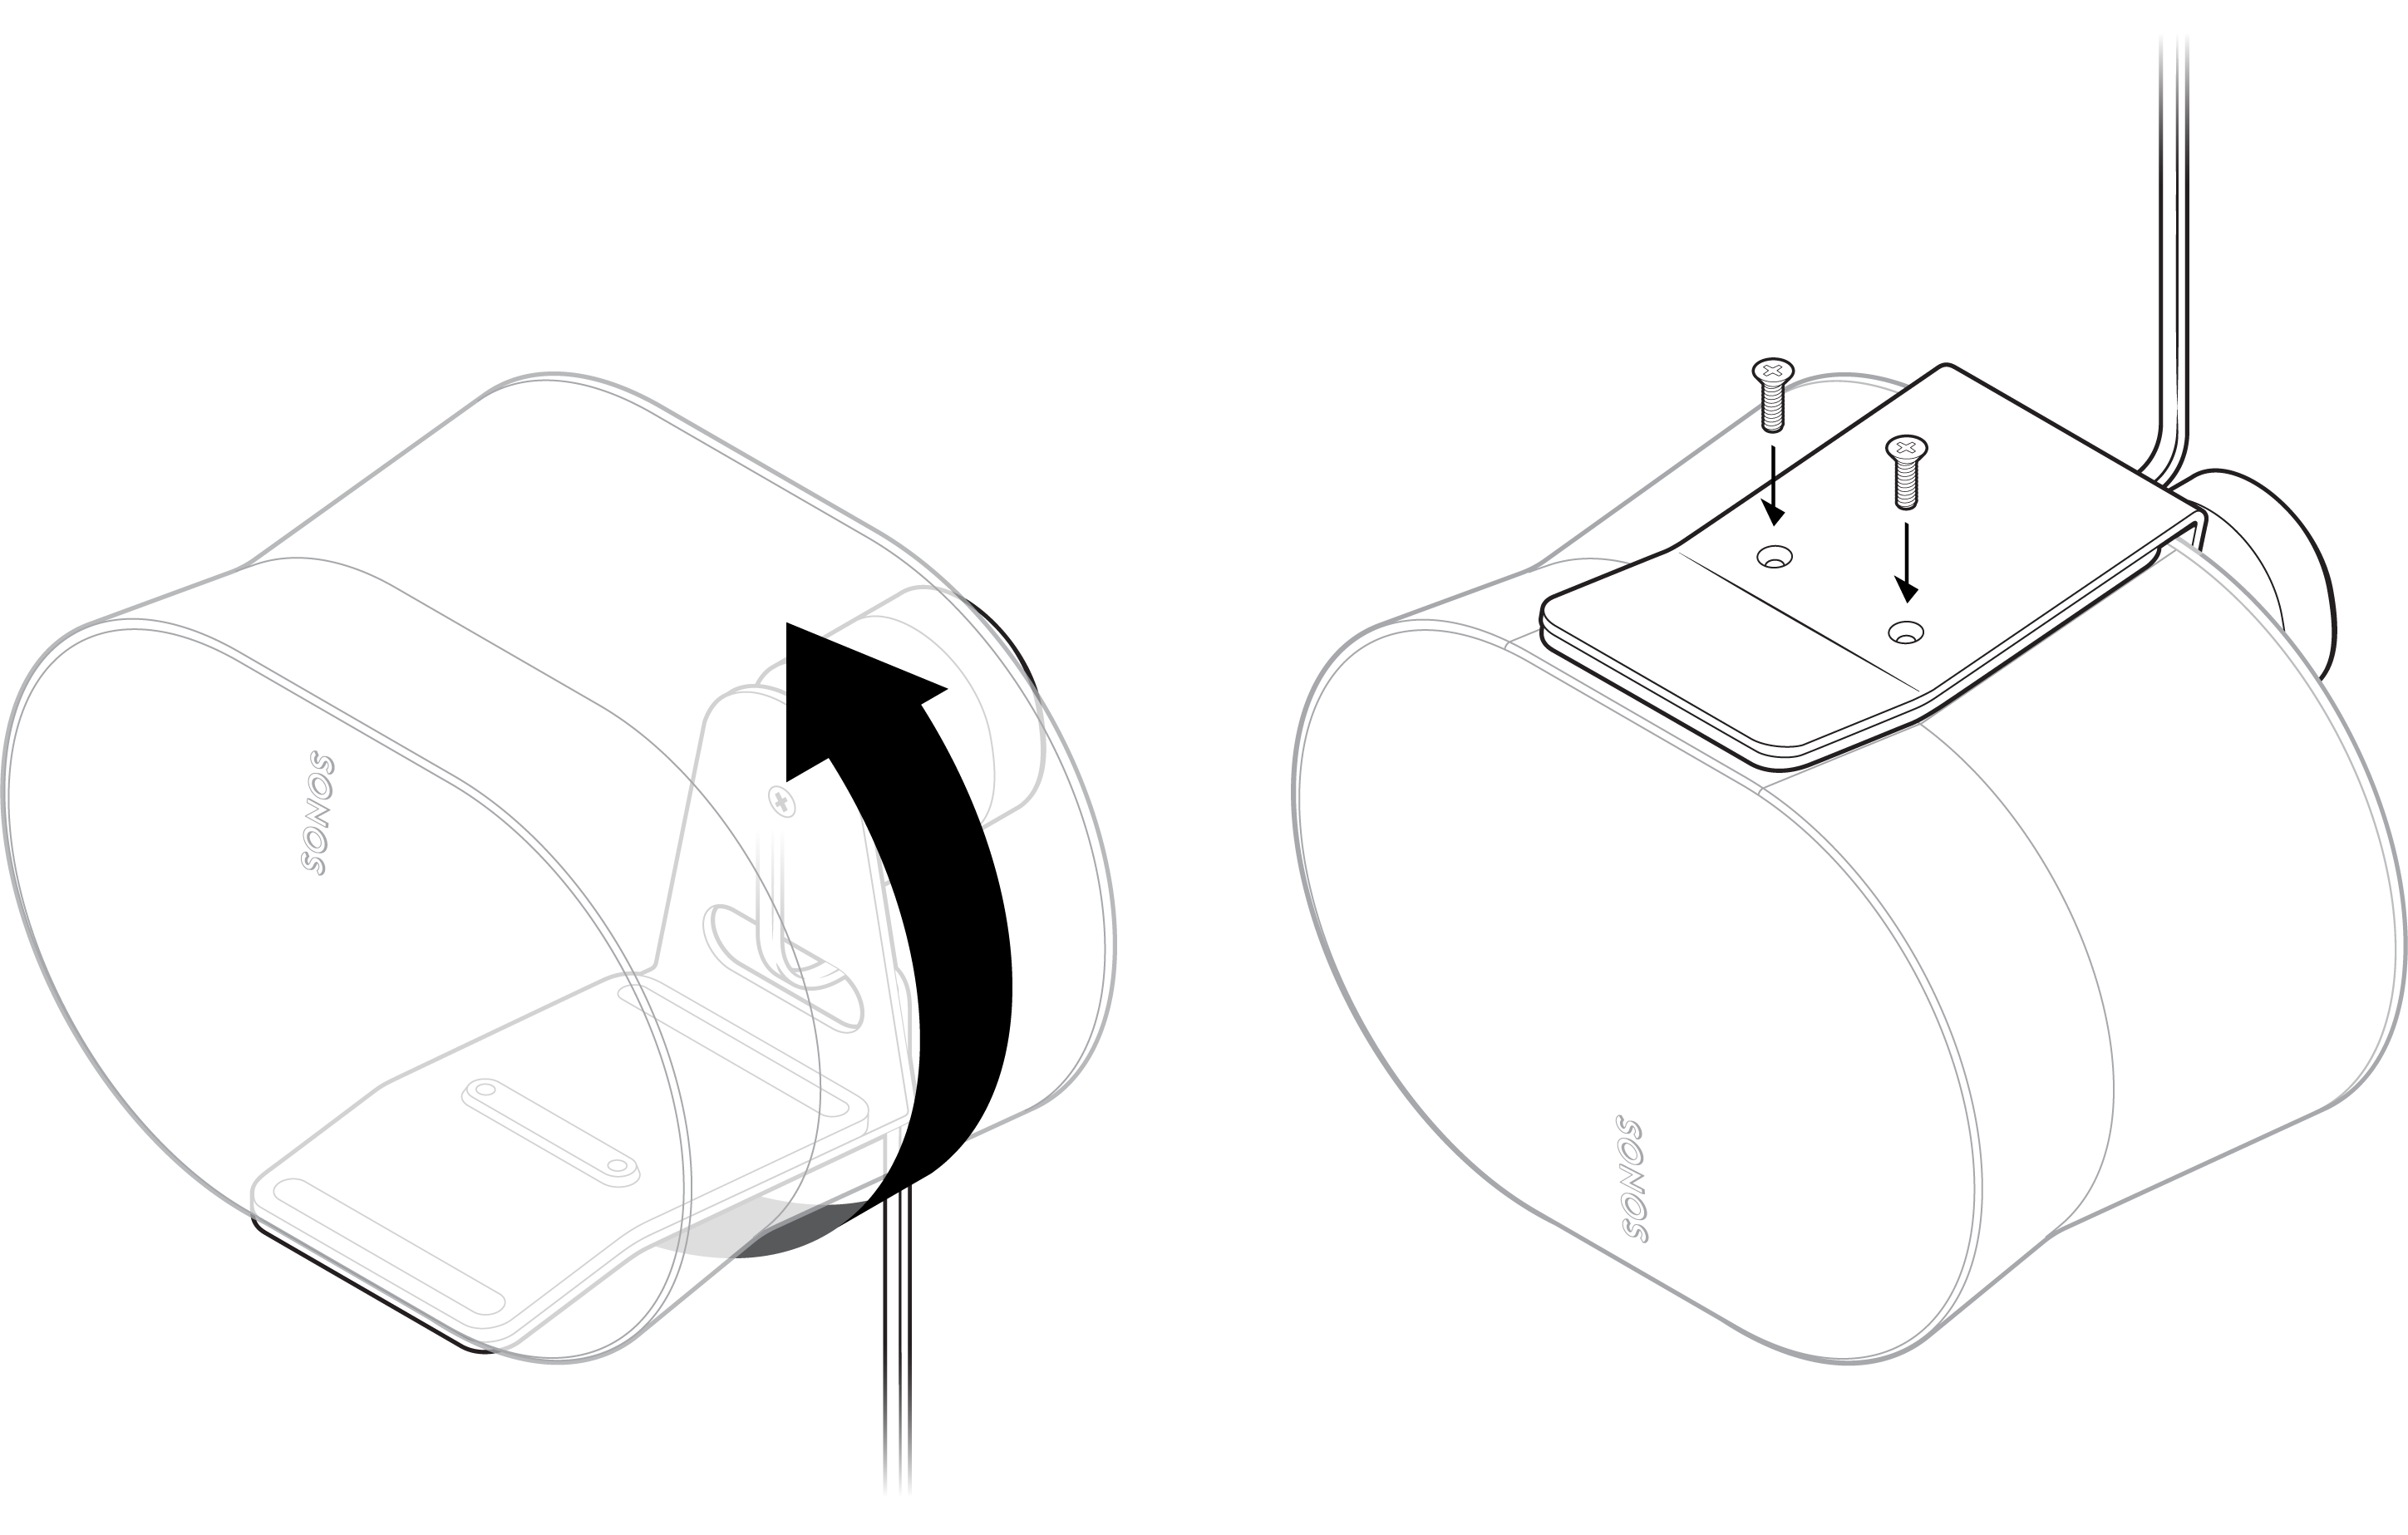 |
5 | Juster festet med nøkkelhullet på braketten, skyv festet ned og lås det på plass. Sørg for at veggfestet og høyttaleren sitter godt før du fjerner hendene fra høyttaleren. | 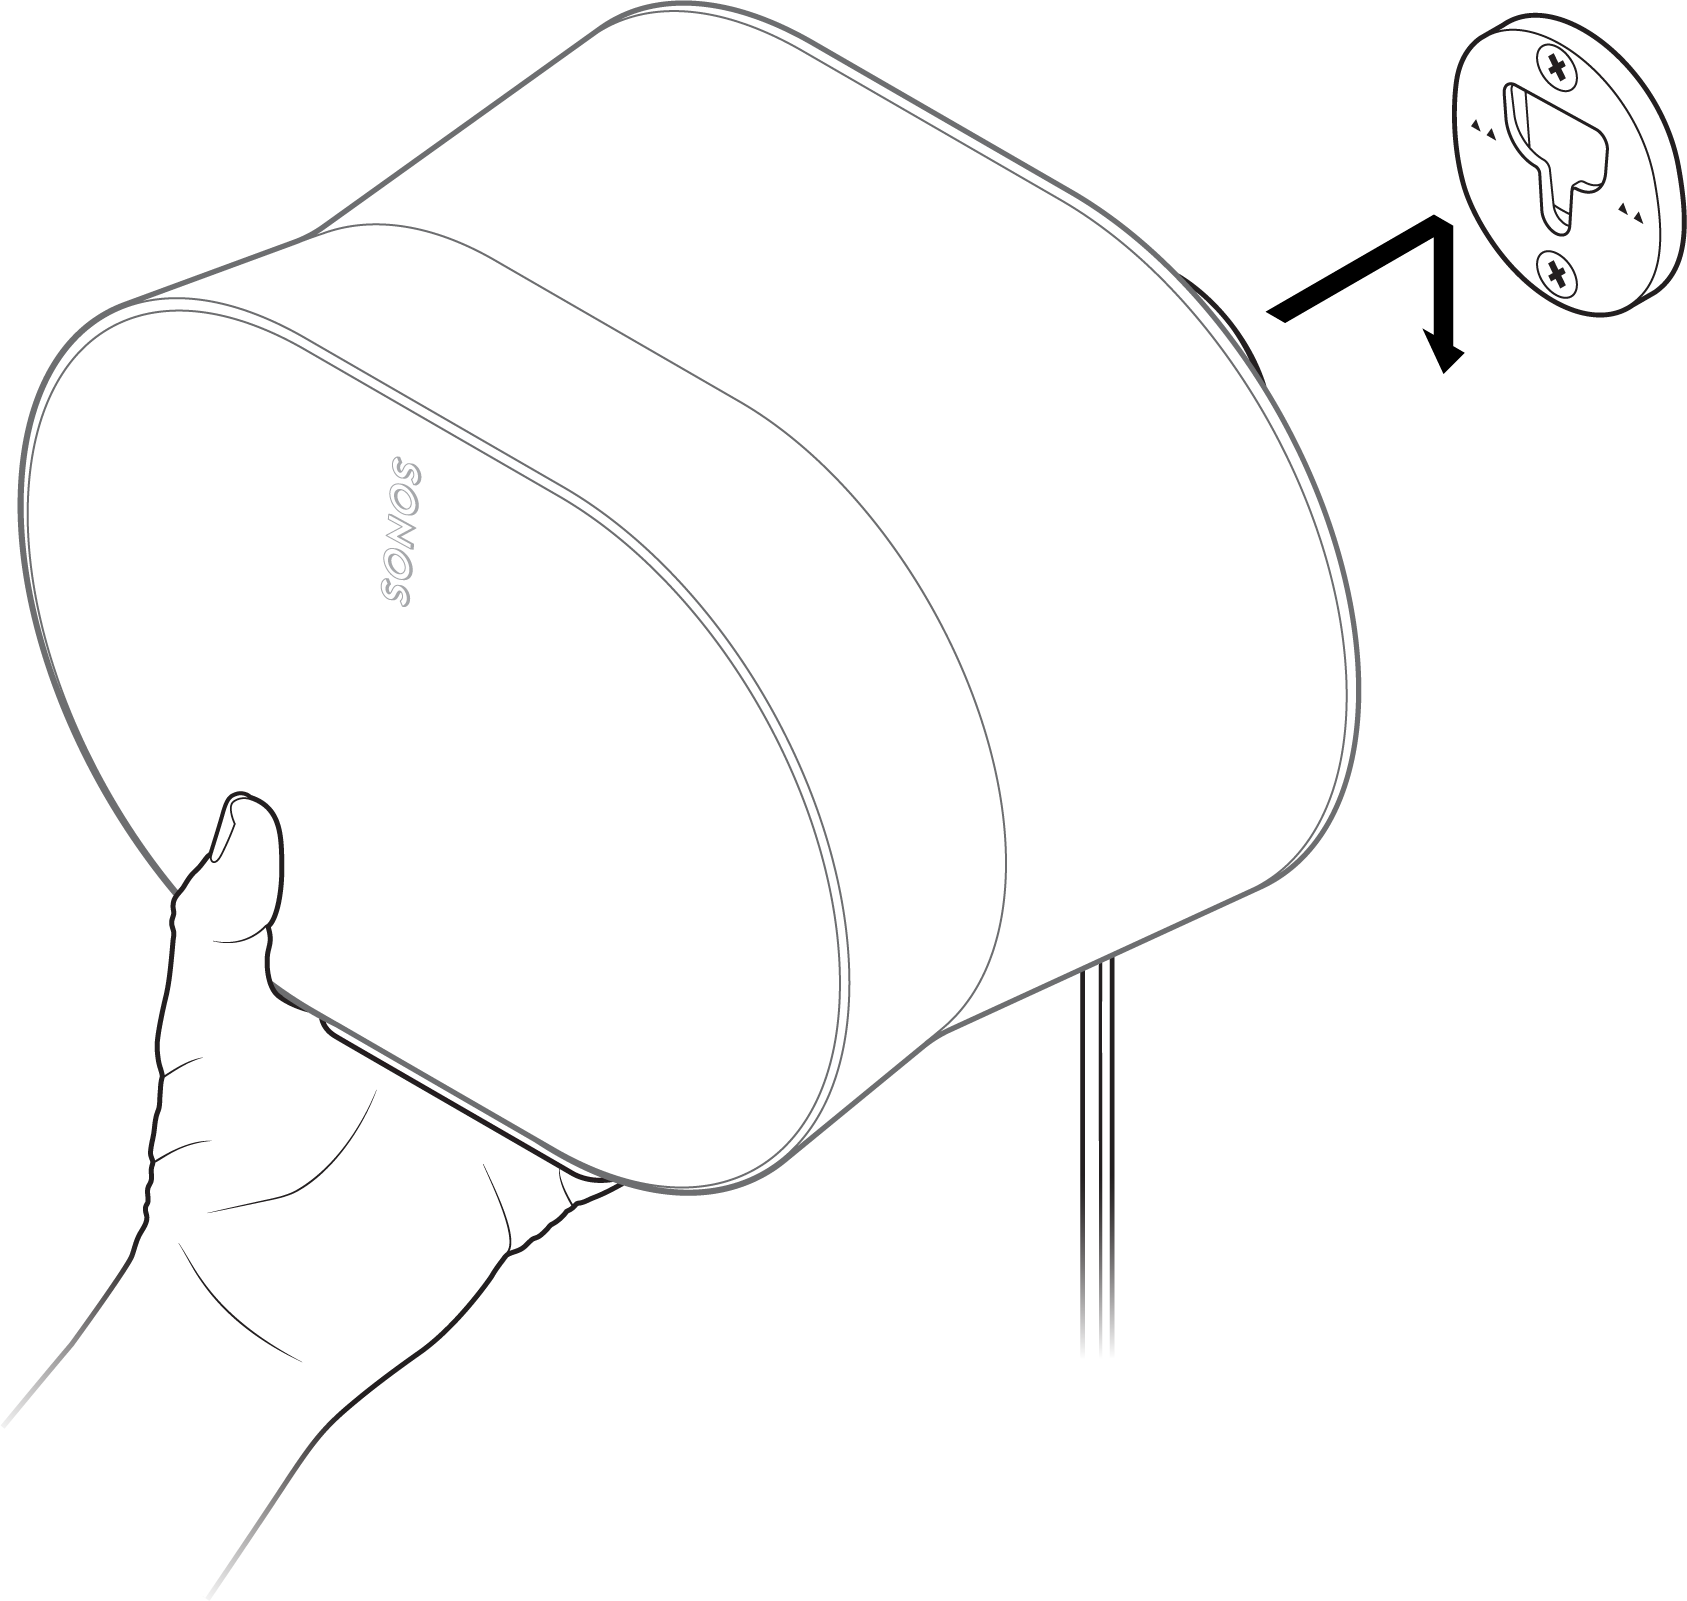 |
6 | For å justere for optimal lyd, lås opp høyttaleren ved å vri kragen på festet 90° mot klokken. Plasser høyttaleren på nytt, og vri deretter kragen 90° med klokken for å låse. | 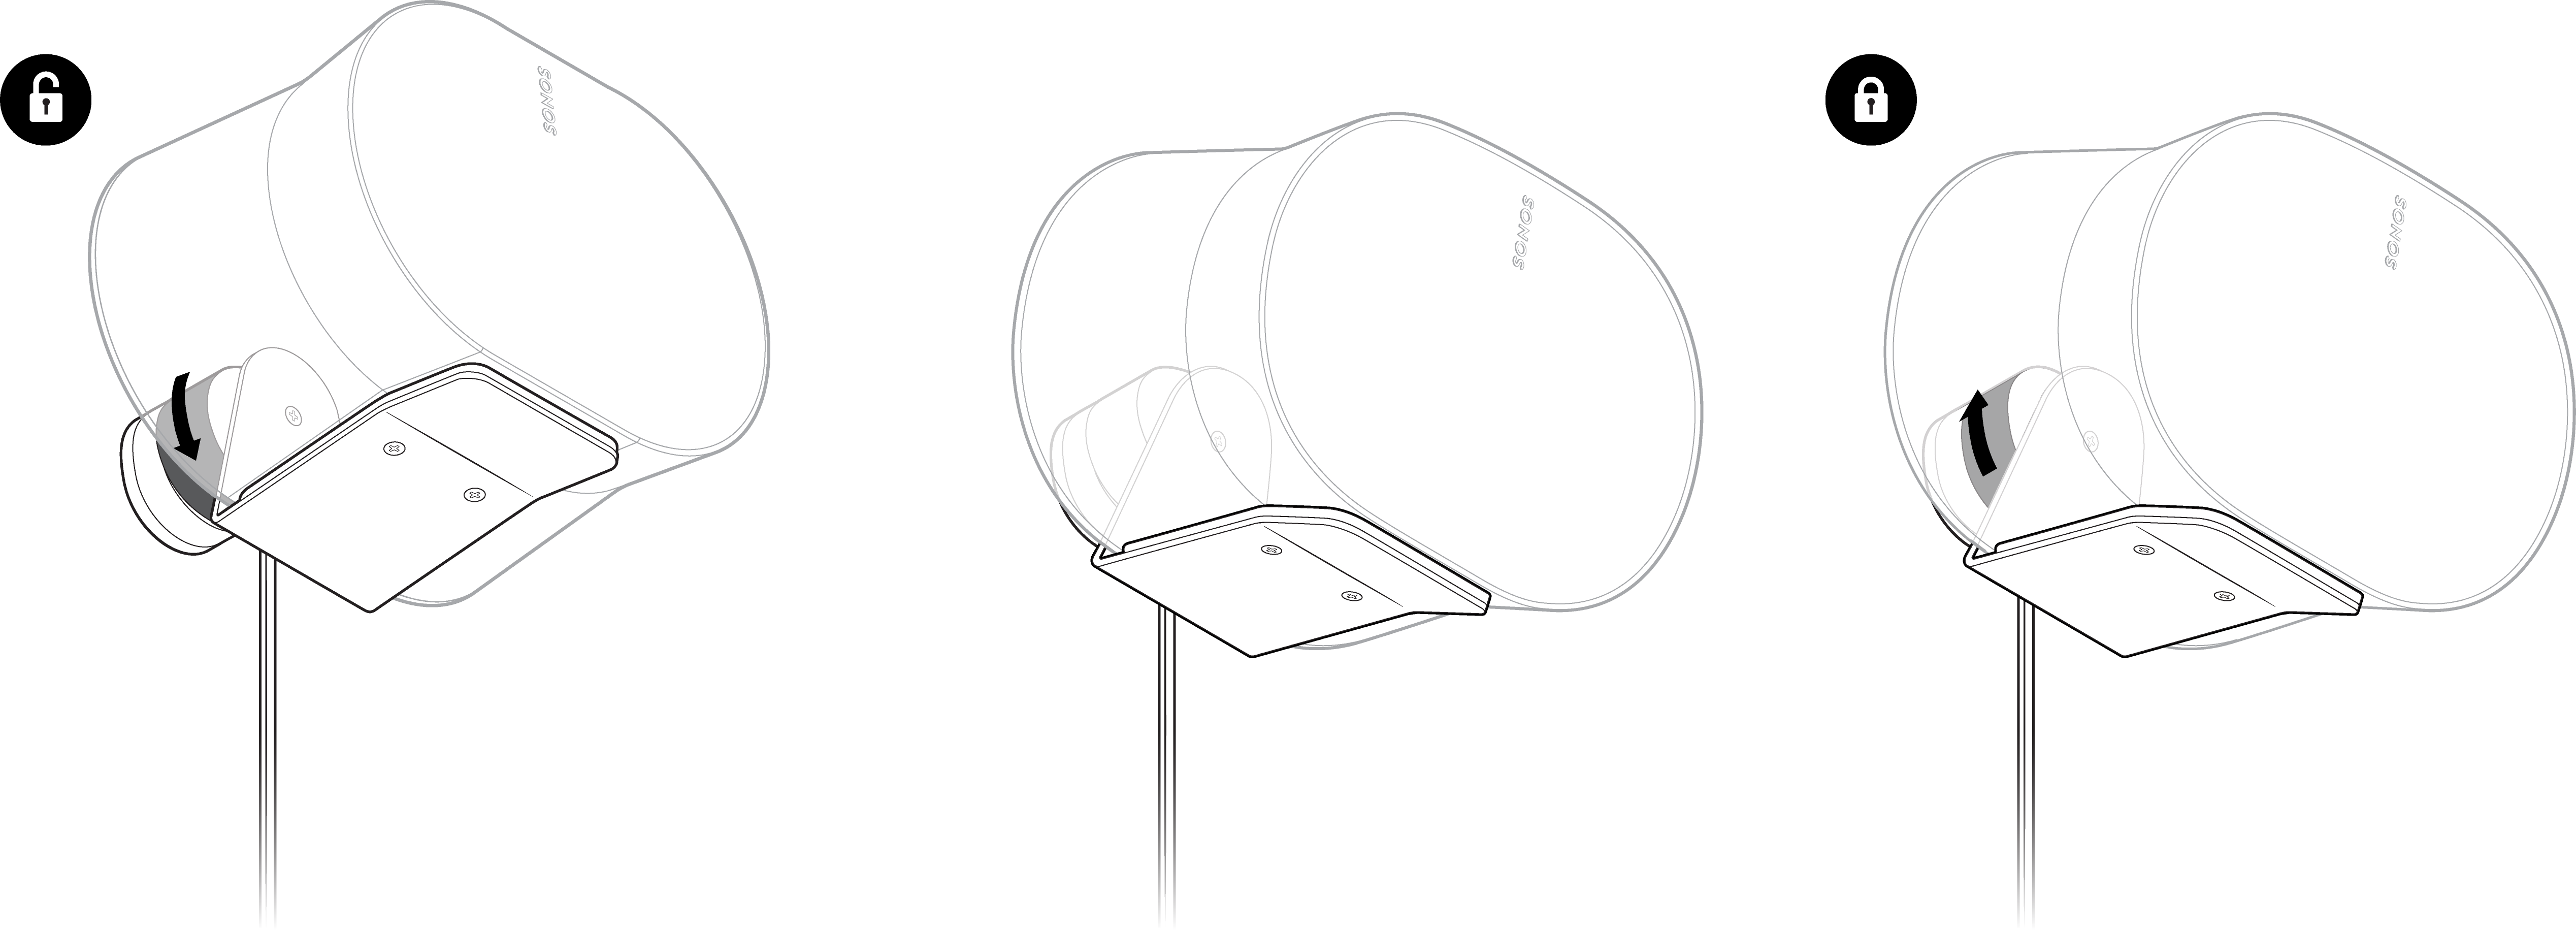 |
Monter opp-ned
1 | Finn en stender i veggen. Plasser braketten mot veggen og bruk et vater for å sikre at den er i vater, og merk av for skruehullene. Fjern braketten. | |
2 | Forbor pilothull i en stender med et 3,5 mm bor. Plasser braketten mot veggen med de små pilene pekende opp, og fest den til veggen med 2 lange veggbrakett-skruer (inkludert) og en drill eller en stjerneskrutrekker. | |
3 | Fjern skruen fra monteringsenheten. Roter monteringen 180 grader slik at skruehullene vender opp, og fest deretter skruen til monteringsenheten igjen. | 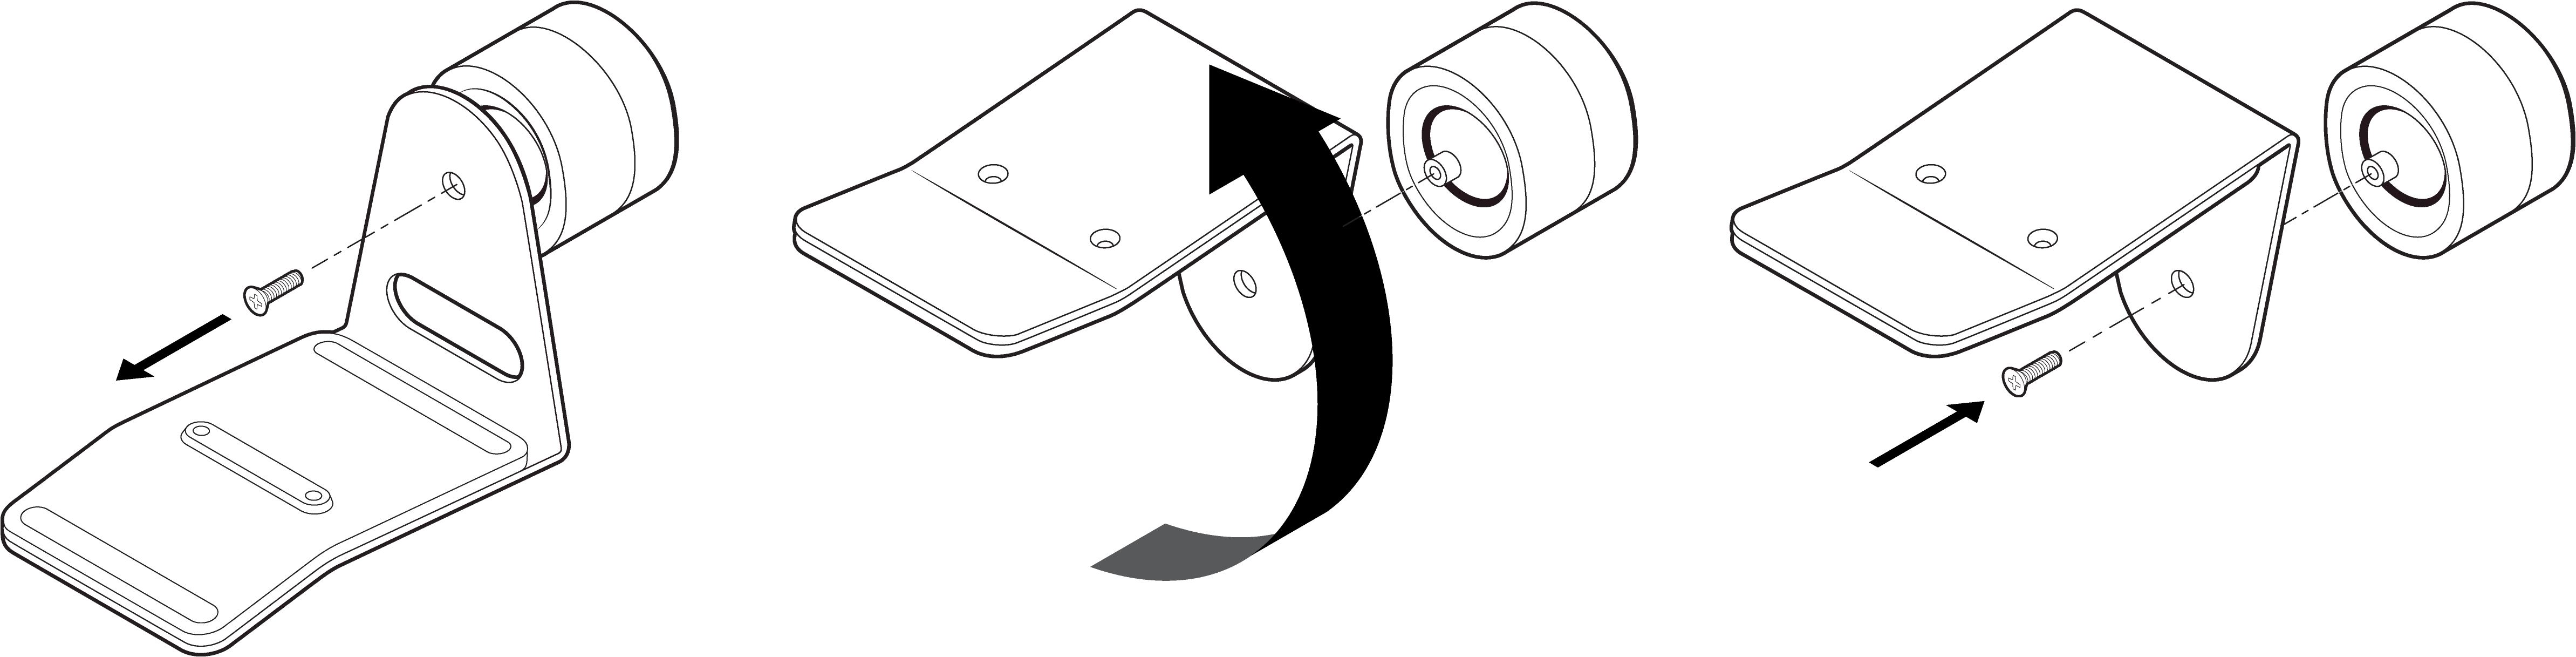 |
4 | Koble strømledningen til høyttaleren. Fest deretter høyttaleren til festet med de 2 korte høyttalerfesteskruene (følger med). | 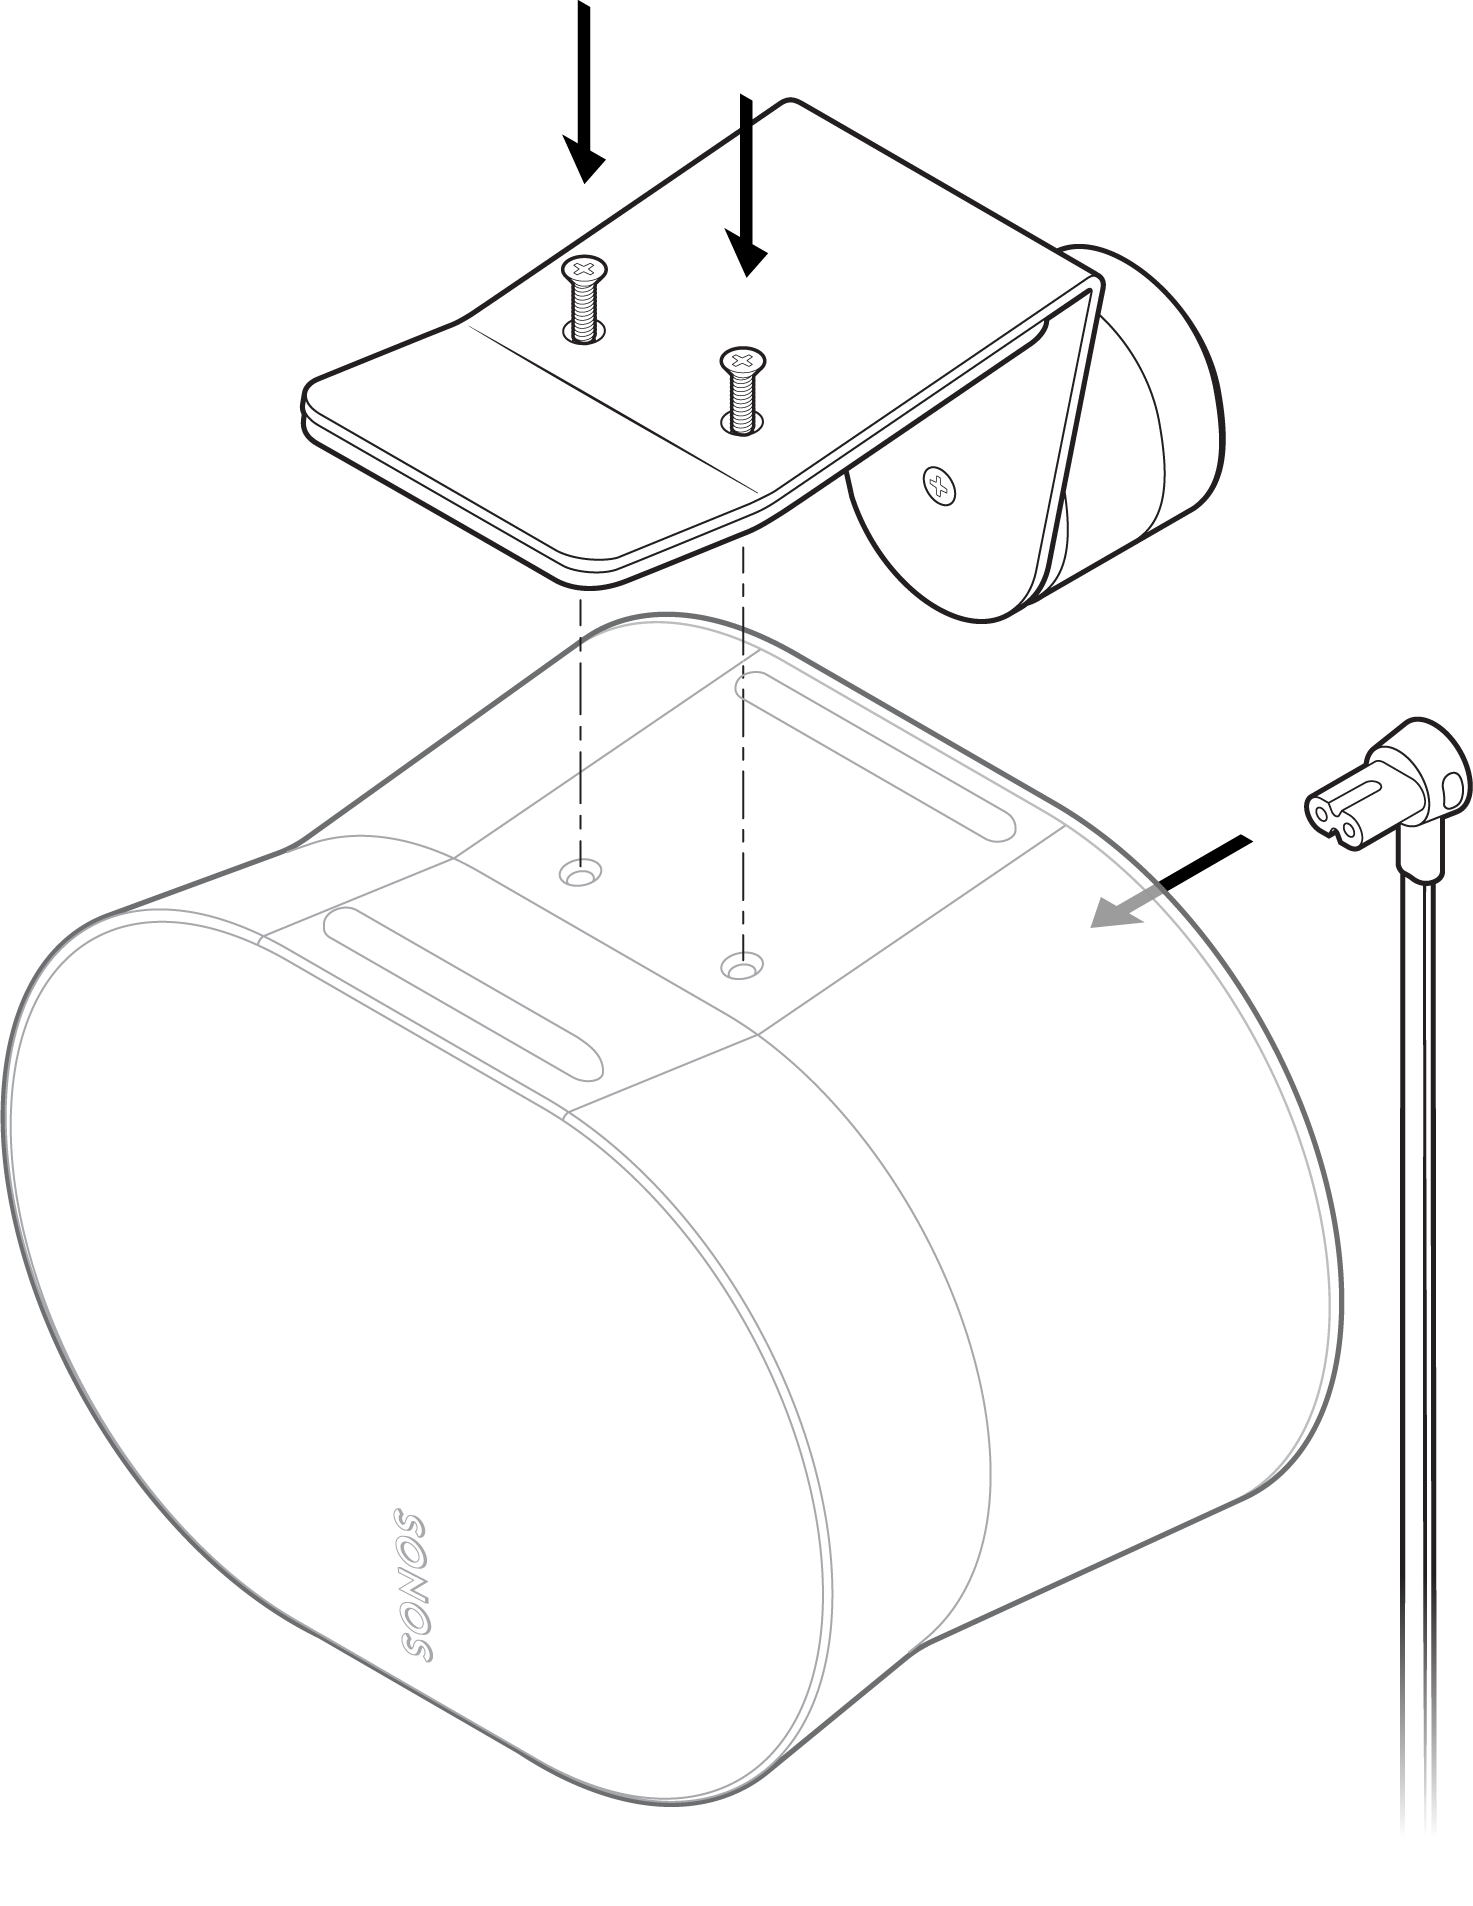 |
5 | Juster festet med nøkkelhullet på braketten, skyv festet ned og lås det på plass. Sørg for at veggfestet og høyttaleren sitter godt fast før du fjerner hendene fra høyttaleren. | 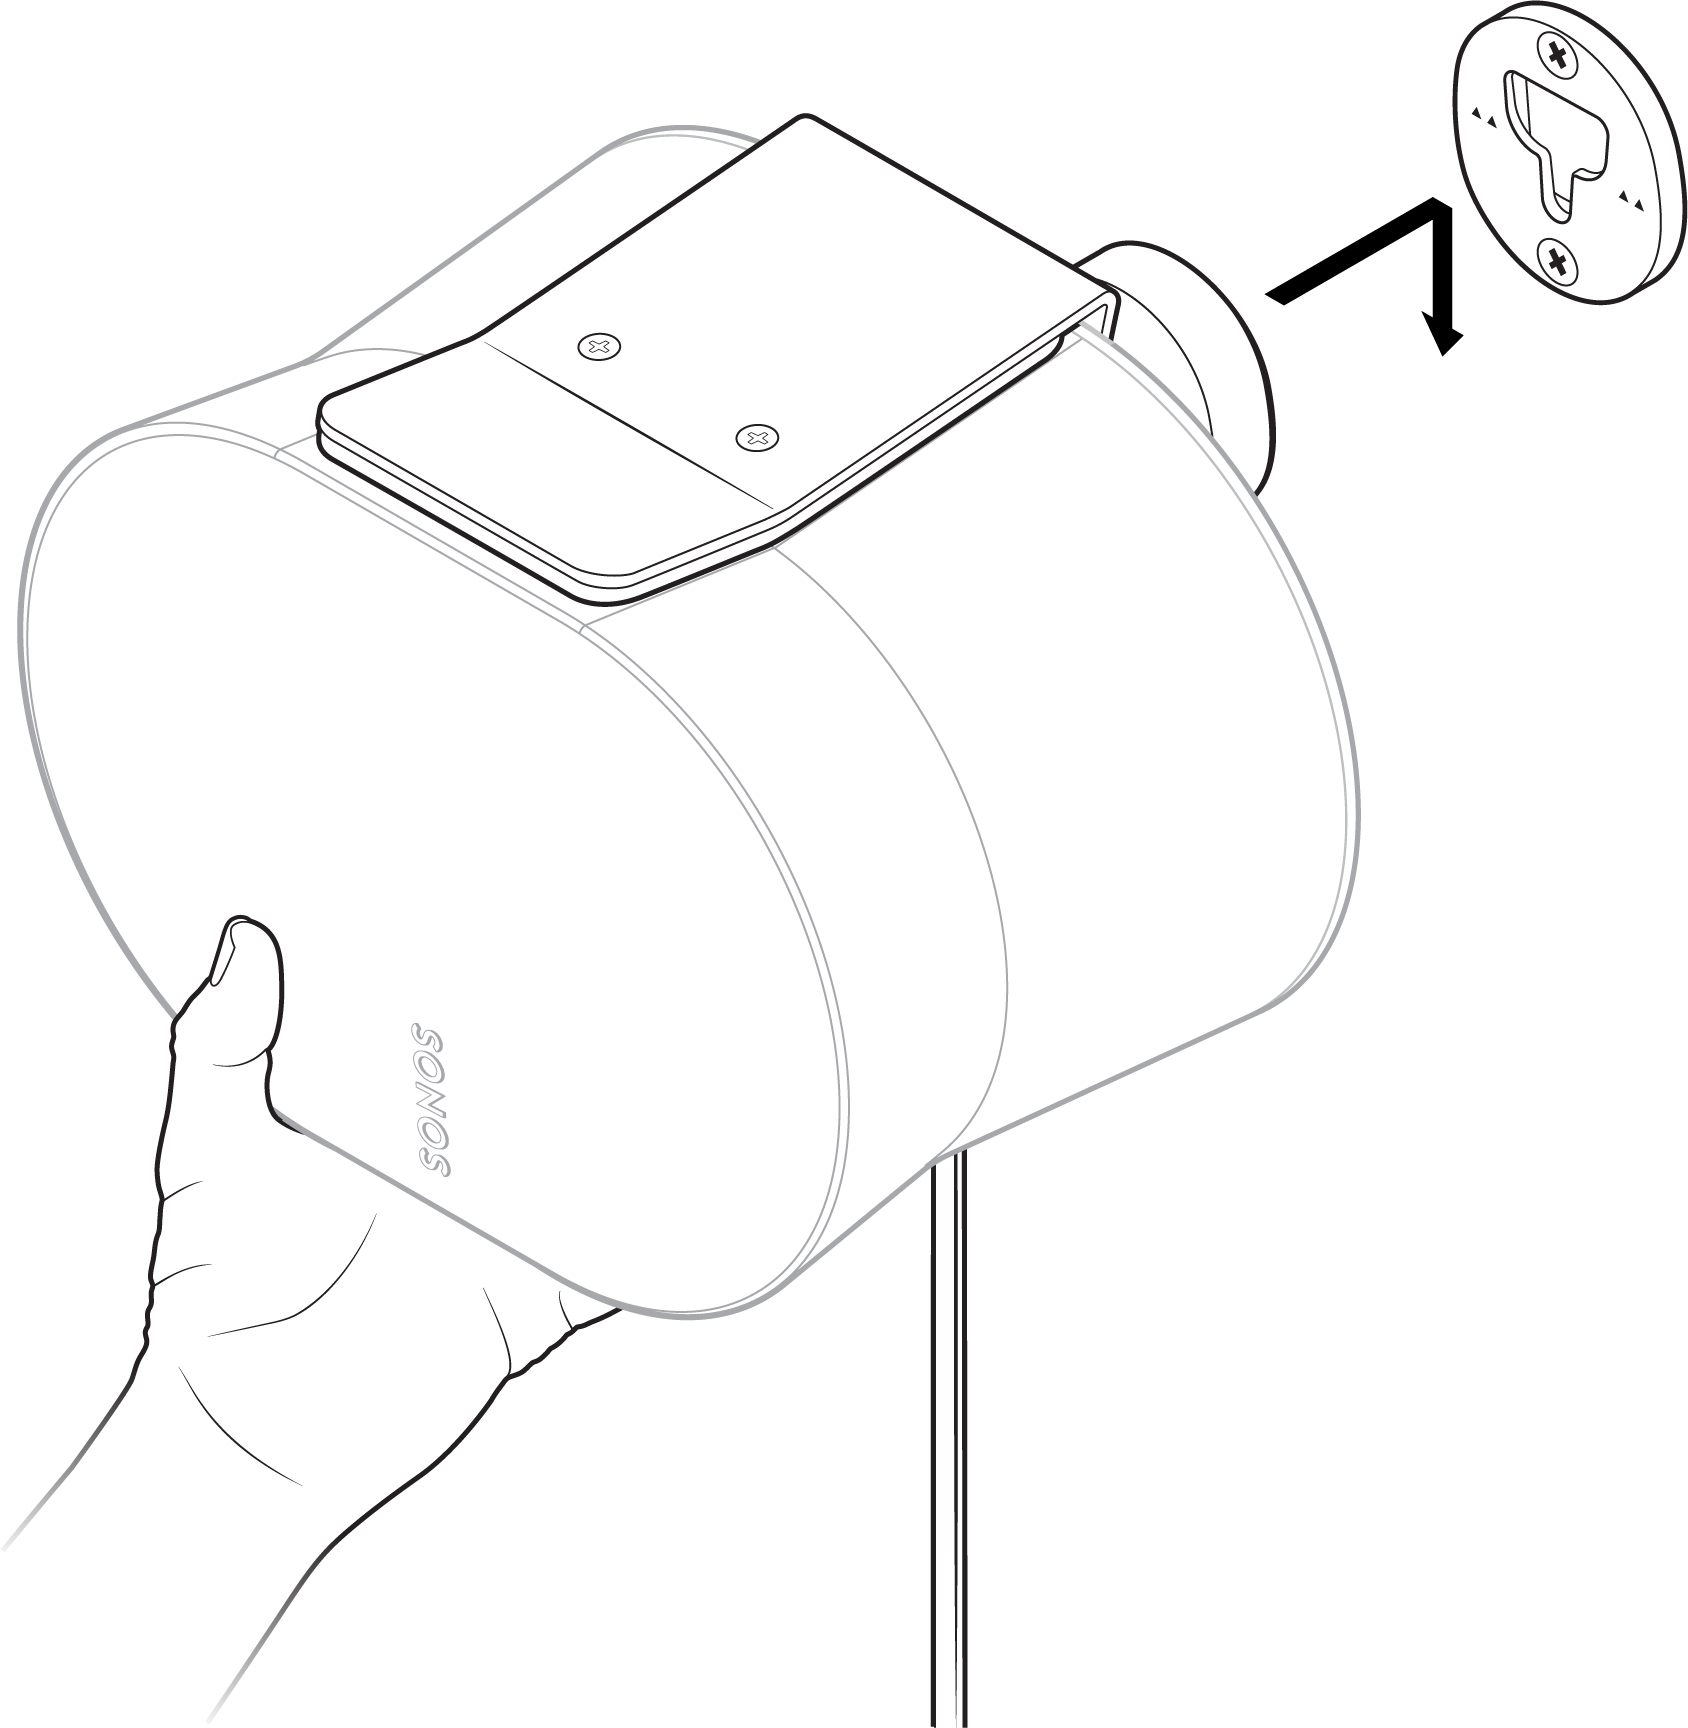 |
6 | For å justere for optimal lyd, lås opp høyttaleren ved å vri kragen på festet 90° mot klokken. Plasser høyttaleren på nytt, og vri deretter kragen 90° med klokken for å låse. | 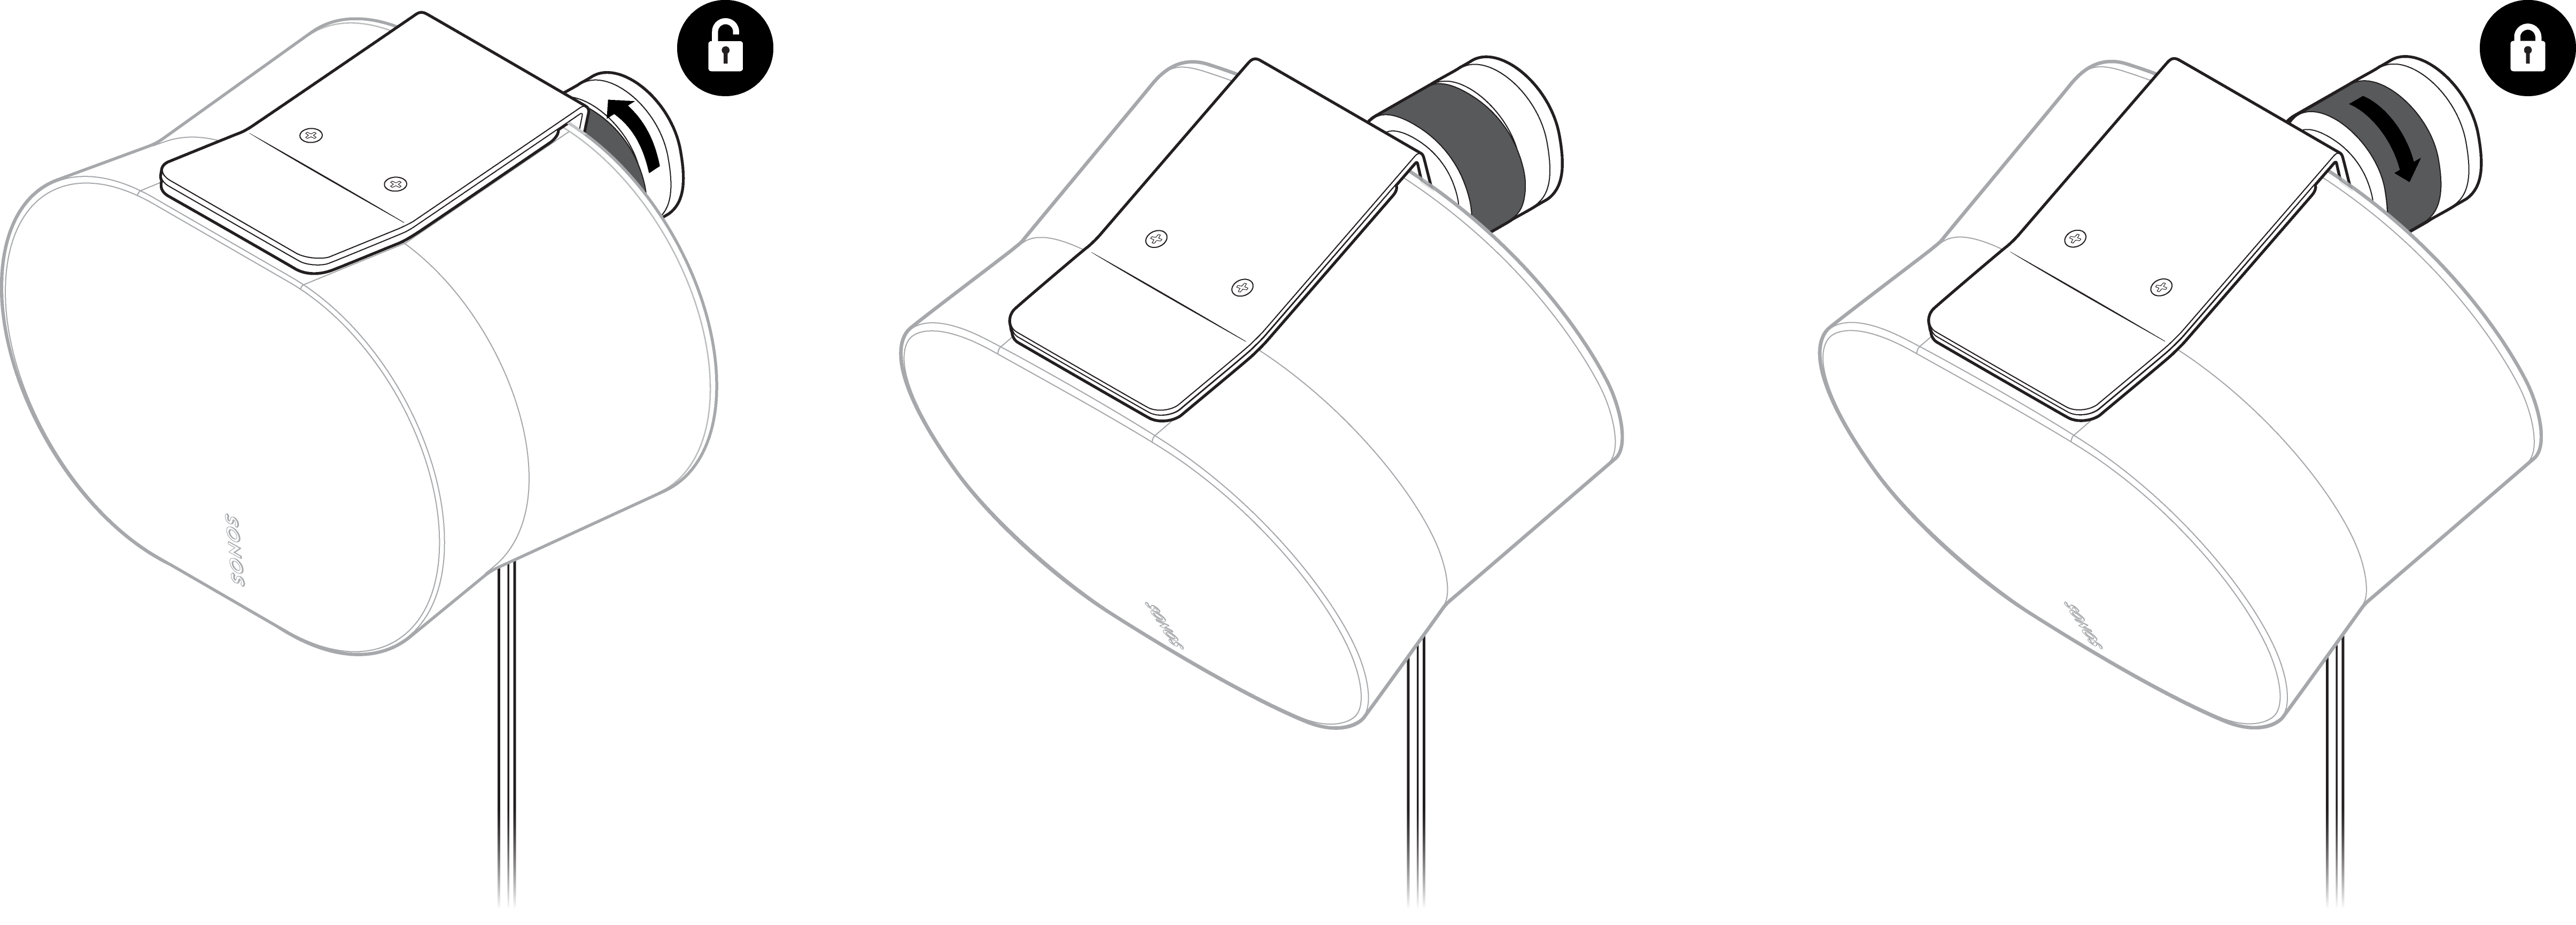 |
Spesifikasjoner
| Funksjon | Beskrivelse |
|---|---|
Audio | |
Forsterker | Seks digitale forsterkere av typen klasse D, presist justert for høyttalerens unike akustiske arkitektur. |
Diskanter | Fire diskanthøyttalere sørger for tro gjengivelse av høye og mellomstore frekvenser. Den fremovervendte mellomdiskanten gir et jevnt senterbilde, mens to sidevendte mellomdiskanter skaper stereoseparasjon. En oppovervendt diskant reflekterer lyden mot taket når du spiller av Dolby Atmos-innhold. |
Basshøyttalere | To basselementer maksimerer bassgjengivelsen og er vinklet mot venstre og høyre for å støtte stereolytting. |
Mikrofoner |
|
Justerbar EQ | Bruk Sonos-appen til å justere bass, diskant og lydstyrke. |
Trueplay™ | Denne programvaren måler akustikken i rommet og finjusterer deretter EQ-en. Kompatibel med iOS- og Android-enheter. (Mikrofonbryteren må være på.) |
Stereopar | Gjør to høyttalere om til separate venstre og høyre kanaler for å skape bredere og dypere lyd. |
Dolby Atmos® | Romtilpassede lydteknologier, som Dolby Atmos, gjør det mulig for skapere å plassere individuelle lyder rundt deg i 3D-rom for en mer oppslukende og realistisk lytteopplevelse. |
Hjemmekino | Legg til to Era 300-høyttalere som surroundhøyttalere for en oppslukende surroundlydopplevelse. |
Strøm / tilkobling | |
WiFi | Bruker Sonos S2: Kobles til WiFi med en hvilken som helst 802.11a/b/g/n/ac/ax 2,4/5 GHz ruter som kan sende ut trådløst nettverk. |
Bluetooth | Bluetooth 5.3 støtter lydstrømming fra alle enheter med Bluetooth. Trykk på Bluetooth-knappen for å pare med en Bluetooth-enhet. |
Strømforsyning | Automatisk veksling 100–240 V AC, ~ 50/60 Hz 2,3 A universalinngang. |
USB-C-port | Én USB-C-port.
|
CPU | Firekjerners |
Minne | 2 GB DDR4 |
Sonos S2 | Konfigurer og styr Era 300 med den nyeste generasjonen av Sonos-appen. |
Linje-inngang | Med en Sonos Line-In Adapter kan du koble til enhetene dine via en 3,5 mm lydinngang (adapter selges separat). |
Apple AirPlay 2 | Fungerer med AirPlay 2 på Apple-enheter med iOS 11.4 eller nyere. |
Stemmestyring |
|
Detaljer / fysiske mål | |
Mål (H x B x D) | 160 x 260 x 185 mm |
Vekt | 4,42 kg |
Driftstemperatur | 0° til 40°C |
Oppbevaringstemperatur | -20° til 70° C |
Farger / finish |
|
Pakkens innhold |
|
Merk: Spesifikasjoner kan endres uten forvarsel.
Viktig sikkerhetsinformasjon
- Les disse instruksjonene.
- Ta vare på disse instruksjonene.
- Følg alle advarsler.
- Følg alle instruksjoner.
- Ikke bruk dette apparatet i nærheten av vann.
- Rengjør kun med en tørr, myk klut. Rengjøringsmidler eller løsemidler til husholdning kan skade finishen på Sonos-produktene dine.
- Ikke blokker noen ventilasjonsåpninger. Installer i henhold til produsentens instruksjoner.
- Ikke installer i nærheten av varmekilder som radiatorer, varmeovner, komfyrer eller annet utstyr som produserer varme.
- Beskytt strømkabelen mot å bli tråkket på eller klemt, spesielt ved støpsler, stikkontakter og der kabelen går ut fra enheten.
- Bruk kun tilbehør/utstyr som er spesifisert av produsenten.
- Trekk ut støpselet til dette apparatet under tordenvær eller når det ikke skal brukes over lengre tid.
- Dette produktet har ingen deler som kan repareres av brukeren. Ikke åpne, demonter eller forsøk å reparere det eller bytte ut noen komponenter. Overlat all service til kvalifisert servicepersonell fra Sonos. Service er nødvendig hvis apparatet er skadet på noen måte, for eksempel hvis strømkabel eller støpsel er skadet, væske har blitt sølt eller gjenstander har falt ned i apparatet, apparatet har vært utsatt for regn eller fuktighet, ikke fungerer som normalt, eller har blitt mistet i gulvet.
- Strømpluggen skal være lett tilgjengelig for å koble fra utstyret.
- Advarsel: For å redusere risikoen for brann eller elektrisk støt, må ikke dette apparatet utsettes for regn eller fuktighet.
- Ikke utsett apparatet for drypp eller sprut, og ikke plasser gjenstander fylt med væske, som vaser, på apparatet.
- Tilkoblinger mellom denne enheten og eksternt utstyr må gjøres med en skjermet kabel for å opprettholde overholdelse av FCCs grenseverdier for radiofrekvensutslipp.