One SL


Overview
Overview
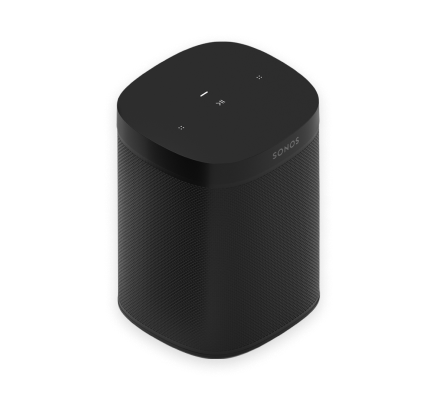
The essential speaker for music lovers—
- Perfect fit for shelves, counters, and snug spaces or mounted to a wall, ceiling, or speaker stand.
- Touch controls on the speaker let you adjust volume, play and pause, or skip through songs.
- Pair two Sonos One SLs for left-right stereo sound, or use two Sonos One SLs as rear surrounds for your home theater.
- Control your Sonos system with the Sonos S2 (for Android and iOS).
- See Setup when you’re ready to add a Sonos One SL to your system.
Controls and lights
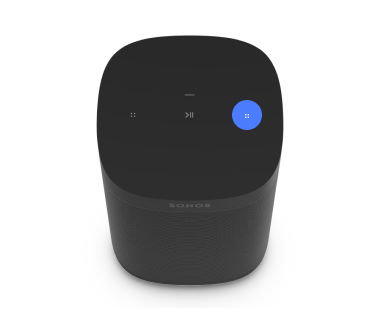 | Volume control |
Press and hold to quickly change the volume. Note: You can also use the Sonos app to adjust volume. |
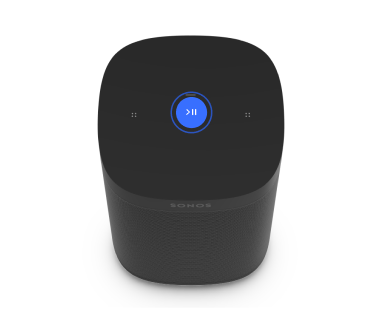 | Play/Pause |
|
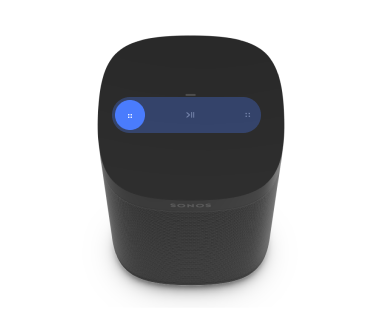 | Next/Previous |
Note: You can’t skip forward or go back when listening to a radio station. |
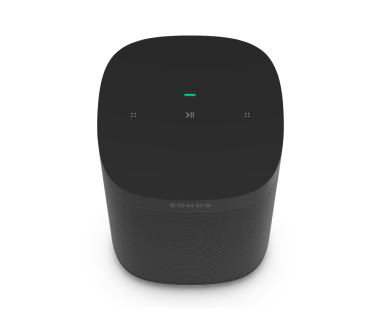 | Status light | Displays the product's connection to WiFi, indicates when the volume is muted, and signals errors. Learn more |
Note: If you don’t want to allow playback or volume adjustments using the speaker touch controls, you can disable them in the room’s settings.
Connector panel
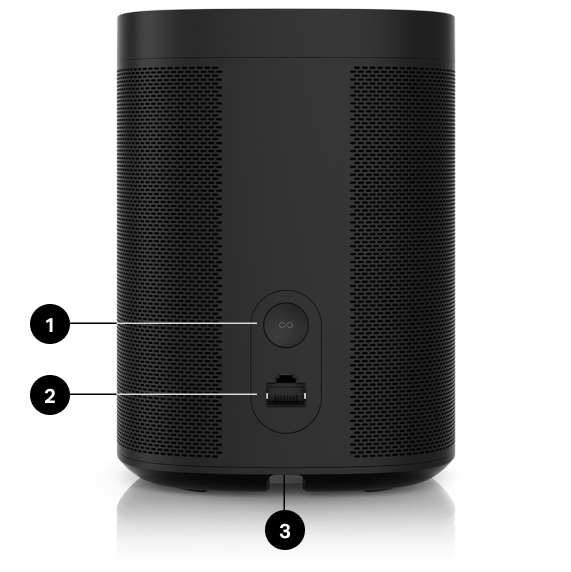
1 | Join button | Press to connect to your Sonos system during setup. |
2 | Ethernet port | Use an Ethernet cable if you want to connect to a router, computer, or network-attached storage (NAS) device (optional). |
3 | AC power (mains) input | Use only the supplied power cord (using a third-party power cord will void your warranty). Note: Insert the power cord firmly until it is flush with the bottom of the speaker. |
Select a location
You can put your speaker just about anywhere. For maximum performance, here's a few guidelines:
- Sonos One SL sounds great even when placed next to a wall or on a shelf. For best performance, leave at least 1" (2.5 cm) space around the back of the speaker.
- It’s humidity-resistant so you can use it in the bathroom.
- It’s not water-resistant so don’t put it near water or leave it in the rain.
Trueplay™
Trueplay tuning measures how sound reflects off walls, furnishings, and other surfaces in a room, then fine tunes your Sonos speaker to make sure it sounds great no matter where you place it.
During setup, choose the Trueplay option that works best for you and your space.
If you would like to retune late, follow these steps:
- Go to Settings
 .
. - Choose the product you would like to tune.
- Select Trueplay.
Set up stereo pair
Pair two Sonos speakers in the same room for an even wider, stereo experience. One speaker serves as the left channel and one serves as the right channel.
Note: The Sonos speakers in a stereo pair must be the same type.
- Place the speakers 8 to 10 feet apart. Your favorite listening position should be 8 to 12 feet from the paired speakers—less distance increases bass, more distance improves stereo imaging.
- Open the Sonos app, and go to Settings .
- Choose one of the products you want to use in the stereo pair.
- Select Set Up Stereo Pair to get started.
Set up surrounds
It’s easy to turn two Sonos speakers (same model), or a Sonos Amp and your favorite non-Sonos speakers, into separate right and left channels for your home theater.
- Place each surround speaker about 10 ft from your favorite listening position, angling them toward the seating area.
- Go to Settings .
- Select a room with a soundbar and choose Add Surrounds to get started.
Note: If you group the rooms or create a stereo pair instead, you won't have surround sound.
Surround audio settings
During setup, surround sound is optimized for your room. These settings are adjustable:
Surrounds | Turn surround sound On or Off. |
TV Level | Adjust surround volume for TV audio. |
Music Level | Adjust surround volume for music. |
Music Playback | Ambient (subtle) or Full (louder, full range). Doesn't apply to Dolby Atmos Music playback. |
Product settings
You can customize Sonos products for your surroundings.
- Go to Settings .
- Select a product.
Room Name | If you move your speaker to a new room, you can change its name in Settings. |
Turn off WiFi (not available for Sonos Era 100, Era 300, or portable products) | You can turn off your speaker’s WiFi when it’s connected to your network with an Ethernet cable. This reduces power consumption and can improve connectivity for wired speakers.
Note: WiFi is turned off for Era 100 and Era 300 when you connect a Sonos Combo Adapter using the Ethernet cable. |
EQ | Sonos products ship with preset equalization settings. You can change the sound settings (bass, treble, or loudness) to suit your personal preferences. Learn more |
Trueplay | Trueplay adapts the sound for your surroundings and content. Portable products can tune themselves automatically. Learn more |
Volume Limit | You can set a maximum volume for each room. Learn more |
Status Light | Displays the speaker’s connection to WiFi, indicates when the volume is muted, and signals errors. Learn more Note: If the light is distracting, you can turn it off in Settings. |
Touch Controls | You can disable the touch control on your speaker. You may want to do this to prevent a child or curious pet from accidentally adjusting playback or volume. Learn more |
Battery Saver (portable products only) | To save battery life, you can set your portable speaker to power off automatically instead of going to sleep. It won't appear in the Sonos app until it’s powered back on. |
Line-In (Sonos products with line-in capability) | When a projector, turntable, stereo, or other audio device is connected to a Sonos product, you can adjust these line-in settings:
|
Zones
Setting up zones helps you fill large spaces with sound. A zone is a new semi-permanent configuration for multiple speakers throughout a system. Zones can be a single room, half of a room, or even multiple rooms in a home or building. Currently, these products can be added to a zone in the Sonos app: Amp Multi, Era 100, Era 100 Pro, Era 100 SL, Five, One, and One SL. You can also add a sub to a zone that only contains a single Amp Multi.
Once a zone is created, all products added to it are controlled together as though they are a single item. This makes playing content to all the speakers in the same space easier, compared to giving them each a common name (e.g. Kitchen, Kitchen 2, Kitchen 3, etc.) and grouping them.
You can add a maximum of 16 products to a zone. Any number of outputs from a single amp counts as 1 product. A system can contain a maximum of 32 products or zones.
To ensure the best experience while using zones, we recommend setting up wired internet connections into each Sonos product. If using wireless connections (WiFi) instead, we recommend adding a maximum of 6 products per zone.
Use the output selector to temporarily group various zones and speakers together. When you ungroup, your zones will stay intact.
Set up a zone
Zones can be a single room, half of a room, or even multiple rooms.
- Go to Settings .
- Choose a compatible room, portable, or headphone (see the above list of compatible products).
- Select Products, and then select + Set Up Zone to get started.
Speakers remain in a zone until you Edit Zone or Separate Zone in Settings .
Manage, edit, and separate your zones
After a zone is created, you can change the speakers in a zone or remove a zone altogether.
- Go to Settings and select a zone.
- Under Products, select either Edit Zone to add or remove speakers in the zone or Separate Zone to disconnect all speakers in the zone.
Identify speakers in a zone
If you lose track of which speakers are in your zone, you can check them by going to System Settings, selecting the zone, and reviewing the product list. In the app, speakers in a zone have a speaker icon next to them within Settings. You can press that icon to have it play a short sound and flash its LEDs so you can identify its physical location.
Accessories
Find the perfect accessory for your Sonos system—tailored to perfectly fit your Sonos products.
For a full selection of Sonos-compatible stands, wall mounts, chargers and cables, see Accessories on our website.
Sonos One Stand
A set of custom-designed stands for Sonos One, One SL and Play:1 speakers provides an elegant solution for placing your home theater surrounds.
- Indentation in the stem hides the speaker’s power cable for simple cable management.
- Solid construction. The base has increased structural stability to eliminate wobbling, and bumpers secure your speakers in place.
- Perfect height for home theater surrounds.
- Dimensions (H x W x D): 32.98 x 11.81 x 11.81in. (837.8 x 300 x 300mm)
- Weight: 12.3lbs (5.58kg) for the pair; 6.15lbs (2.8kg) each
Note: For the full selection of Sonos-compatible stands, wall mounts, and cables, see Accessories on our website.
What's in the box?
The kit contains a pair of Sonos stands. Each stand assembly includes:
- Base
- Stem
- Speaker platform
- Speaker platform bottom cover
- Stem top cap
- Mounting kit with 4 screws (2 silver, 2 black)
Note: Sonos speakers sold separately.
What you'll need
- Phillips-head screwdriver
Set it up
1 | Take everything out of the box and place the base in the packaging slot to stabilize it for the next few steps. Unplug your Sonos speaker, and thread the speaker end of the power cord through the opening in the base. | 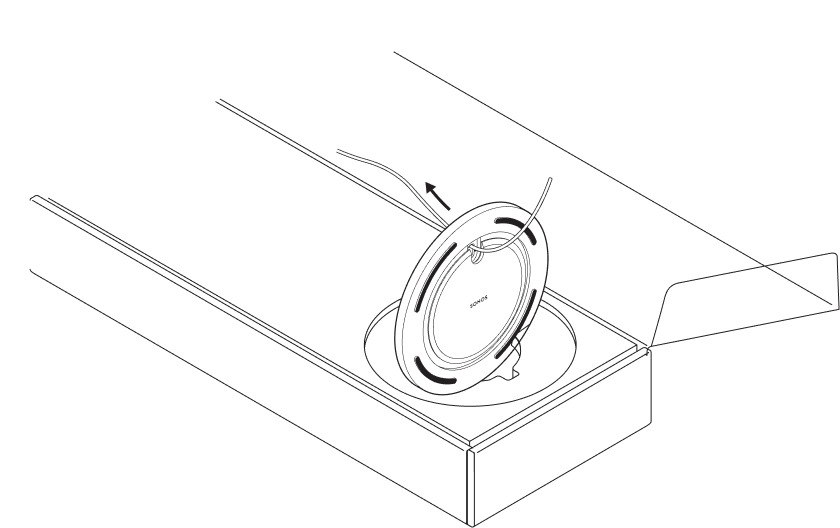 |
2 | Insert the stem snugly into the base, using the alignment pins to position the power cord channel either in the front or back. Use the 2 black screws and a Phillips-head screwdriver to attach the base. | 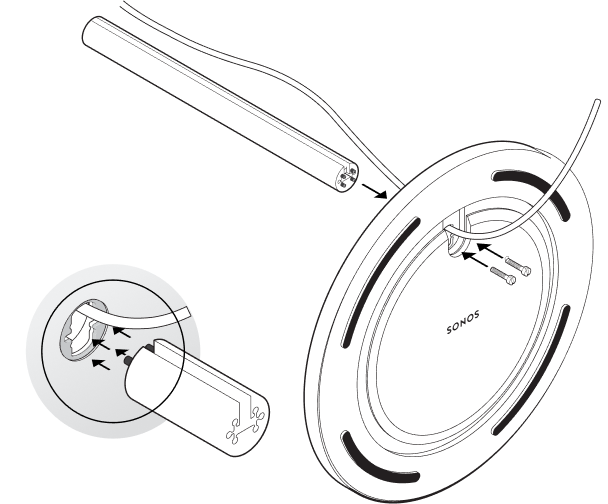 |
3 | Route the speaker’s power cord through the speaker platform. |  |
4 | Use the 2 silver screws to attach the speaker platform to the top of the stem, threading the power cable carefully. Snap the bottom plate on with the power cable channel in the back, and mount the platform on the stem. | 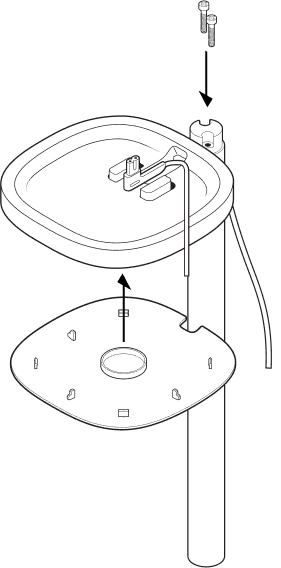 |
5 | Plug the power cord back into the speaker and place on the top mount, pulling any extra cable down from the top. Tighten the screws and attach the top cap with the notch facing toward the speaker. | 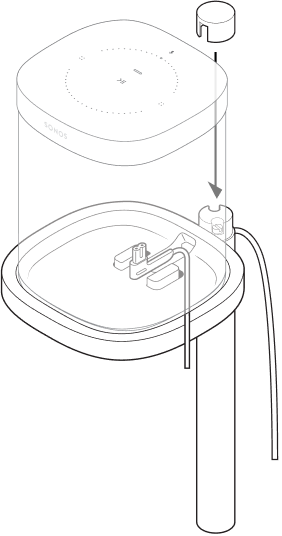 |
6 | Press the power cord into the stem, working from top to bottom. Pull the excess cable down from the base. | 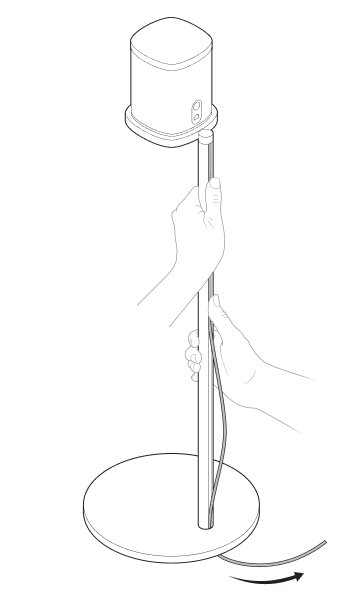 |
7 | Tilt the Stand forward slightly to wrap the excess cord around the bottom of the base. Plug the speaker’s power cable into the wall and enjoy the music! | 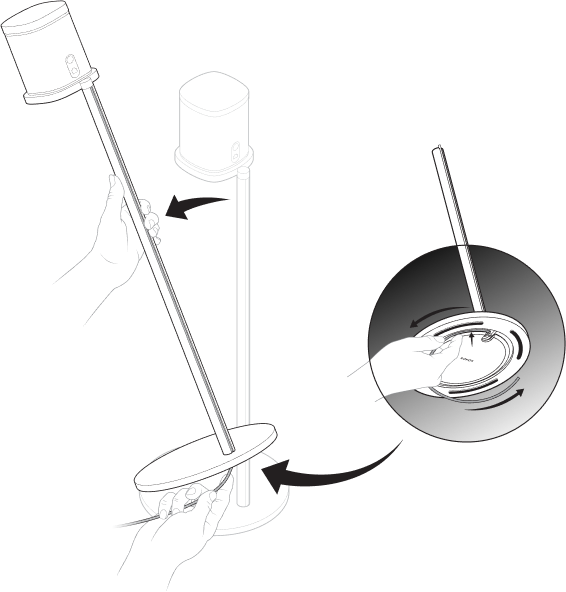 |
Sonos One Shelf
The easy-to-install shelf for Sonos One, One SL and Play:1 securely holds your speaker in place—its space-saving design provides a designated space for your speaker.
- Designed to support up to 8lbs (3.6kg).
- Dimensions (H x W x D): 0.89 x 10.23 x 6.29in.(22.7 x 260 x 160mm)
- Weight: 1lb (0.45kg)
Note: For the full selection of Sonos-compatible stands, wall mounts, and cables, see Accessories on our website.
What's in the box?
- Top shelf
- Wall bracket
- Bottom cover
- Mounting
Note: Sonos speakers sold separately.
What you'll need
- Pencil
- Phillips-head screwdriver
- Power drill (if needed for install)
| Wall material | Pre-drill | Use wall anchors | Use screws |
|---|---|---|---|
Wood stud | 1/8” / 3 mm bit | No | Yes |
Drywall (no stud) | 5/16” / 8 mm bit | Yes | Yes |
Hard wallboard or double board | 5/16” / 8 mm bit | Yes | Yes |
Plaster | 5/16” / 8 mm bit | Yes | Yes |
Concrete or brick | 5/16” / 8 mm bit | Yes | Yes |
Set it up
1 | Place the wall bracket against the wall and mark the screw holes. (Make sure the black bracket foam ring is face up.) | 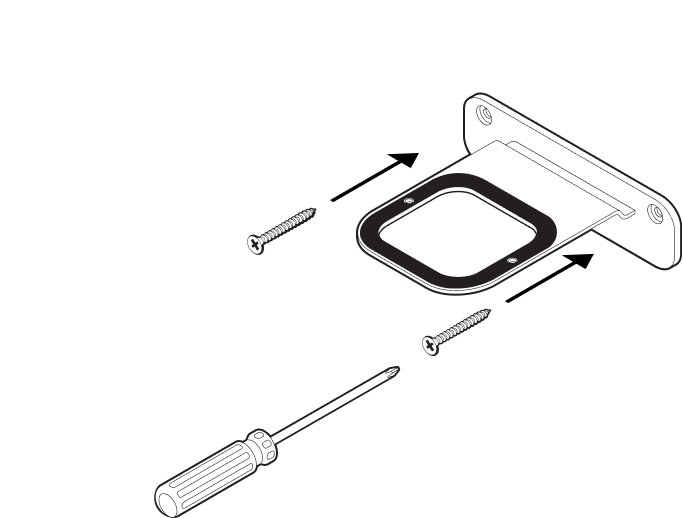 |
2 | If using wall anchors, use a 5/16" drill bit to drill 2 pilot holes and then insert the wall anchors. Refer to the wall mounting information below for guidelines. Otherwise skip this step. | 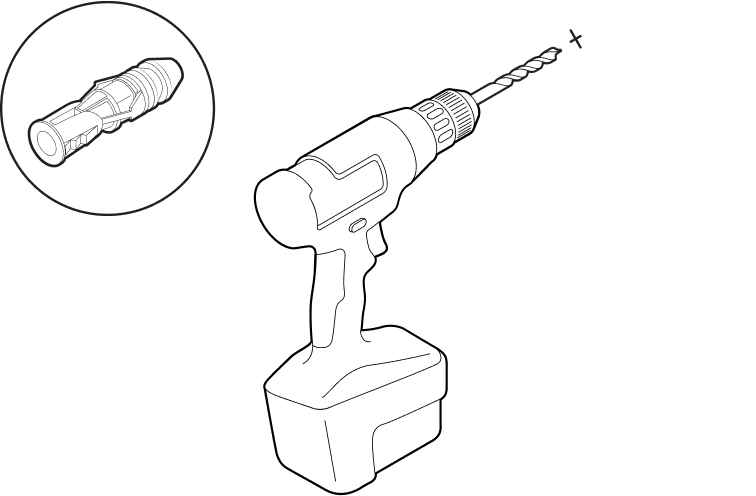 |
3 | Use a Phillips-head screwdriver or a power drill to screw the bracket to the wall. | 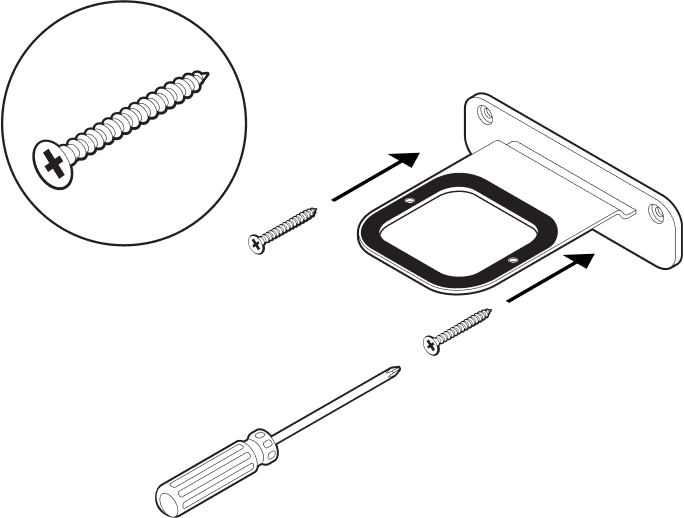 |
4 | Position the Shelf the way you want it (supports left or right speaker placement). Press the Shelf firmly on to the wall bracket until it snaps into place (both front and back). | 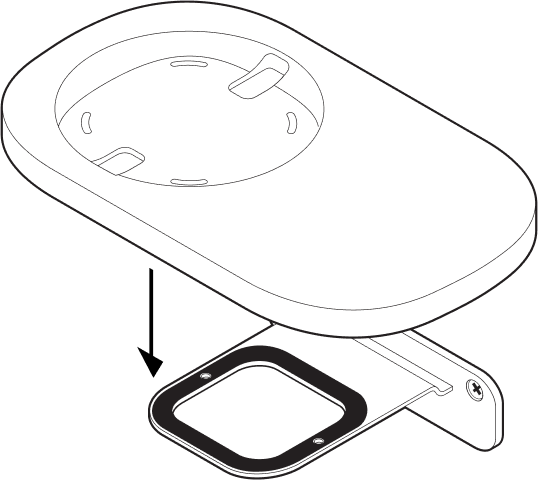 |
5 | Route the speaker’s power cord through the Shelf opening. (You’ll wrap the cord around the bottom of the Shelf after it’s assembled.) | 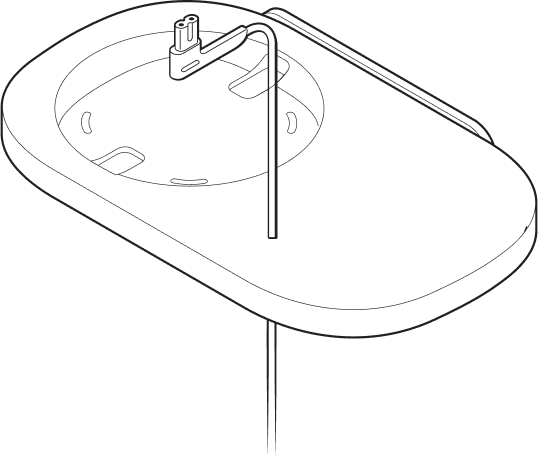 |
6 | Carefully align the pins, then press the bottom cover firmly onto the shelf until it snaps into place. Plug the power cord into the speaker and place it on top of the Shelf. | 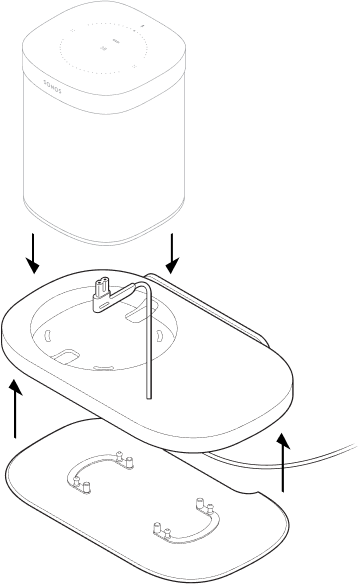 |
7 | Wrap the excess power cord around the bottom of the Shelf. | 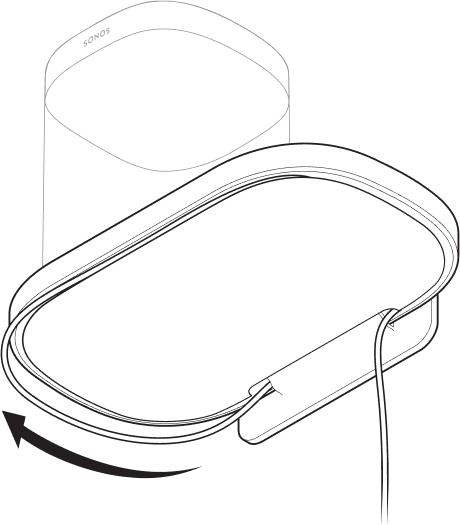 |
8 | Your Shelf assembly is complete—time to play some music! | 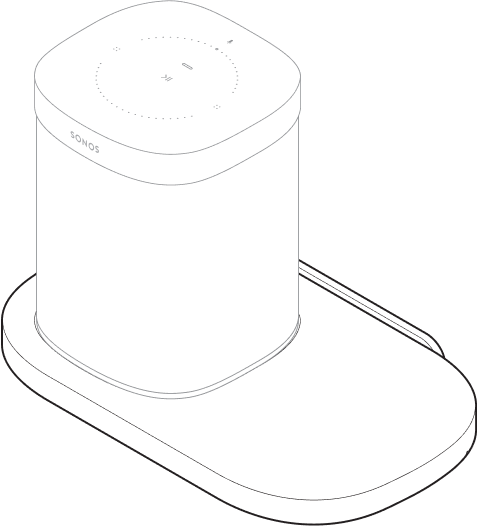 |
Sonos One Mount
- The easy-to-install mount for Sonos One, One SL and Play:1.
- Holds speaker normally, upside-down, or even horizontally.
- Speaker can pivot up to 45 degrees.
- Allows access to ports, buttons, and touch controls.
- Cleanly routes your speaker’s cables.
Important: This mount is intended for use only with Sonos One, One SL, and Play:1.
What's in the box?
- Mount
- Wall bracket
- Top cap
- Mounting kit
Note: Sonos speakers sold separately.
What you’ll need
- Pencil
- Level
- Phillips-head screwdriver
- Power drill (if needed for installation location)
| Wall mount | Pre-drill | Use wall anchors | Use screws |
|---|---|---|---|
Wood stud | 1/8” / 3mm bit | No | Yes |
Drywall (no stud) | 5/16” / 8mm bit | Yes | Yes |
Hard wallboard or double board | 5/16” / 8mm bit | Yes | Yes |
Plaster | 5/16” / 8mm bit | Yes | Yes |
Concrete or brick | 5/16” / 8mm bit | Yes | Yes |
Set it up
1 | Place the wall mount bracket against the wall using a level to make sure it is vertical and mark the screw holes. | 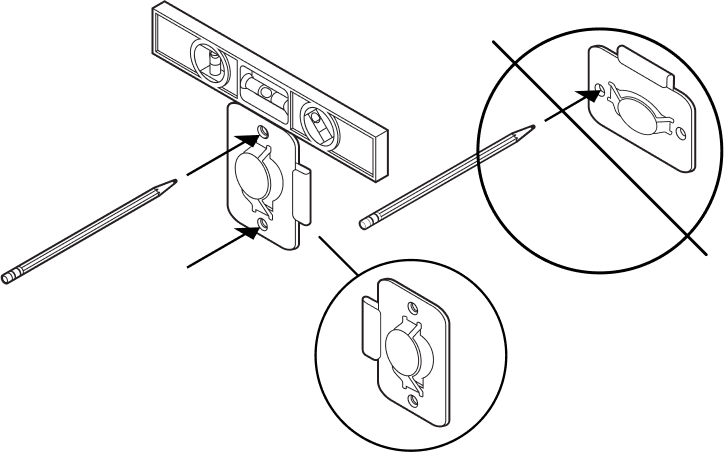 |
2 | If you're using wall anchors, use a 5/16" drill bit to drill 2 pilot holes and then insert the wall anchors. | 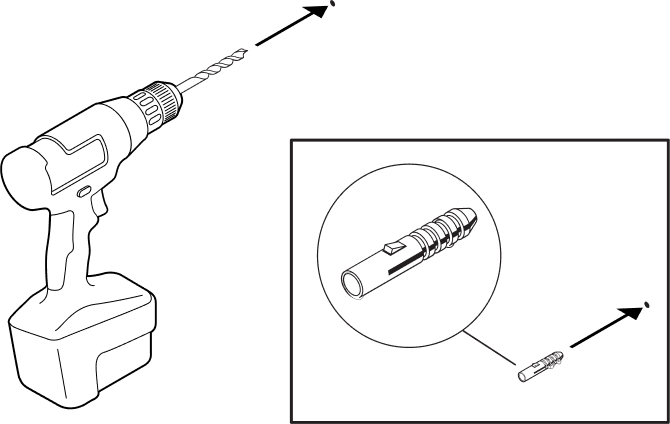 |
3 | Use a Phillips-head screwdriver or power drill to screw in the wall mount bracket. |  |
4 | Feed the speaker's power cord through the Mount opening and plug it into the speaker. Place it down onto the Mount. | 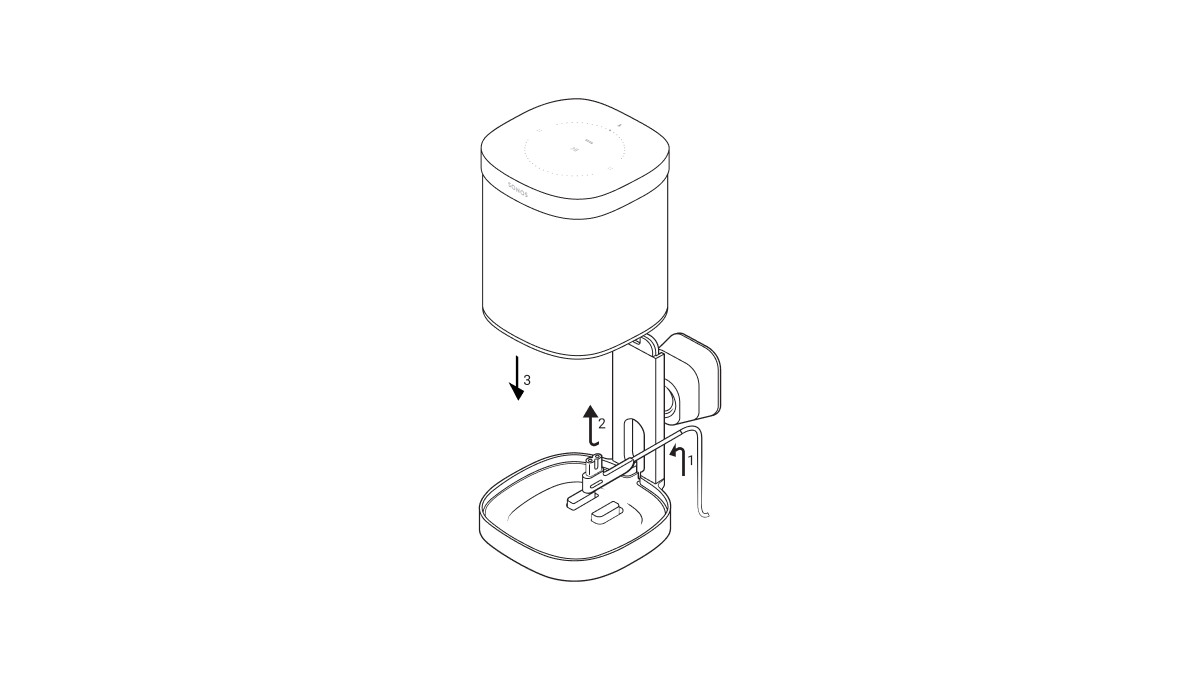 |
5 | Press the top band down firmly onto the speaker and use a Phillips-head screwdriver to screw in the top band fastener on the back. | 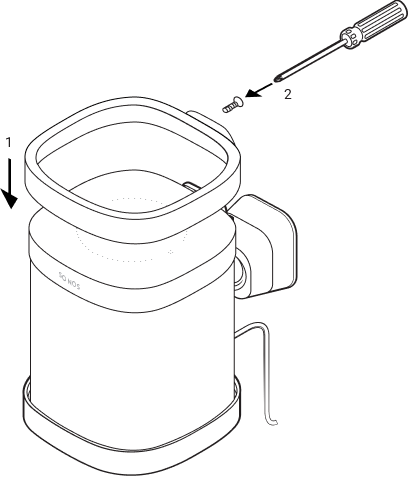 |
6 | Slide the Mount down onto the wall bracket. | 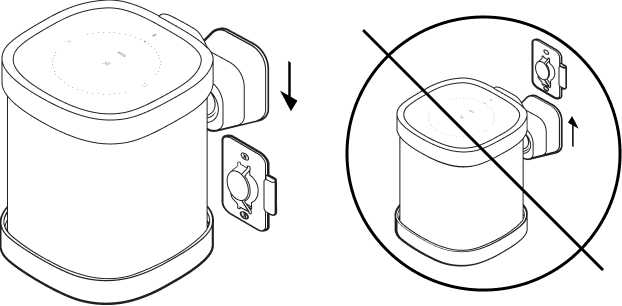 |
7 | Twist the speaker to position it in place, then turn it right to lock it in securely. Turn left to unlock. | 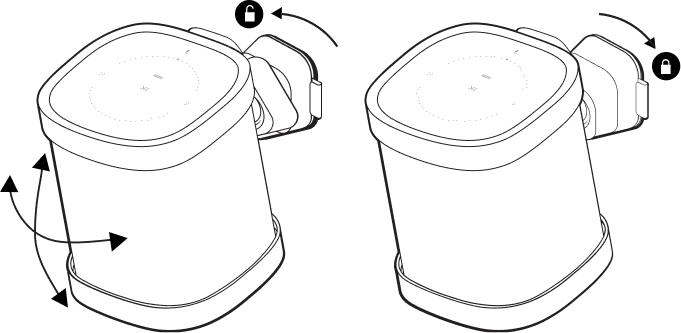 |
8 | Route the power cable into the side hook and plug the speaker into power. | 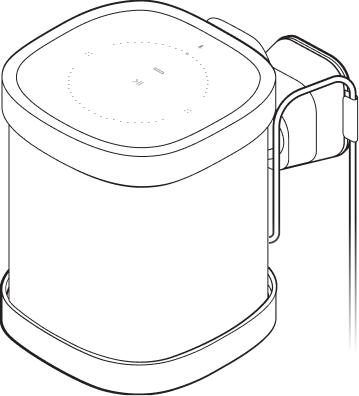 |
Specifications
| Feature | Description |
|---|---|
AUDIO |
|
Amplifier | Two Class-D digital amplifiers. |
Tweeter | One tweeter creates a crisp and accurate high frequency response. |
Mid-woofer | One mid-woofer ensures the faithful playback of mid-range vocal frequencies plus deep, rich bass. |
Stereo pair | Turn two speakers into separate left and right channel speakers to create wider, deeper sound. |
Home theater | Add two speakers as surrounds for a true surround sound experience. |
NETWORKING* |
|
Wireless connectivity | Using Sonos S2: Connects to WiFi with any 802.11a/b/g/n/ac/ax 2.4/5 GHz broadcast-capable router. Wi-Fi Activation/Deactivation:
(Wi-Fi disable only available when Sonos One SL has an Ethernet connection.) |
Ethernet port | One 10/100Mbps Ethernet port. You can plug a Sonos product directly into your router if your WiFi is unstable. |
GENERAL |
|
Power supply | Auto-switching 100 - 240V ~ 50-60 Hz 1A AC universal input |
Dimensions (H x W x D) | 6.36 x 4.69 x 4.69in. (161.45 x 119.7 X 119.7mm) |
Weight | 4.08lb (1.85kg) |
Operating temperature | 32° to 104°F (0 to 40°C) |
Storage temperature | -4° to 158°F (-20° to 70°C) |
Humidity resistant | Designed to withstand high humidity, like in a bathroom with a running shower. (It is not waterproof or water-resistant.) |
Product finish | White with white grille; black with black grille |
Package contents | Sonos One SL, power cord, and Quickstart Guide |
* Specifications subject to change without notice.
Important safety information
- Read these instructions.
- Keep these instructions.
- Heed all warnings.
- Follow all instructions.
- Do not use this apparatus near water.
- Clean only with dry soft cloth. Household cleaners or solvents can damage the finish on your Sonos products.
- Do not block any ventilation openings. Install in accordance with the manufacturer’s instructions.
- Do not install near any heat sources such as radiators, heat registers, stoves, or other apparatus that produce heat.
- Protect the power cable from being walked on or pinched, particularly at plugs, convenience receptacles, and the point where they exit from the apparatus.
- Only use attachments/accessories specified by the manufacturer.
- Unplug this apparatus during lightning storms or when unused for long periods of time.
- This product does not have any user-serviceable parts. Do not open or disassemble or attempt to repair it or replace any components. Refer all servicing to Sonos qualified service personnel. Servicing is required when the apparatus has been damaged in any way, such as power-supply cable or plug is damaged, liquid has been spilled or objects have fallen into the apparatus, the apparatus has been exposed to rain or moisture, does not operate normally, or has been dropped.
- The Mains plug should be readily available to disconnect the equipment.
- Warning: To reduce the risk of fire or electric shock, do not expose this apparatus to rain or moisture.
- Do not expose apparatus to dripping or splashing and do not place objects filled with liquids, such as vases, on the apparatus.