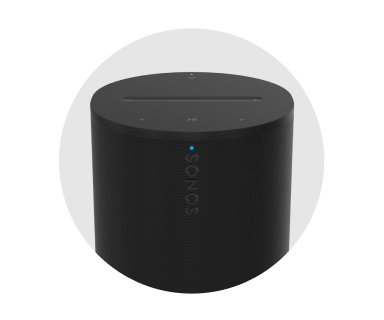
Era 100


Overview
Overview
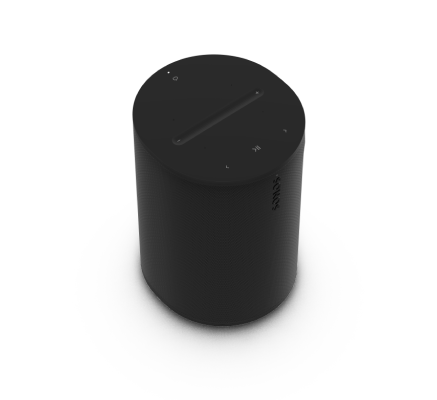
The compact smart speaker designed for room-filling sound
- Compact design fits beautifully on bookshelf, kitchen counter, nightstand, or mounted to a wall or stand.
- Flexible connectivity with WiFi, Bluetooth®, and USB-C line-in.
- Easy control using the Sonos app, your voice, or the intuitive touch controls.
- Pair two Era 100 speakers for an even wider soundstage, or use two as rear surrounds with the latest Sonos soundbars.
- See Setup when you’re ready to add a Sonos Era 100 to your system.
Control and lights
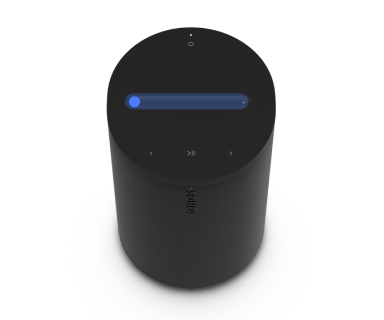 | Volume control |
Note: When music is playing, press and hold + or - to quickly change the volume. |
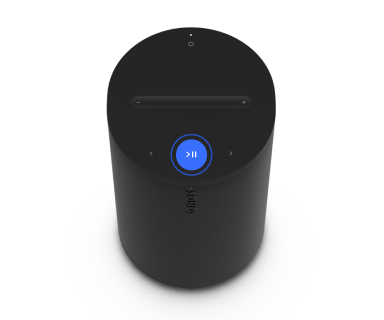 | Play/Pause |
|
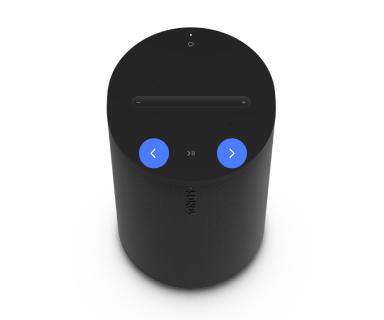 | Next/Previous |
Note: You can’t skip forward or go back when listening to a radio station. |
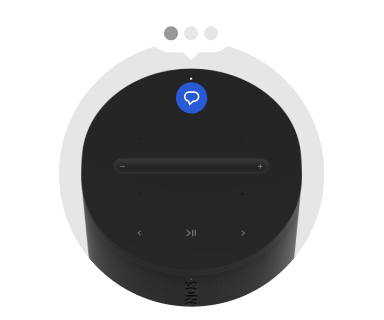 | Voice services on/off | Press the microphone icon on top of the speaker to turn voice services on or off.
|
 | Status light | Displays the product's connection to WiFi, indicates when the volume is muted, and signals errors. |
Connector panel
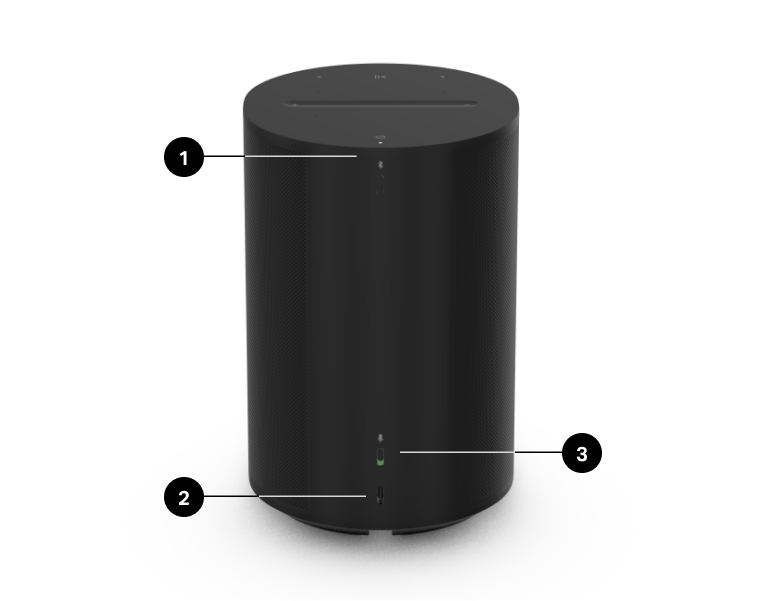
1 | Bluetooth button |
|
2 | USB-C port | The USB-C port is designed for line-in and Ethernet connections using the Sonos Line-In Adapter or Combo Adapter (sold separately). It's not a power source for the speaker and shouldn't be used to charge other devices.
|
3 | Universal microphone switch | Toggle to turn all product microphones on or off.
Note: To use voice services, both the microphone switch and the voice services indicator light must be on. |
Select a location
You can put your speaker just about anywhere. For the best performance, here's a few guidelines:
- Era 100 is made to give you powerful sound anywhere—Trueplay tuning balances the sound for wherever it's placed, and whatever you're listening to.
- When Era 100 is placed next to a wall or on a shelf, leave at least 1" (2.5 cm) of space around the back of the speaker for best performance.
- If you're using Era 100 speakers as surrounds, leave at least 8" (203 mm) clearance around each speaker.
Bluetooth pairing
- Turn Bluetooth on in your device settings.
- Press and hold the Bluetooth button on the back on the speaker until you hear a tone, then release. The status light blinks blue when the speaker is ready to pair.
- Choose Sonos Era 100 from the list of available devices in your Bluetooth settings. Your mobile device will automatically connect next time.
Line-in
Koble en ekstern lydenhet, som en CD-spiller eller platespiller med en innebygd phono forforsterker, til line-in-porten på et Sonos-produkt (Amp, Port eller Five).
Microphone on/off
There are two ways to control the microphones on Era 100:
A universal microphone switch on the back of Era 100 turns all microphones on and off.
A voice services button on top of Era 100 turns voice services on and off without affecting the microphones needed for Trueplay and other microphone-dependent features.
- When both are on, voice control and all microphone-enabled features are available.
- When both are off, voice control and all microphone-enabled features are unavailable.
- When the universal microphone switch is on and the voice services light is off, Trueplay and other microphone-enabled features are available but voice control is off.
Voice services
Bruk stemmen til å styre Sonos-anlegget ditt med alle stemmeaktiverte Sonos-produkter – spill av og styr innhold, skru volumet opp eller ned med mer.
- Sonos Voice Control: styr hele Sonos-anlegget enkelt og håndfritt, med uovertruffent personvern. Sonos Voice Control kommer klar til å brukes – det tar bare noen få sekunder å legge det til når du konfigurerer høyttalerne dine. Finn ut mer
- Amazon Alexa: du trenger Sonos-appen og Alexa-appen med Sonos-ferdigheten aktivert. Du skal gjøre noen endringer i begge appene under konfigureringen. Finn ut mer
- Google Assistant: du trenger Sonos-appen og Google Assistent-appen. Du skal gjøre noen endringer i begge appene under konfigureringen. Finn ut mer
- Siri: du trenger Apple Home-appen. Legg til de AirPlay 2-kompatible Sonos-høyttalerne dine i Apples Hjem-appen og bruk iPhone, iPad eller Apple TV til å be Siri om å spille av musikk (foreløpig begrenset til Apple Music). Finn ut mer
Merk: Stemmestyring er foreløpig ikke støttet i alle land. Denne funksjonen blir tilgjengelig så snart Sonos og en stemmetjeneste lanseres sammen i regionen din.
Trueplay™
Trueplay tuning measures how sound reflects off walls, furnishings, and other surfaces in a room, then fine tunes your Sonos speaker to make sure it sounds great no matter where you place it.
During setup, choose the Trueplay option that works best for you and your space. To retune later, go to  > System, choose a room, and select Trueplay.
Advanced tuning
Advanced tuning is custom and precise. It takes about 5 minutes and uses the microphone on an iOS device (running iOS 8 or later) so you'll move around the room while the sound is fine tuned for your space.
Note: Advanced tuning is the best choice for large rooms (open concept spaces may experience less precise tuning).
Quick tuning
Quick tuning is fast, effortless, and accessible. It takes about a minute and uses the microphone on your Sonos product to detect the environment so there's no need to move around the room during tuning.
Note: Quick tuning is available for both iOS and Android, and is a good choice for smaller rooms, or spaces where it's difficult to move easily.
Auto Trueplay
Portable Sonos products like Sonos Roam and Move can tune themselves automatically. Auto Trueplay uses your speaker’s microphone to detect the environment and make periodic tuning adjustments so you get great sound wherever your speaker is and whatever you're listening to.
Go to > System, and select your portable speaker to turn on auto Trueplay.
Set up stereo pair
Par to Sonos-høyttalere i samme rom for å oppnå en fyldigere stereoopplevelse. Én høyttaler fungerer som den venstre kanalen, og den andre som den høyre kanalen.
Merk: Sonos-høyttalerne i stereoparet må være av samme type.
- Plasser høyttalerne 2,5–3 meter unna hverandre. Lytteposisjonen bør være 2,5 til 3,5 meter unna de to høyttalerne. Hvis du er nærmere, hører du mer bass, og hvis du er lenger unna, får du bedre stereolyd.
- Gå til > System..
- Velg en av høyttalerne du vil bruke i stereoparet, og velg deretter Konfigurer et stereopar for å komme i gang. Finn ut mer
Set up surrounds
Det er enkelt å forvandle to Sonos-høyttalere (samme modell) eller en Sonos Amp og favoritthøyttalerne dine av et annet merke til henholdsvis høyre og venstre kanal i et hjemmekinoanlegg.
- Plasser hver surroundhøyttaler omtrent 3 m fra favorittlytteposisjonen din, og vend dem mot sitteområdet.
- Gå til > System.
- Velg et rom med en lydplanke og velg Legg til surroundhøyttalere for å komme i gang.
Merk: Hvis du i stedet oppretter en romgruppe eller et stereopar, får du ikke surroundlyd.
Innstillinger for surroundlyd
Under konfigurering blir surroundlyden optimalisert for rommet. Disse innstillingene kan justeres:
Surroundhøyttalere | Slå surroundlyd av eller på. |
TV-nivå | Juster surroundvolumet for TV-lyd. |
Musikknivå | Juster surroundvolumet for musikk. |
Musikkavspilling | Omgivelser (myk) eller Full (sterkere lyd, hele registeret). Gjelder ikke for Dolby Atmos-musikkavspilling. |
Product settings
Du kan tilpasse Sonos-produktene til omgivelsene. Gå til > System, og velg et produkt.
Romnavn | Hvis du flytter en høyttaler til et nytt rom, kan du endre navnet i Innstillinger. |
Skru av Wi-Fi (ikke på bærbare produkter) | Du kan slå av høyttalerens Wi-Fi når den er tilkoblet nettverket med en Ethernet-kabel. Dette reduserer strømforbruket og kan gi bedre tilkoblingsmuligheter for noen kablede høyttalere. |
EQ | Sonos-produktene leveres med forhåndsinnstilte utjevningsinnstillinger. Du kan endre lydinnstillingene (bass, diskant, balanse eller loudness (lydstyrke)) for å passe med de personlige preferansene dine. Finn ut mer |
Trueplay | Trueplay tilpasser lyden etter omgivelsene og innholdet. Bærbare produkter kan justere seg selv automatisk. Finn ut mer |
Volumgrense | Du kan angi et maksimalt volum for hvert rom. Finn ut mer |
Statuslys | Viser høyttalerens tilkobling til Wi-Fi, angir når volumet er satt på lydløs og signaliserer feil. Finn ut mer Merk: Hvis lyset er forstyrrende, kan du slå det av i Innstillinger. |
Berøringskontroller | Du kan deaktivere berøringskontrollene på høyttaleren. Det kan være lurt å gjøre dette for å hindre at barn eller et nysgjerrig kjæledyr ved et uhell skifter musikken eller justerer volumet. Finn ut mer |
Batterisparing (bærbare produkter) | For å spare batteritid, kan du stille den bærbare høyttaleren til å slås av automatisk i stedet for å gå i dvale. Den vil ikke vises i Sonos-appen før den slås på igjen. |
Line-in (produkter med line-in-funksjon) | Koble til en lydenhet, som en platespiller eller et stereoanlegg, til en Amp, Port eller Five. Gå til Bla gjennom > Line-In og velg kilden for å begynne avspilling. |
Accessories
Find the perfect accessory for your Sonos system—tailored to perfectly fit your Sonos products.
For a full selection of Sonos-compatible stands, wall mounts, chargers and cables, see Accessories on our website.
Era 100 Stand
Custom designed stand for Sonos Era 100 holds speaker securely in place.
- Fixed height, optimal for home theater surrounds.
- Easy assembly.
- Channel in the pole hides the speaker’s power cable for simple cable management.
Note: For the full selection of Sonos-compatible stands, wall mounts, and cables, see Accessories on our website.
What's in the box?
Each Sonos Era 100 Stand assembly includes:
- 1 stand base
- 1 stand pole
- 1 speaker platform
- 1 stand pole cap
- Mounting kit with 3 screws (2 long, 1 short), 1 washer
Note: Sonos speakers sold separately.
What you'll need
- Phillips-head screwdriver
Set it up
1 | Take everything out of the box and place the base in the packaging slot to stabilize it for the next few steps. Thread the end of the Sonos Era 100 power cord that attaches to the speaker through the opening in the stand base and into the pole channel. Caution: This stand is intended only for use with Sonos Era 100. | 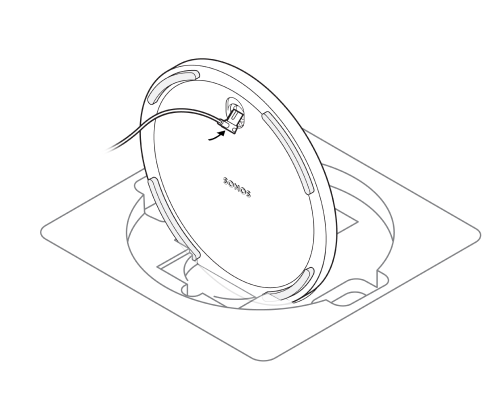 |
2 | Position the washer with the alignment pins facing in. Then align the stand pole with the base, using the alignment pins to guide you. |  |
3 | Fasten the base (with the washer) to the stand pole using 1 long screw (included) and a Phillips-head screwdriver. Make sure the cord can still slide freely. | 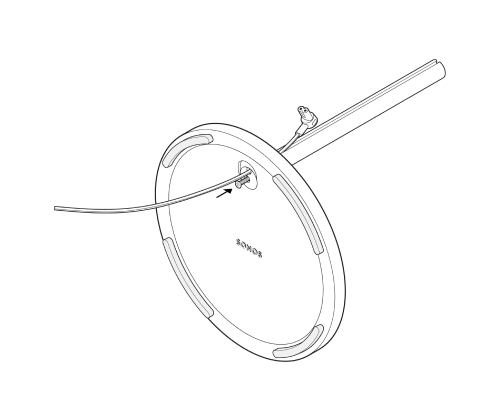 |
4 | Use the alignment pins to position the speaker platform on the pole, then attach the speaker platform to the stand pole using the other long screw (included). | 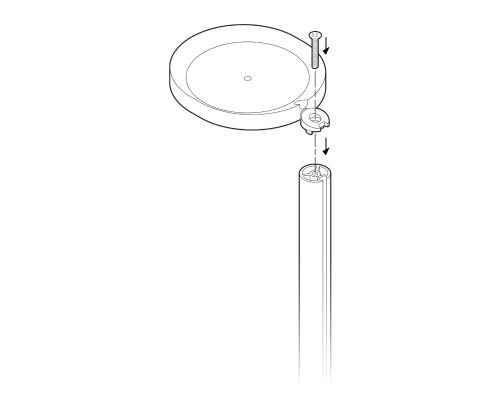 |
5 | Bring the power cord up to the speaker and plug it in, then neatly press the power cord into the cable channel on the pole, working from top to bottom. | 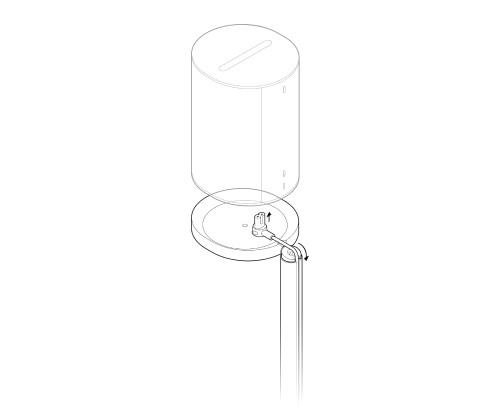 |
6 | Attach the speaker to the platform using the short screw (included). | 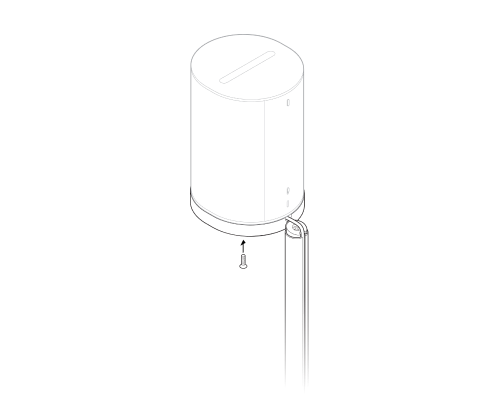 |
7 | Snap the pole cap onto the top of the stand pole to hide the power cord. |  |
8 | Plug the speaker into a power outlet, then tuck the excess cord under the base. | 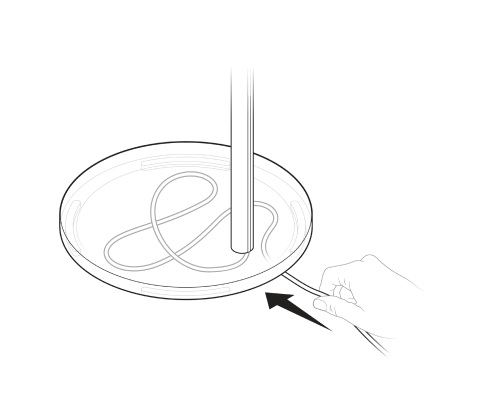 |
Era 100 Wall Mount
- The easy-to-install mount for Sonos Era 100.
- Supports the weight of your speaker and secures it in place.
- Allows access to ports, buttons, and touch controls, and cleanly routes your speaker’s cable.
- Flexibility to position your speaker for best sound.
Important: This mount is intended for use with Sonos Era 100 in a vertical orientation, as the acoustic and wireless performance of the speaker has been optimized for a standard table-top orientation.
What's in the box?
Each custom-designed Sonos Era 100 wall mount assembly includes:
- 1 wall mount
- 1 wall bracket
- 2 drywall anchors
- Mounting kit with 3 screws (2 long wall bracket screw, 1 short speaker mount screw)
Note: Sonos speakers sold separately.
What you’ll need
- Pencil
- Level
- Phillips-head screwdriver
Set it up
1 | Place the bracket against the wall using a level to make sure it’s aligned, and mark the screw holes. Remove the bracket. |  |
2 | If you’re using wall anchors, use a 5/16" drill bit to drill 2 pilot holes, starting with the hole on the top. Then insert the wall anchors. (Don’t use wall anchors if you’re drilling into wood or plastic.) | 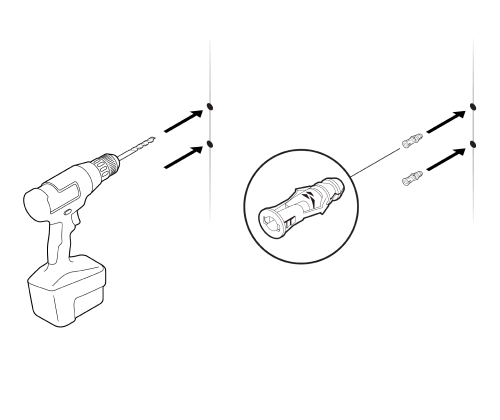 |
3 | Place the bracket against the wall with the arrows facing up. Secure it using 2 long wall bracket screws (included) and a power drill or Phillips-head screwdriver. Drive the top screw in halfway. Drive the bottom one in all the way, then tighten the top screw. | 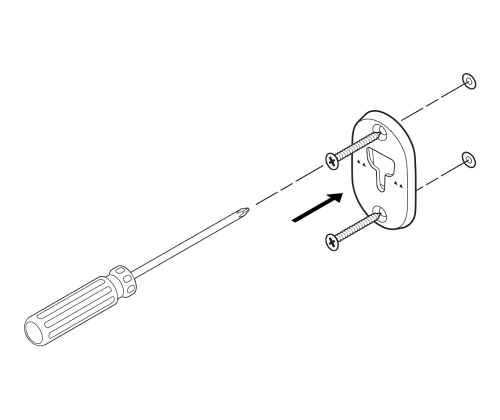 |
4 | Thread the power cord through the opening at the back of the mount and plug it into the speaker. |  |
5 | Rotate the speaker 180 degrees so the screw hole is facing up. Attach the speaker to the mount using 1 short speaker mount screw (included). | 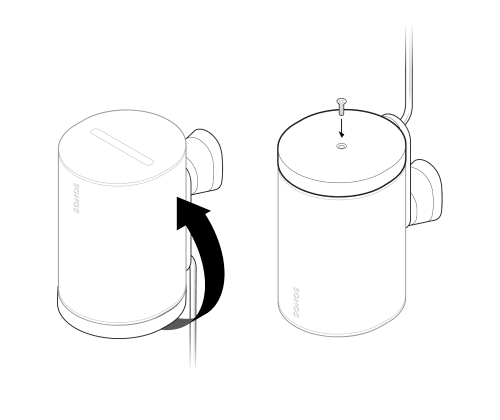 |
6 | Align the mount with the bracket keyhole, slide the mount down, and lock it into place. Make sure the mount and speaker are securely seated before removing your hand. | 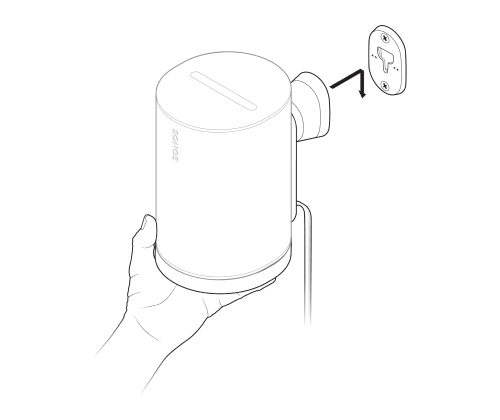 |
7 | To adjust for optimal sound, unlock the speaker by rotating the collar on the mount 90° counterclockwise. Reposition the speaker, then rotate the collar 90° clockwise to lock. | 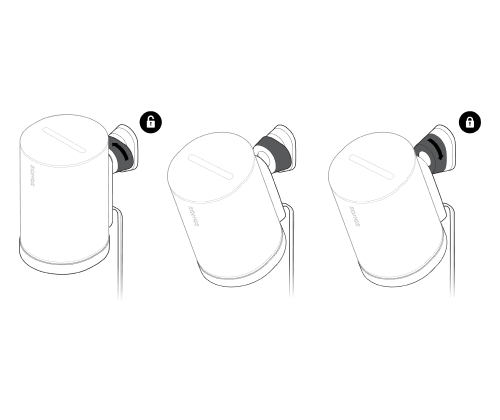 |
Specifications
| Feature | Description |
|---|---|
AUDIO |
|
Amplifier | Three Class-D digital amplifiers. |
Tweeter | Two angled tweeters create a crisp and accurate high frequency response and a separated sense of right and left. |
Woofer | One mid-woofer ensures the faithful playback of mid-range vocal frequencies plus deep, rich bass. |
Stereo pair | Turn two speakers into separate left and right channel speakers to create wider, deeper sound. |
Home theater | Add two Era 100 speakers as surrounds for a true surround sound experience. |
Microphones |
|
Voice control |
|
Adjustable EQ | Use the Sonos app to adjust bass, treble, and loudness. |
Trueplay™ | This software measures the acoustics of the room then fine-tunes the EQ. Compatible with iOS and Android devices. (Microphone switch must be on.) |
POWER / CONNECTIVITY |
|
WiFi | Using Sonos S2: Connects to WiFi with any 802.11a/b/g/n/ac/ax 2.4/5 GHz broadcast-capable router. |
Bluetooth | Bluetooth 5.0 supports audio streaming from any Bluetooth enabled device. Press the Bluetooth button to pair with a Bluetooth device. |
Power supply | Auto-switching 100 - 240V ~ 50-60 Hz 1A AC universal input. |
USB-C port | One USB-C port.
|
CPU | Quad Core |
Memory | 1GB SDRAM |
Sonos S2 | Set up and control with the latest generation of the Sonos app. |
Line-in | With a Sonos Line-In Adapter, you can connect your devices through a 3.5 mm audio line-in connection (adapter sold separately). |
Apple AirPlay 2 | Works with AirPlay 2 on Apple devices iOS 11.4 and higher. |
DETAILS / DIMENSIONS |
|
Dimensions (H x W x D) | 7.18 x 4.72 x 5.13 in / 182.5 x 120 x 130.5 mm |
Weight | 4.85 lb / 2.2 kg |
Operating temperature | 32º to 104º F / (0º to 40º C |
Storage temperature | -4º to 158º F / -20º to 70º C |
Humidity-resistant | Designed to withstand high humidity, like in a bathroom with a running shower. (It is not waterproof or water-resistant.) |
Product finish | White with white grille; black with black grille |
Package contents | Sonos Era 100, 6 ft (2 m) power cable, Quickstart Guide |
Note: Specifications subject to change without notice.
Important safety information
- Read these instructions.
- Keep these instructions.
- Heed all warnings.
- Follow all instructions.
- Do not use this apparatus near water.
- Clean only with dry soft cloth. Household cleaners or solvents can damage the finish on your Sonos products.
- Do not block any ventilation openings. Install in accordance with the manufacturer’s instructions.
- Do not install near any heat sources such as radiators, heat registers, stoves, or other apparatus that produce heat.
- Protect the power cable from being walked on or pinched, particularly at plugs, convenience receptacles, and the point where they exit from the apparatus.
- Only use attachments/accessories specified by the manufacturer.
- Unplug this apparatus during lightning storms or when unused for long periods of time.
- This product does not have any user-serviceable parts. Do not open or disassemble or attempt to repair it or replace any components. Refer all servicing to Sonos qualified service personnel. Servicing is required when the apparatus has been damaged in any way, such as power-supply cable or plug is damaged, liquid has been spilled or objects have fallen into the apparatus, the apparatus has been exposed to rain or moisture, does not operate normally, or has been dropped.
- The Mains plug should be readily available to disconnect the equipment.
- Warning: To reduce the risk of fire or electric shock, do not expose this apparatus to rain or moisture.
- Do not expose apparatus to dripping or splashing and do not place objects filled with liquids, such as vases, on the apparatus.
- Connections between this device and external equipment must be made using a shielded cable in order to maintain compliance with FCC radio frequency emission limits.