The amplified music streaming upgrade for your favorite indoor or outdoor speakers—
-
Plug in any audio device, like a turntable or a phone, and listen out loud.
-
Built-in amplifier powers large or small speakers.
-
RCA line-in for connecting a range of playback sources.
-
Pairs with your Sonos home theater speaker for surround sound using your favorite non-Sonos speakers.
-
See Getting started when you’re ready to add a Connect:Amp to your Sonos system.
|
|
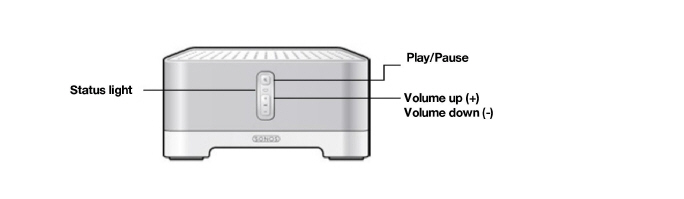
Volume up (+) Volume down (-) |
Press to adjust the volume. Note:You can also use the app. |
|
|
Note:You can’t skip forward or go back when listening to a radio station. |
|
|
|
Status light |
Indicates the status. Learn more If the light is distracting, you can turn it off in your room’s settings. |


|
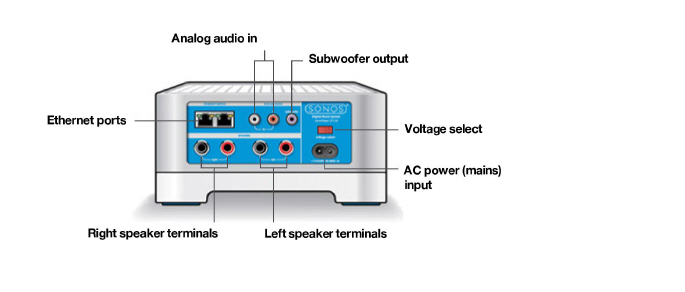
You can use an Ethernet cable (supplied) to connect to a router, computer, or additional network device like a network-attached storage (NAS) device. LED indicators:
|
|
|
Use high-quality speaker wire to connect the right speaker to Connect:Amp. |
|
|
Use high-quality speaker wire to connect the left speaker to Connect:Amp. |
|
|
100 – 120V~ / 220 – 240V~ 50 – 60 Hz Select the appropriate voltage setting for your country. |
|
|
Use only the supplied power cord to connect to a power outlet (using a third party power cord will void your warranty). |
|
|
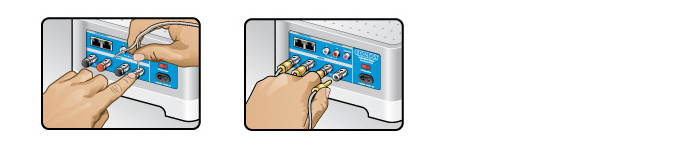
You may use a standard RCA audio cable to connect the Connect:Amp’s analog audio inputs to the audio outputs from a separate audio component, like a turntable. |
|
|
Note:If you disconnect your subwoofer, make sure to also disconnect the subwoofer’s cable from the Connect:Amp output. |
You may connect a powered subwoofer to this output using a standard RCA cable. The system will detect when a cable is connected to the subwoofer output and adjust the crossover frequency automatically. |
Attach desired speakers
Your speaker’s power rating should be at least 55W for 8 ohm speakers, and at least 100W for 4 ohm speakers. Don’t connect speakers rated at less than 4 ohms.
-
Use your thumb or finger to firmly push the spring-loaded speaker connector post inward to reveal the connection hole.
-
Insert the stripped end of the speaker wire into the hole, and then release. The stripped portion should be caught firmly in the connector post.
-
Repeat to install the other speaker wires.
Note:Connect the red (+) and black (-) terminals from each speaker to the corresponding terminals on the Connect:Amp. Mismatching of polarities will result in weak central sound, and a distorted sense of sound direction.
If your speakers have banana connectors, you can insert the plugs directly into the banana jacks on the back of the Connect:Amp instead.
Connect the power cord
Attach the power cord and plug in the Connect:Amp.
If you don’t have the app, download it from the app store. You’ll use it to set up and control your Sonos system. See Getting started.
Connect an external source like a phono preamp (your turntable may have a built-in phone preamp), or other audio device. Learn more.
|
Feature |
Description |
|---|---|
|
Amplifier |
Class-D |
|
Rated Output |
110W RMS (2x55W continuous average power into 8 ohms, THD+N<0.02%)* |
|
Spring binding posts (in North America, the Connect:Amp has combined spring binding post/banana jack connectors). |
|
|
Line-In Connections |
Auto-detecting RCA type |
|
Auto-detecting RCA type, 80 Hz crossover |
|
|
Home Theater |
Pairs with a Sonos home theater speaker for a true surround sound experience. You must use Ethernet cables to connect both Sonos products to your router when you use Connect:Amp for surround sound. |
|
Networking* |
|
|
Wireless Connectivity |
Connects to your home WiFi network with any 802.11b/g/n router. 802.11n only network configurations are not supported—you can either change the router settings to 802.11b/g/n or connect a Sonos product to your router. |
|
Ethernet port |
Two 10/100 Mbps Ethernet ports. You can plug a Sonos product directly into your router if your WiFi is unstable. |
|
General |
|
|
100–120V~ / 220–240V~ 50–60 Hz 2A |
|
|
3.50 x 7.28 x 8.15 in. (89 x 185 x 207 mm) |
|
|
5.1 lb (2.3 kg) |
|
|
32º to 104º F (0º to 40º C) |
|
|
Storage Temperature |
-4º to 158º F (-20º to 70º C) |
|
Product Finish |
Anodized precision machined extrusion aluminum case. Aluminum casing also facilitates passive cooling. |
|
Package Contents |
Connect:Amp, power cord, Ethernet cable, and Quickstart Guide. |
* Specifications subject to change without notice.
|
1.Read these instructions. |
|
2.Keep these instructions. |
|
3.Heed all warnings. |
|
4.Follow all instructions. |
|
5.Do not use this apparatus near water. |
|
6.Clean only with dry soft cloth. Household cleaners or solvents can damage the finish on your Sonos components. |
|
7.Do not block any ventilation openings. Install in accordance with the manufacturer’s instructions. |
|
8.Do not install near any heat sources such as radiators, heat registers, stoves, or other apparatus that produce heat. |
|
9.Protect the power cable from being walked on or pinched, particularly at plugs, convenience receptacles, and the point where they exit from the apparatus. |
|
10.Only use attachments/accessories specified by the manufacturer. |
|
11.Unplug this apparatus during lightning storms or when unused for long periods of time. |
|
12.Refer all servicing to Sonos qualified service personnel. Servicing is required when the apparatus has been damaged in any way, such as power-supply cable or plug is damaged, liquid has been spilled or objects have fallen into the apparatus, the apparatus has been exposed to rain or moisture, does not operate normally, or has been dropped. |
|
13.The Mains plug should be readily available to disconnect the equipment. |
|
14. |
|
15.Do not expose apparatus to dripping or splashing and do not place objects filled with liquids, such as vases, on the apparatus. |
